Creating an Advanced Shipping Notice (ASN) in Supplier One > Orders > PO management ensures accurate and timely communication of shipment information. This guide walks you through the ASN creation process with a focus on clarity, compliance, and operational efficiency. Each section is designed to be intuitive and task-focused, helping you to fill out your ASNs accurately and efficiently.
The following sections focus on an aspect of the ASN process, beginning with inputting important information regarding shipment and general details, and what to do once you’ve created your ASN labels.
This section covers the transportation and shipping information required to initiate the ASN. It’ll required you to include information like carrier details, shipment dates, and other logistics-related data.
In this section, you’ll enter item-level details about the contents of the shipment. This includes pallet and pack identifiers, as well as lot code and location information—especially important for FSMA-eligible items.
This section explores the PO submissions page, located in Supplier One. Here, you can review and manage your existing submitted, draft, and rejected ASN documents.
Entry point
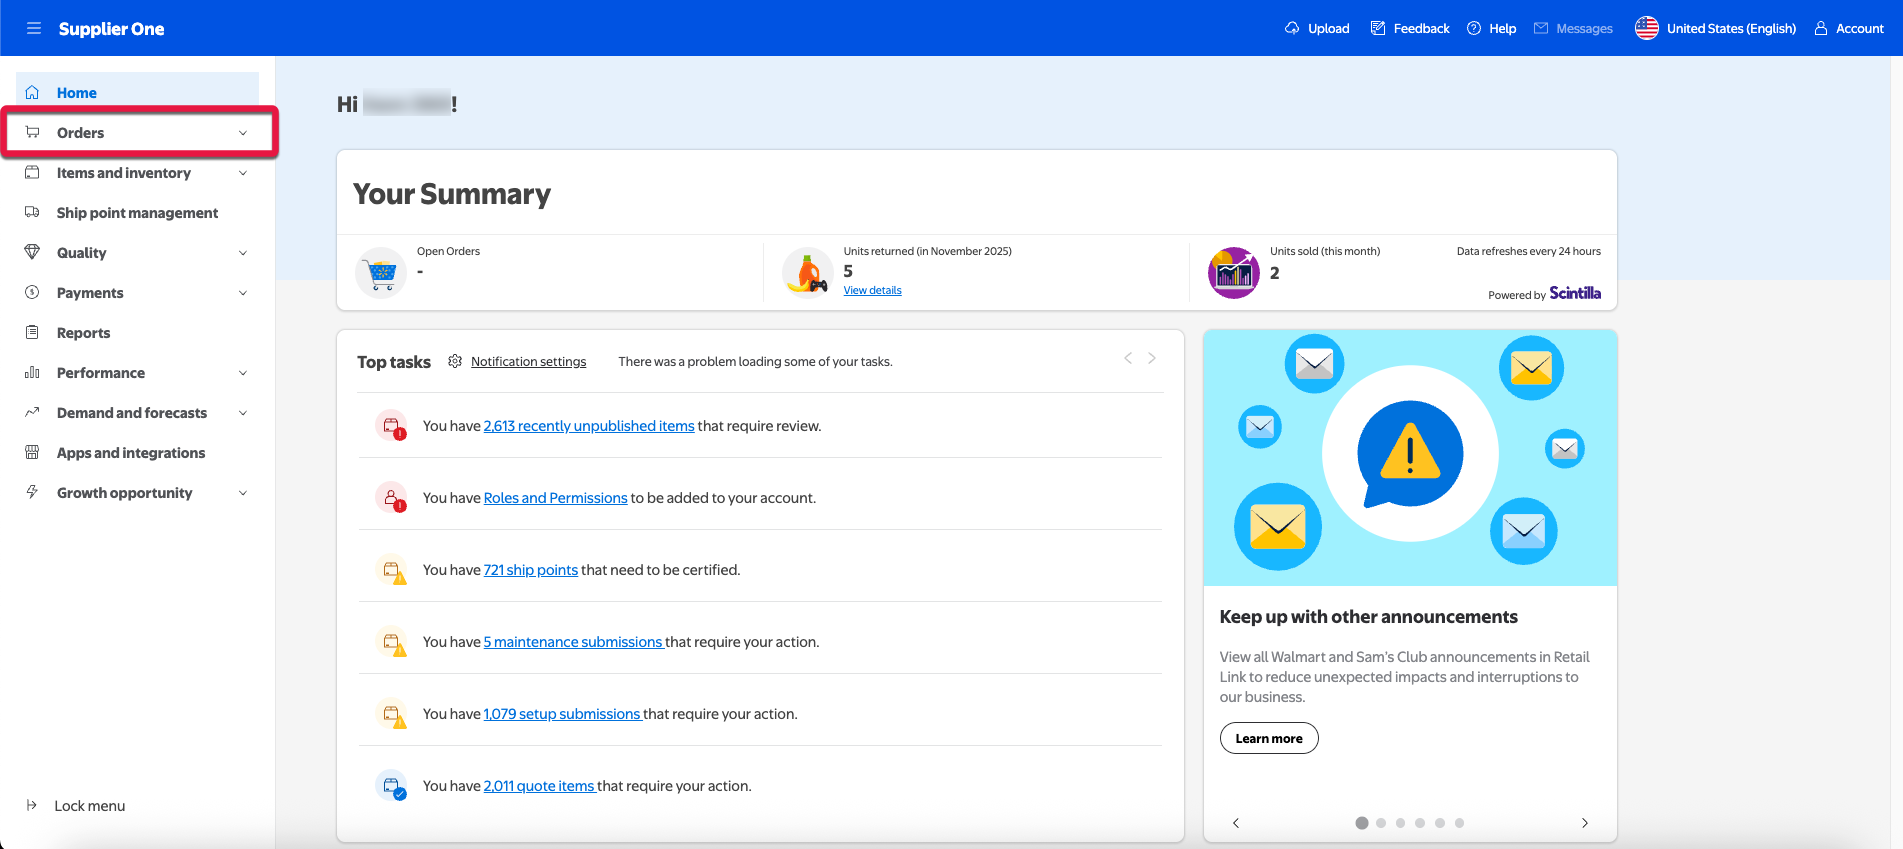
Sign into Retail Link. Select the Supplier One app to access the Supplier One dashboard.
Open the navigation menu on the left-hand side and select Orders.
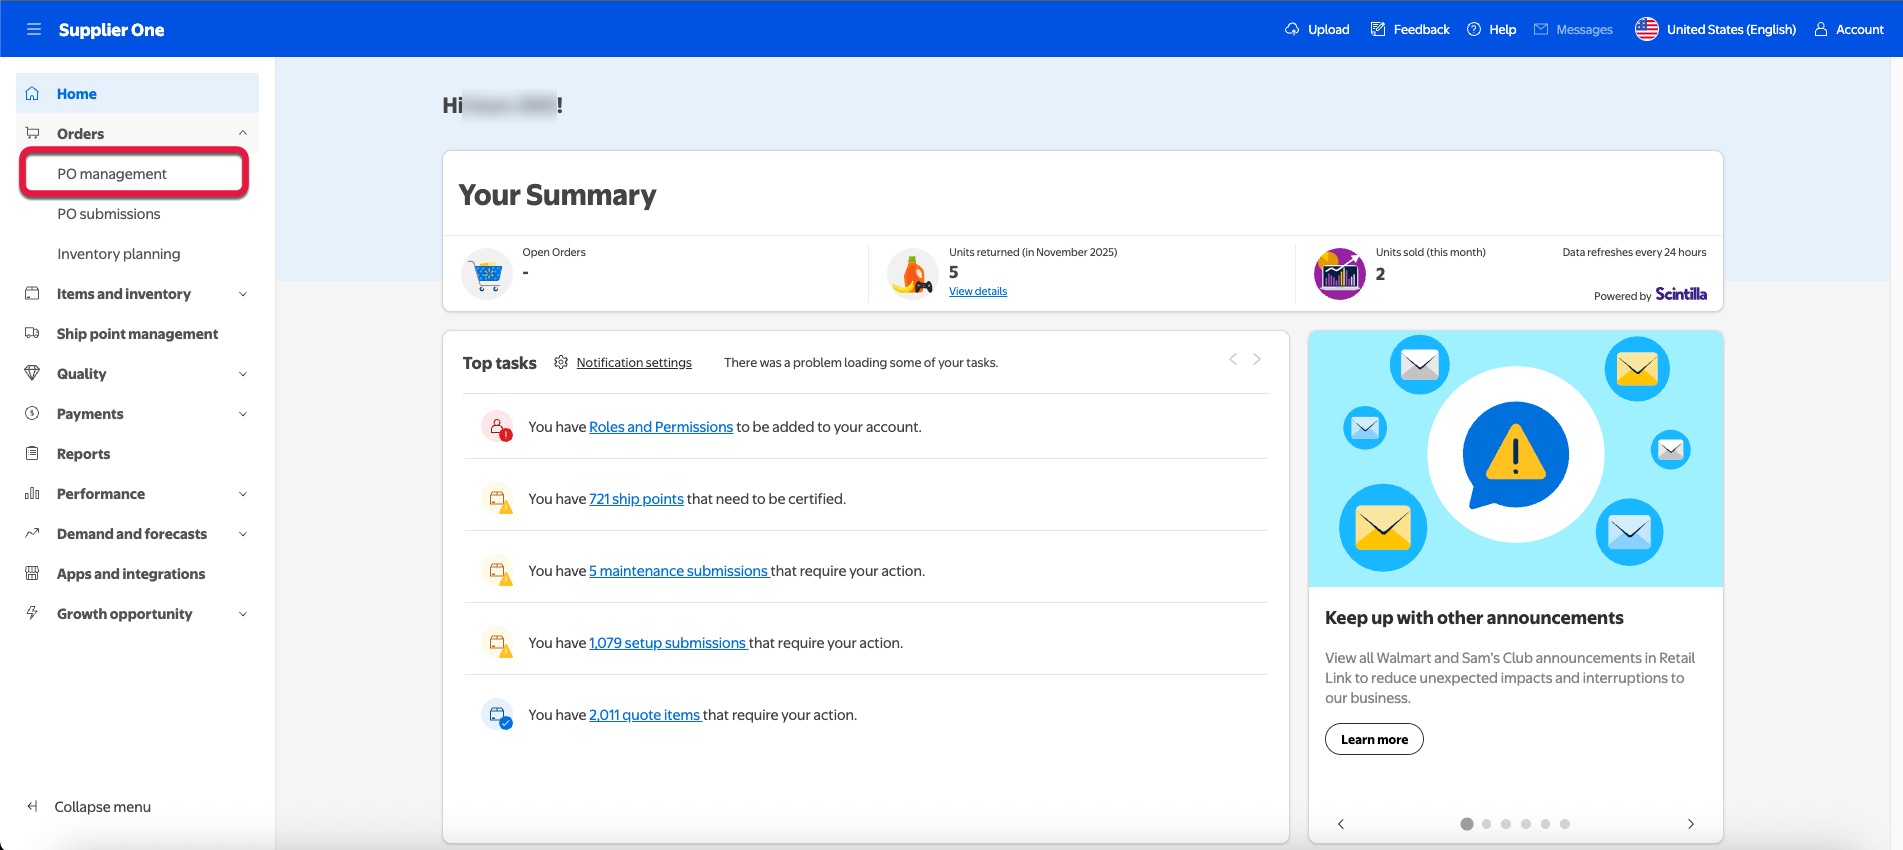
Select PO management.
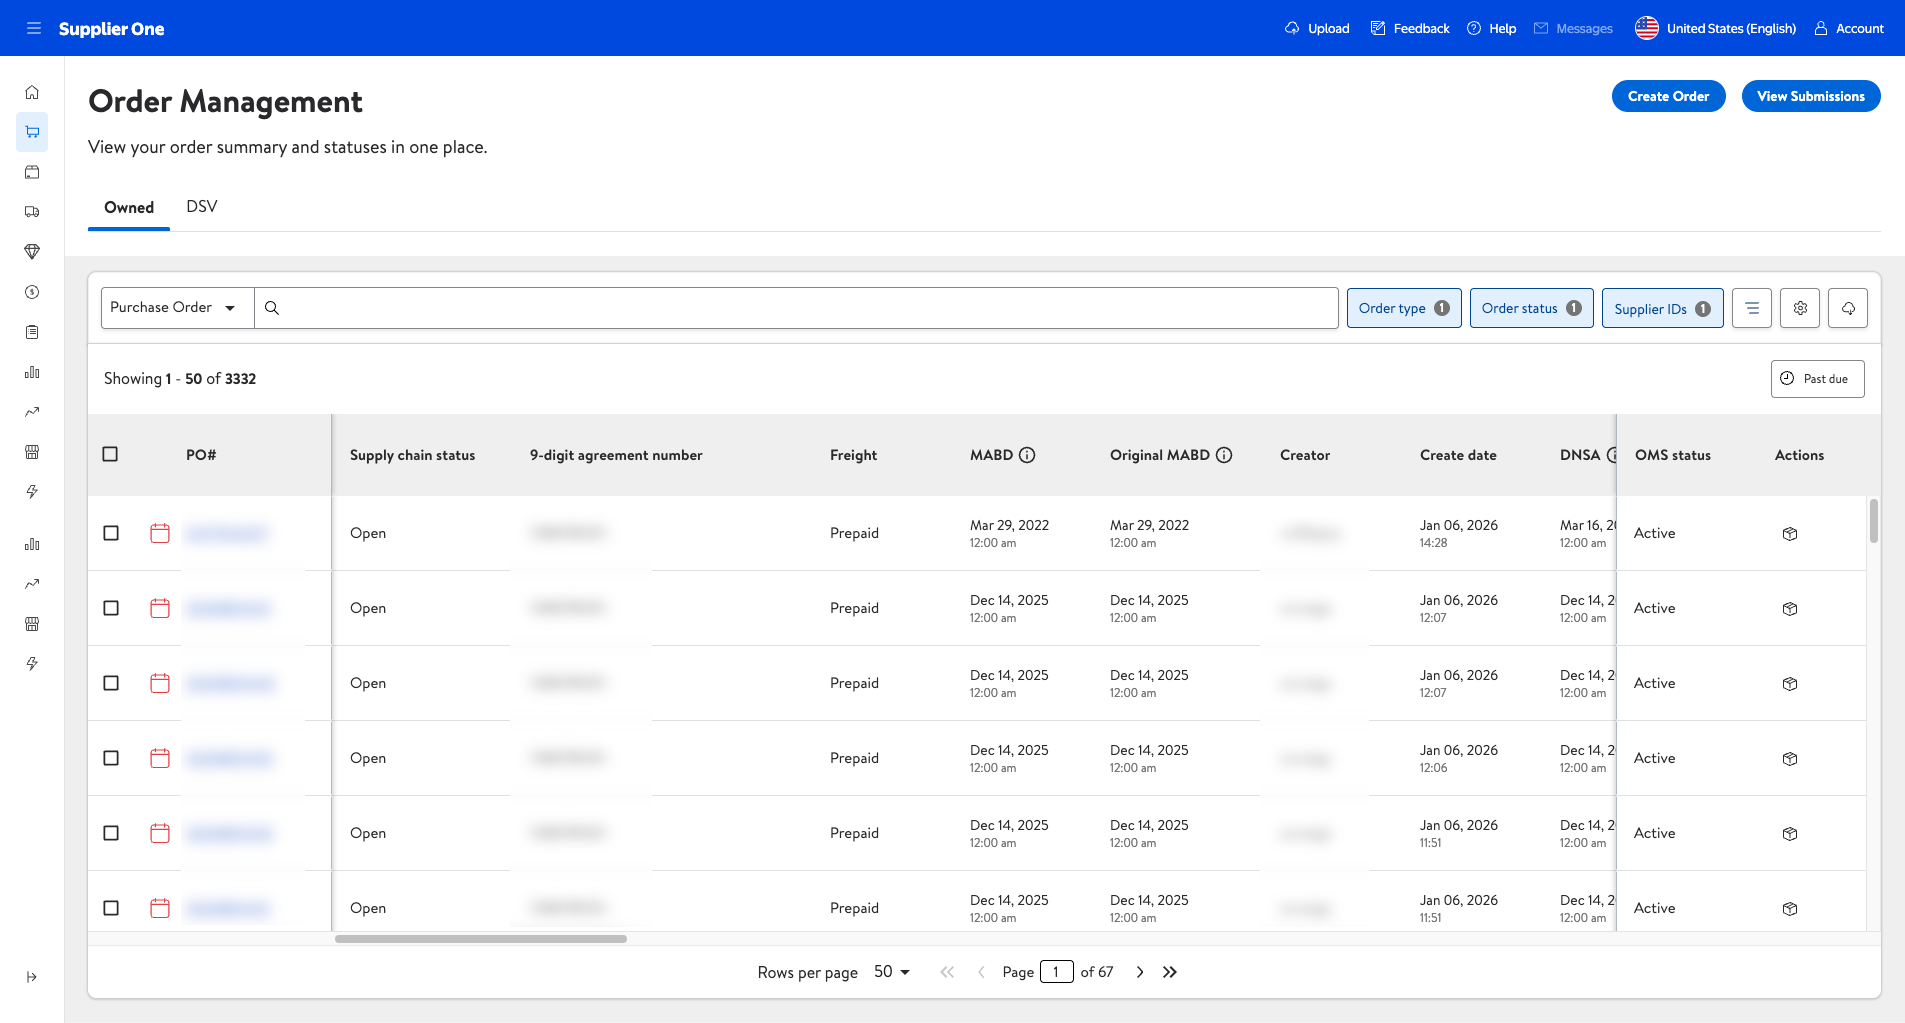
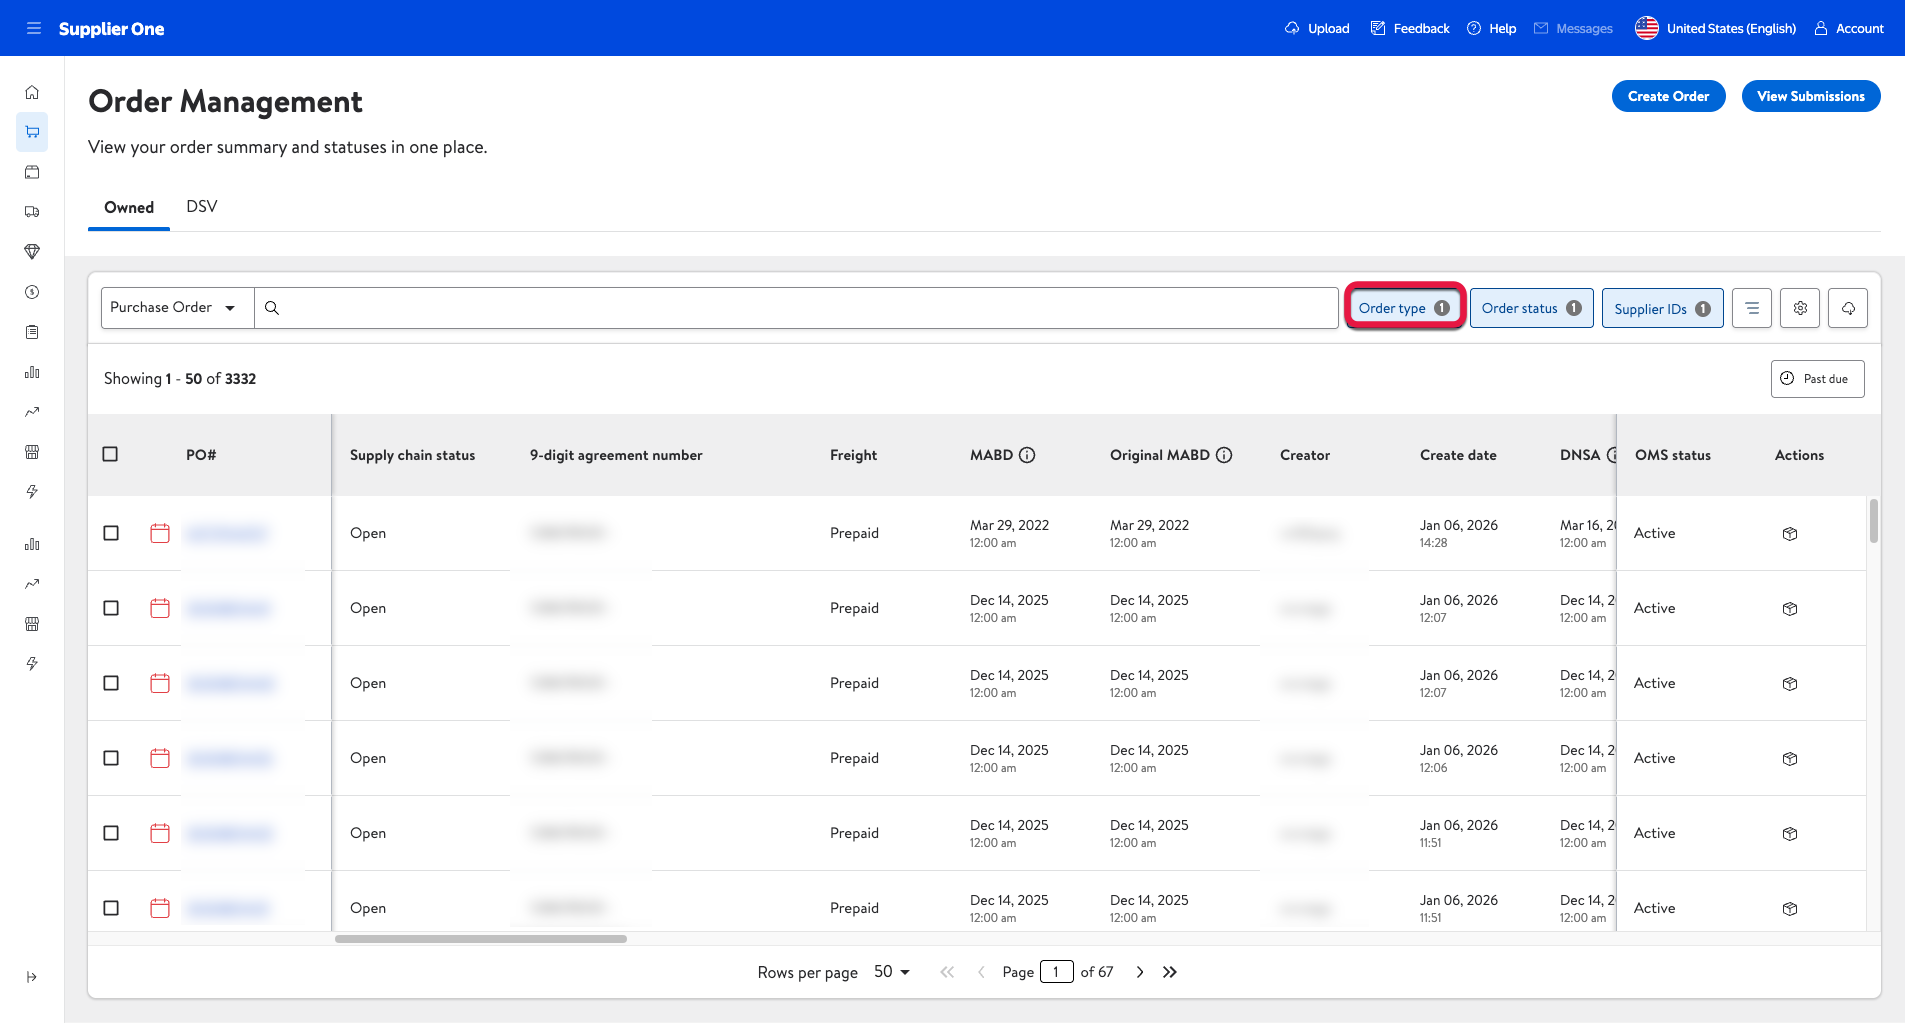
On this page, you can view your POs, create Advanced Shipment Notices (ASNs), and manage the statuses of both Owned and DSV order types.
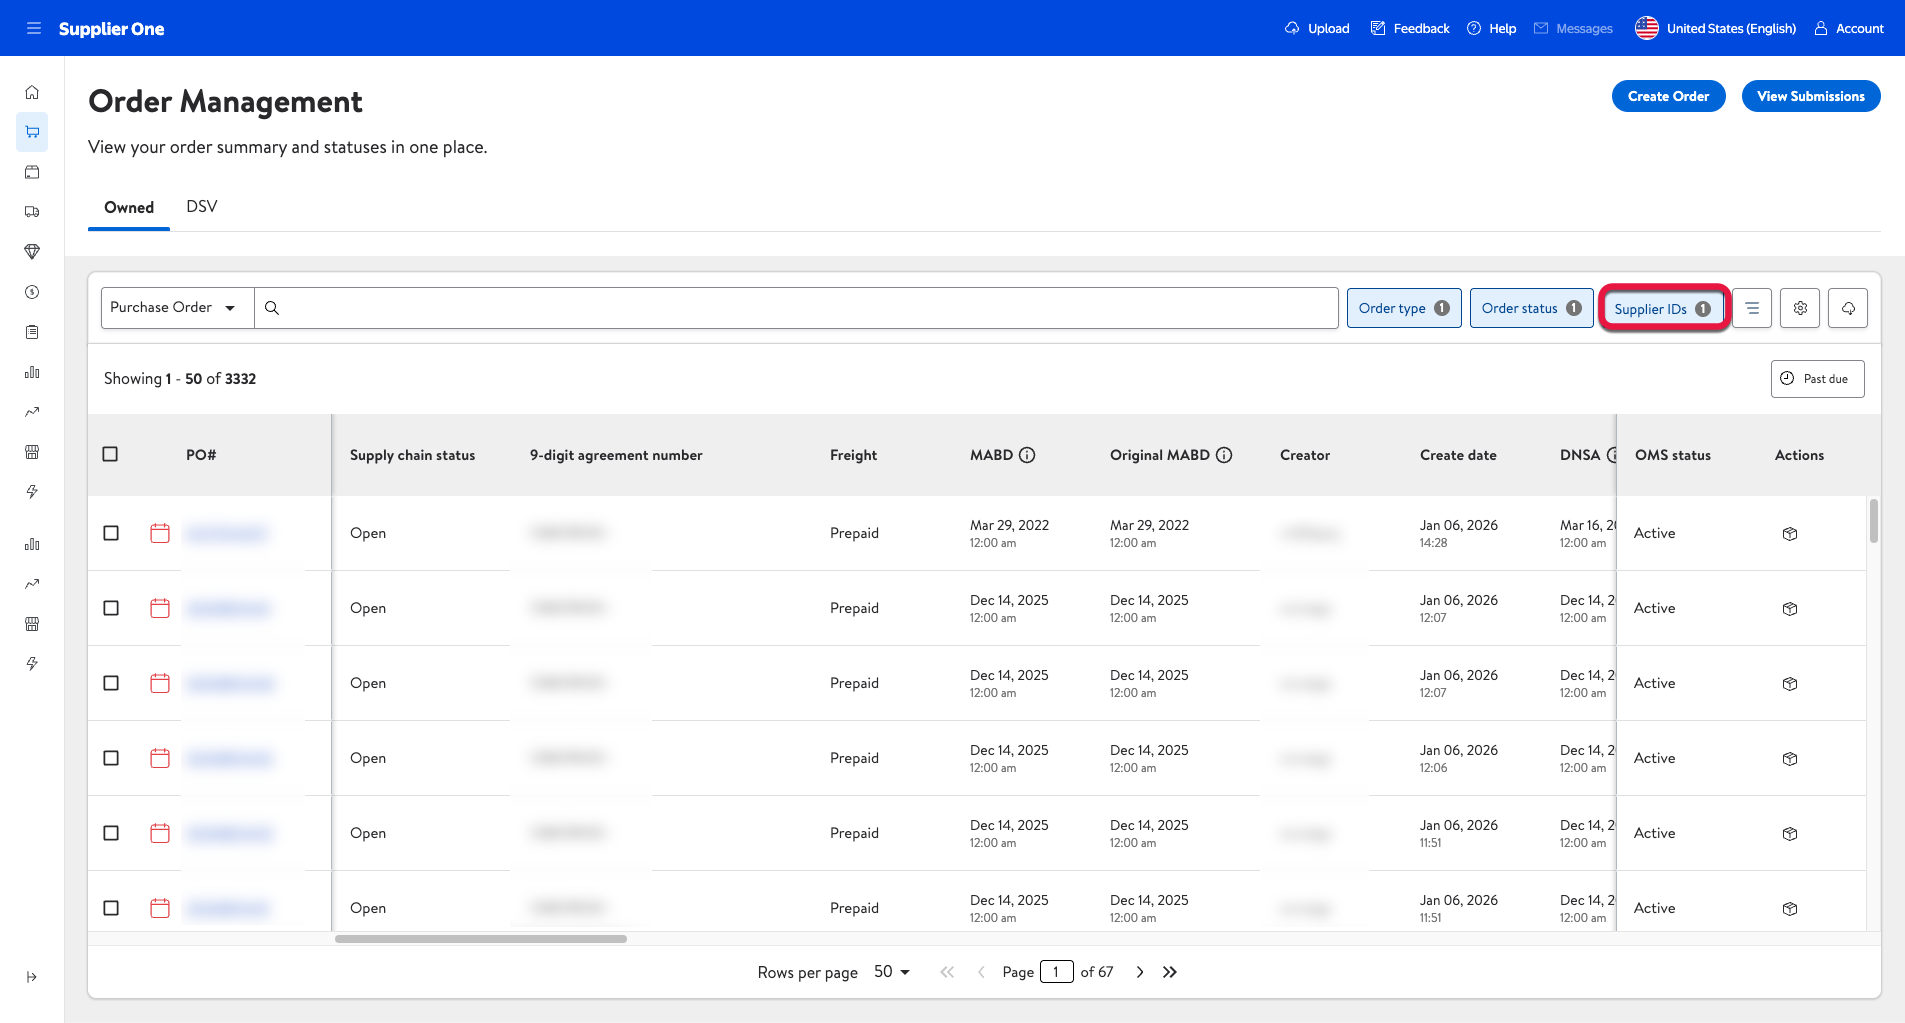
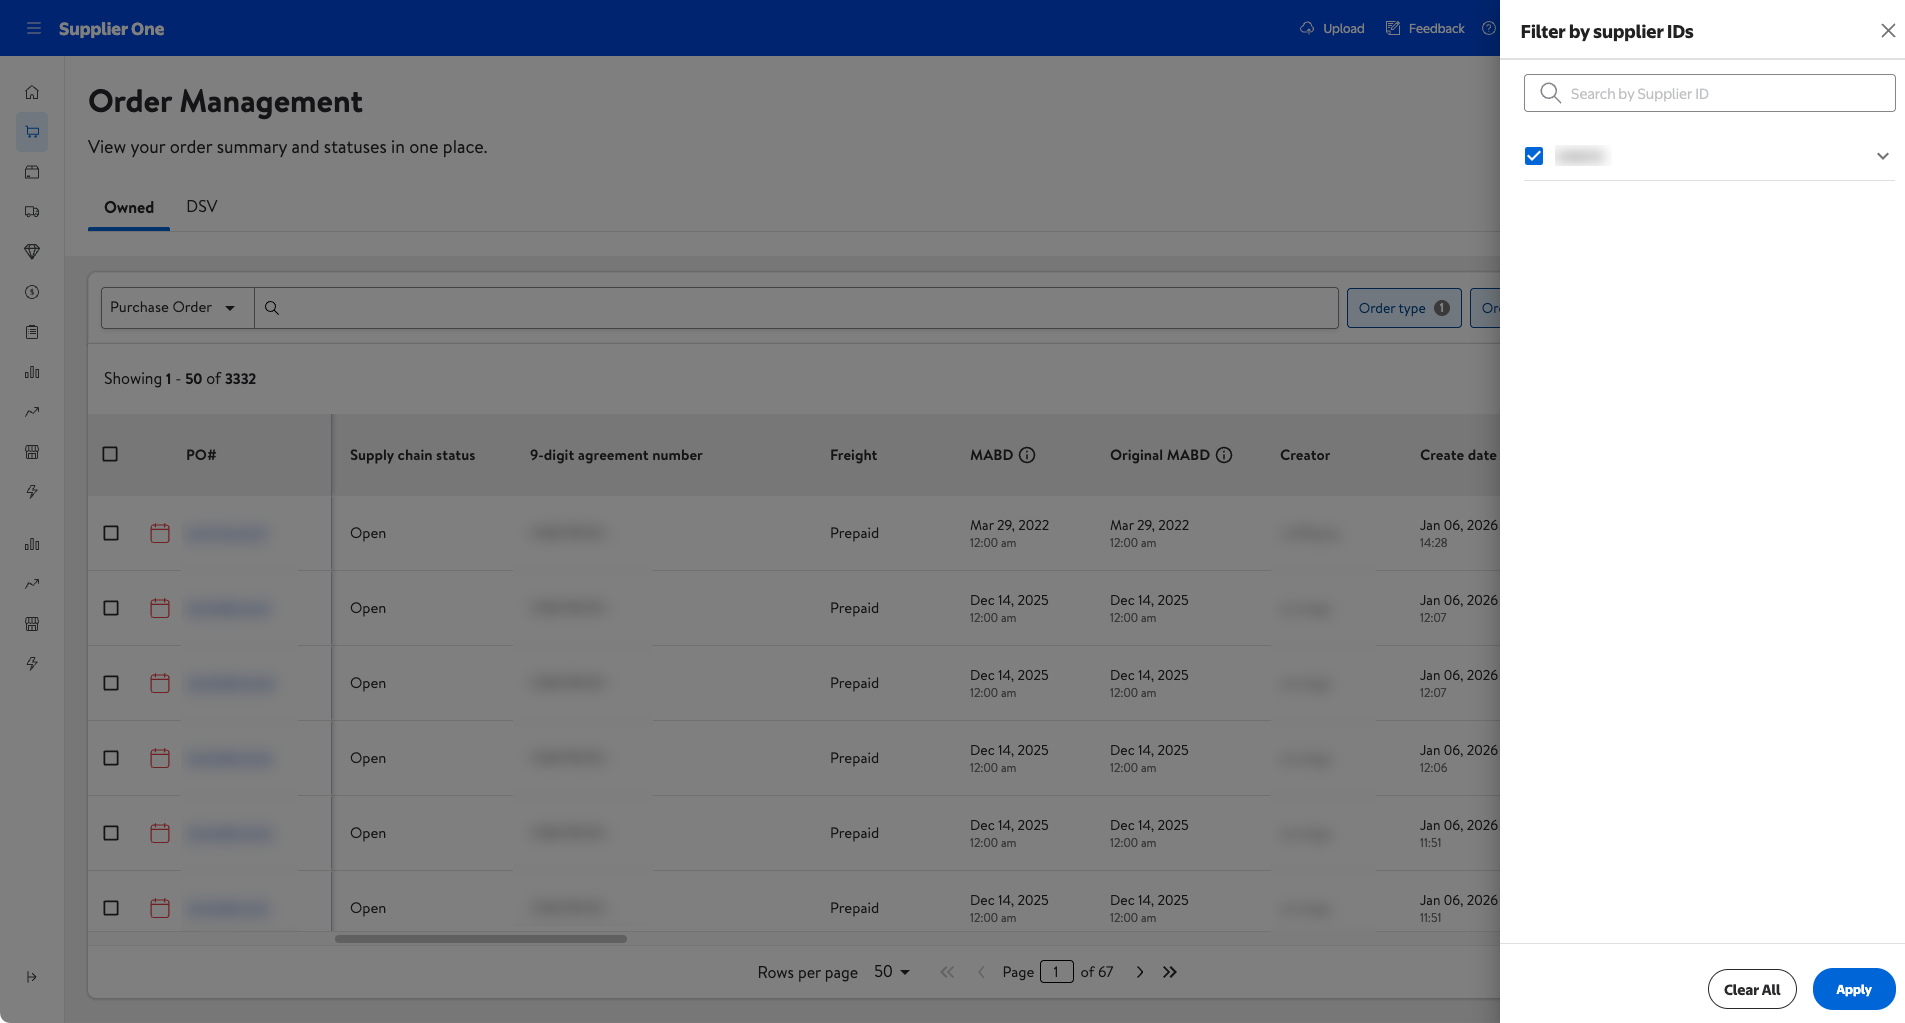
If you’re managing multiple Supplier IDs, you can select the Supplier IDs filter function to show POs for one or multiple Supplier IDs at one time.
Navigating to the Create ASN page
Click the Order type filter function in the upper-right of the search bar.
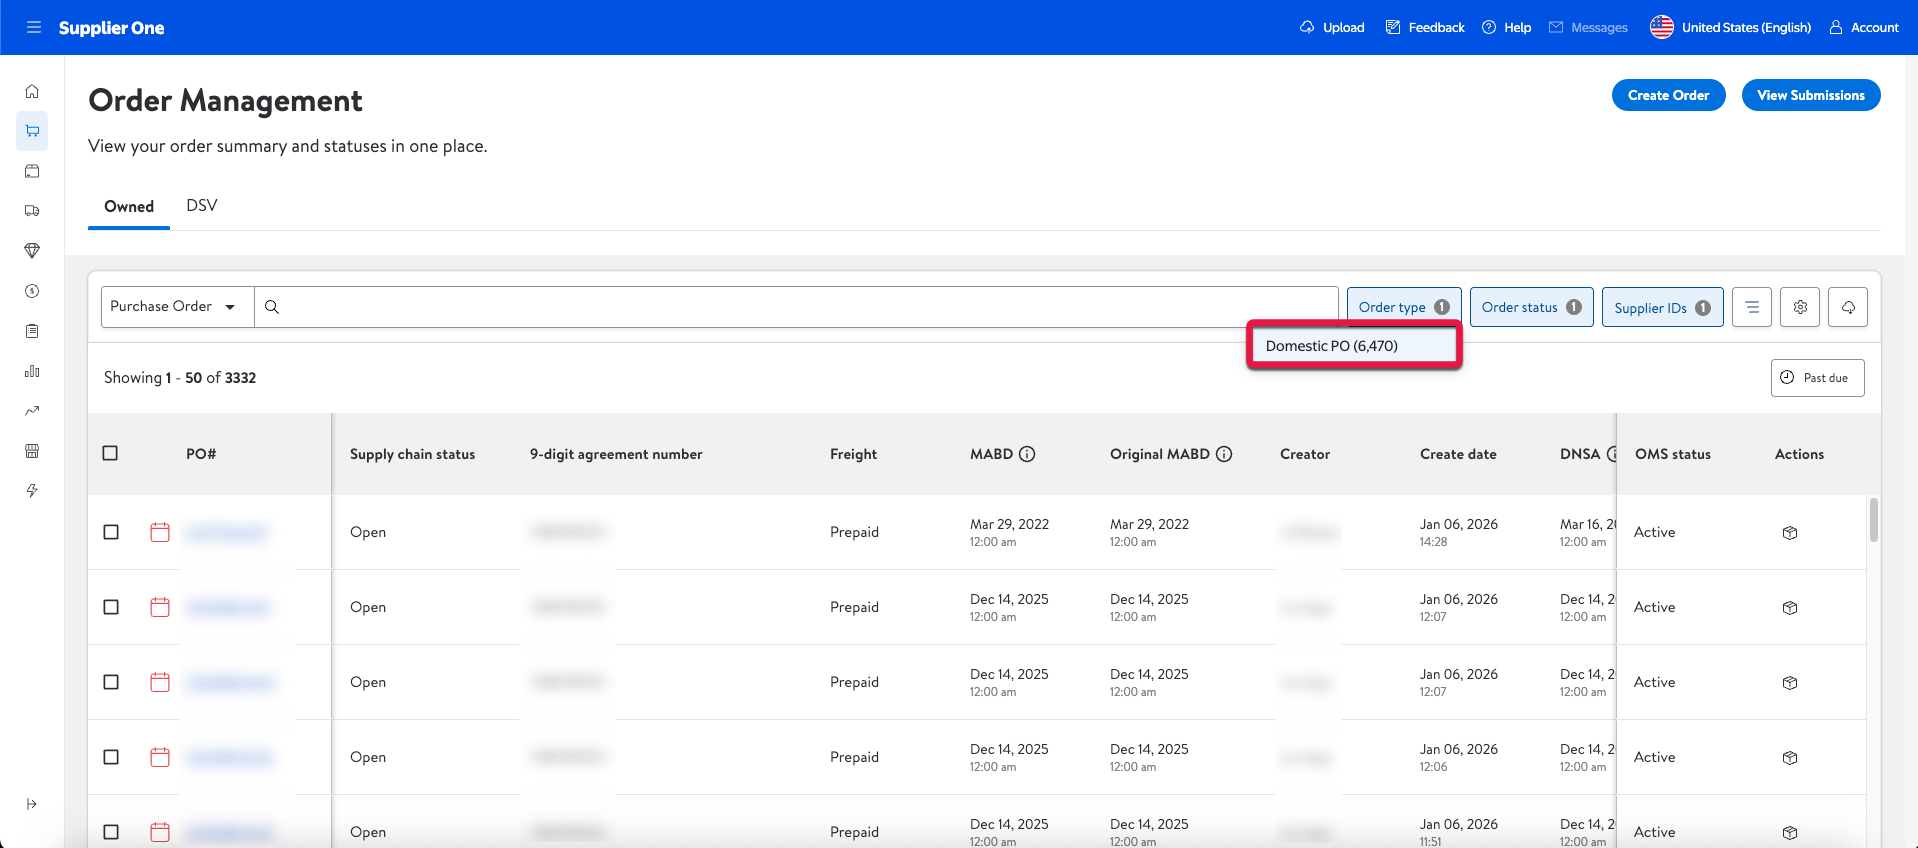
Select Domestic PO from the drop-down menu.
ASN creation is only available for Domestic POs.
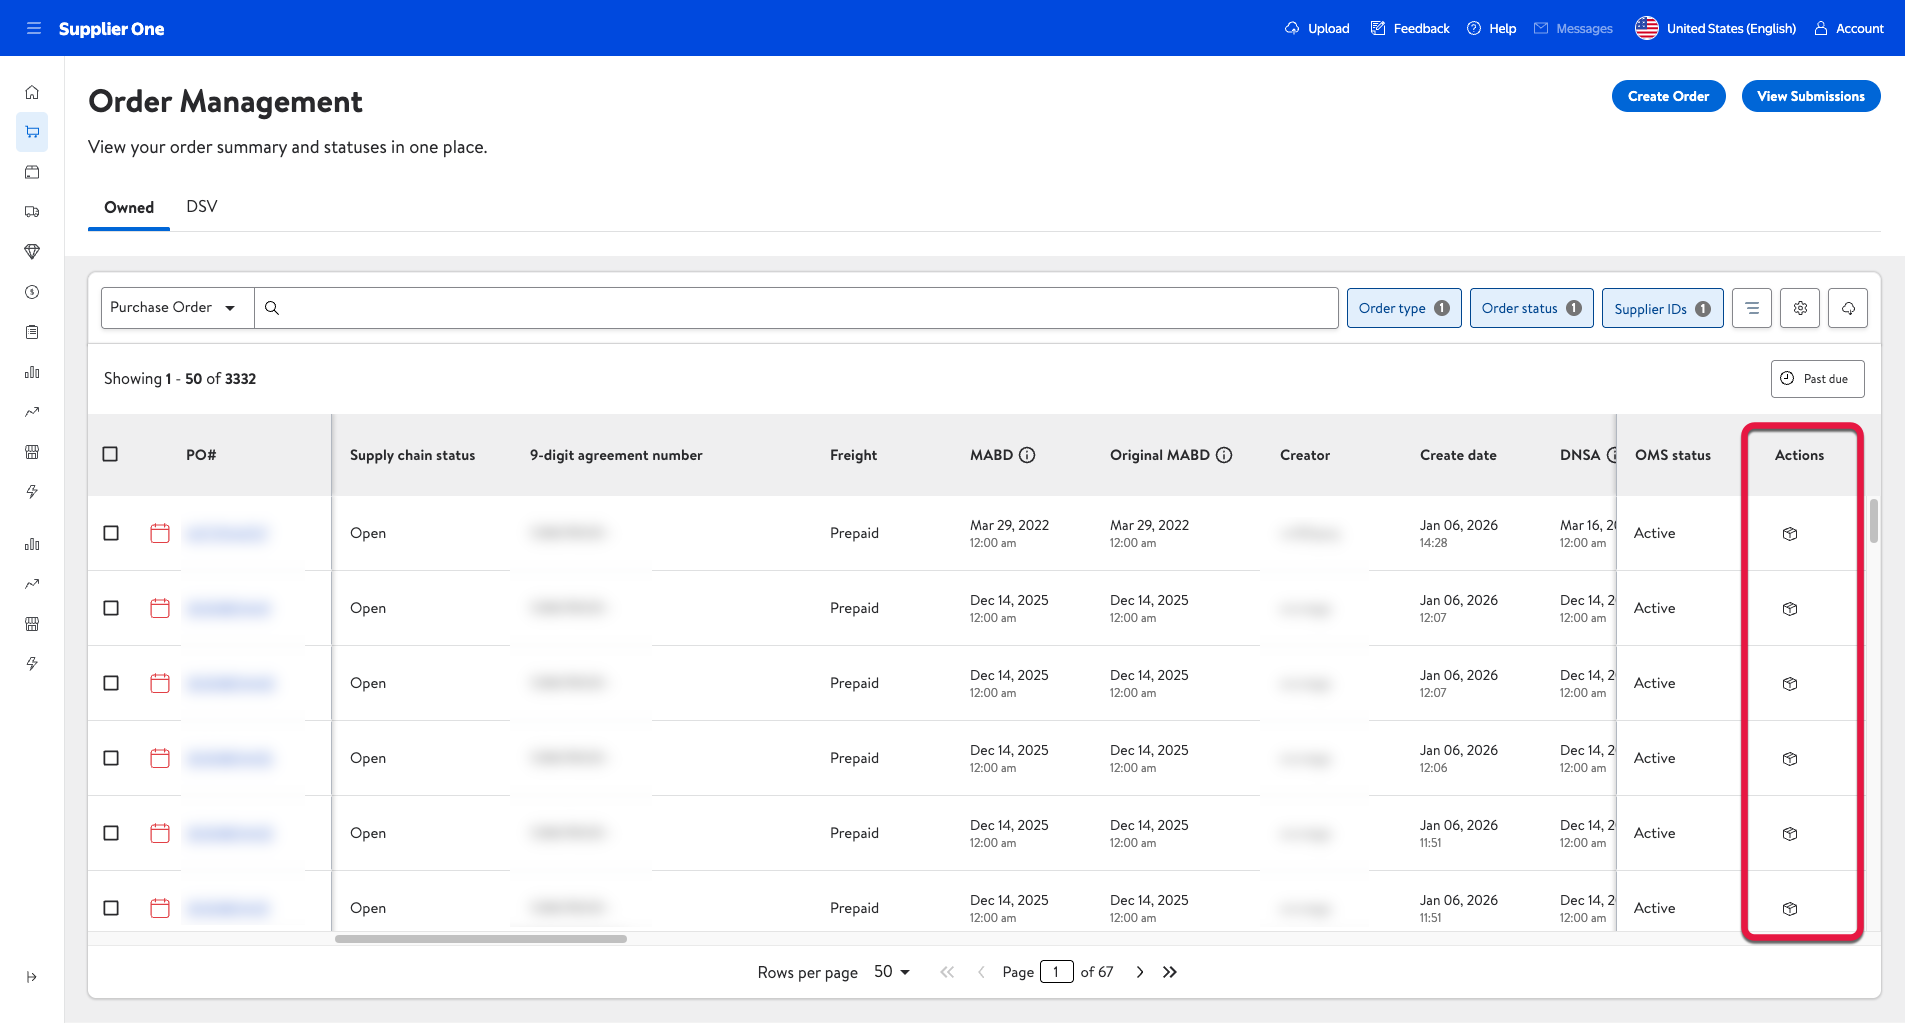
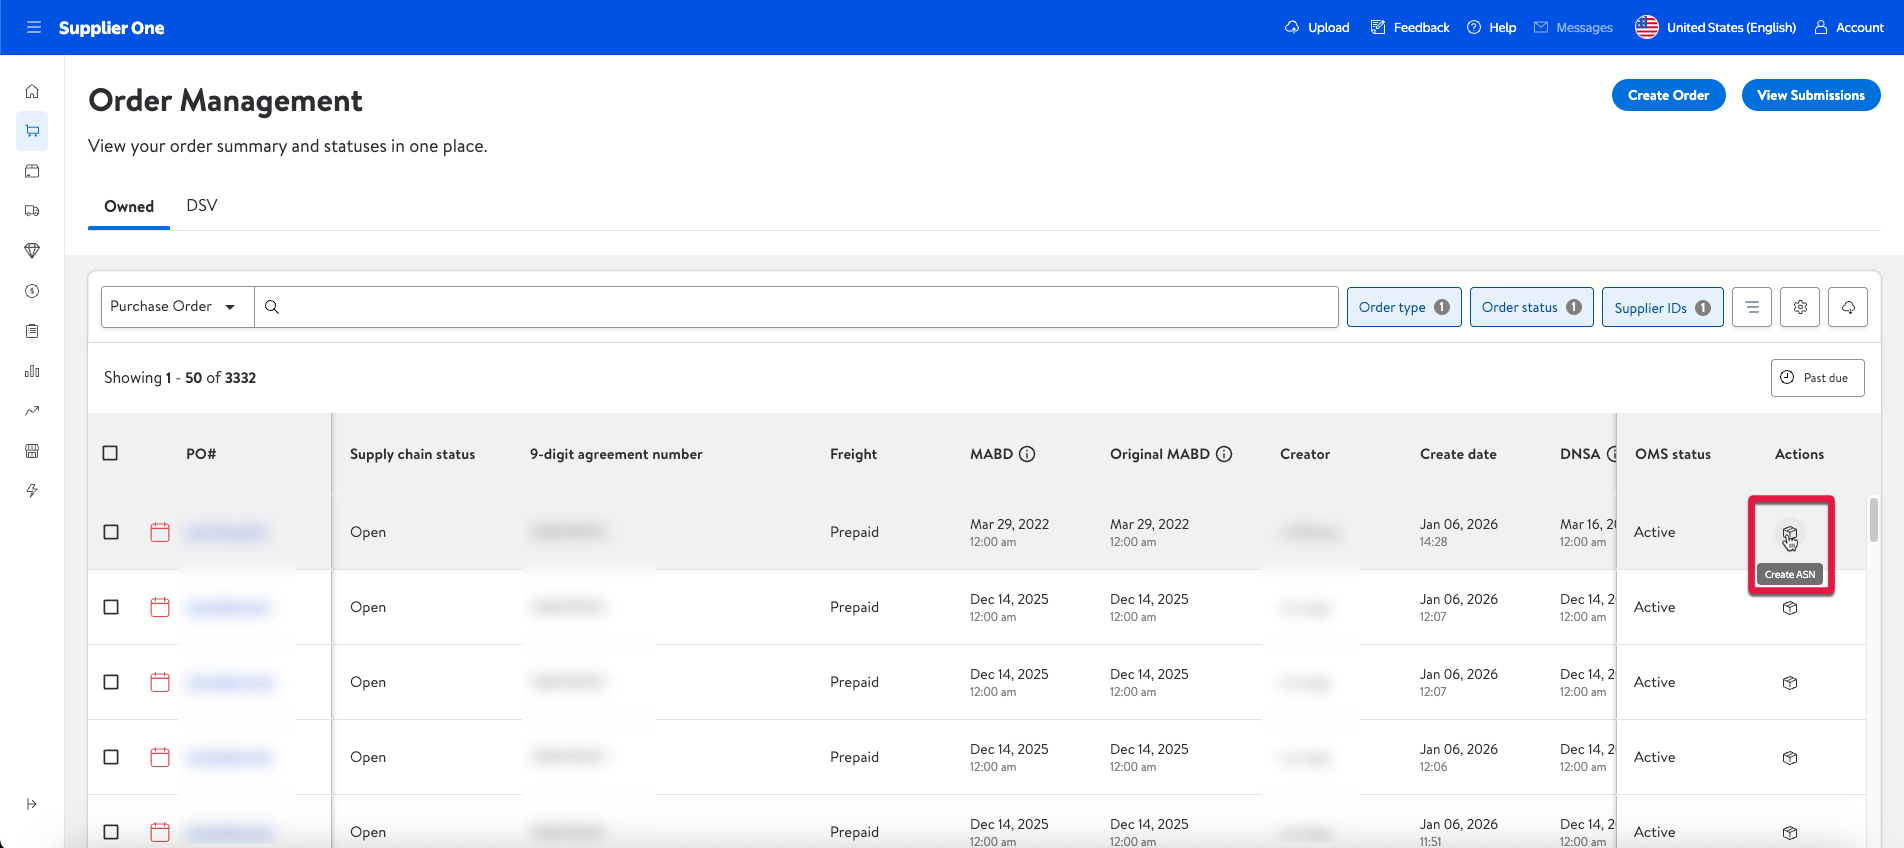
In the Actions column, a box icon appears in the row of each PO that needs an ASN.
For POs with a single delivery location, select the box icon next to the PO. This opens the Create ASN page, where you can begin creating an ASN for that PO.
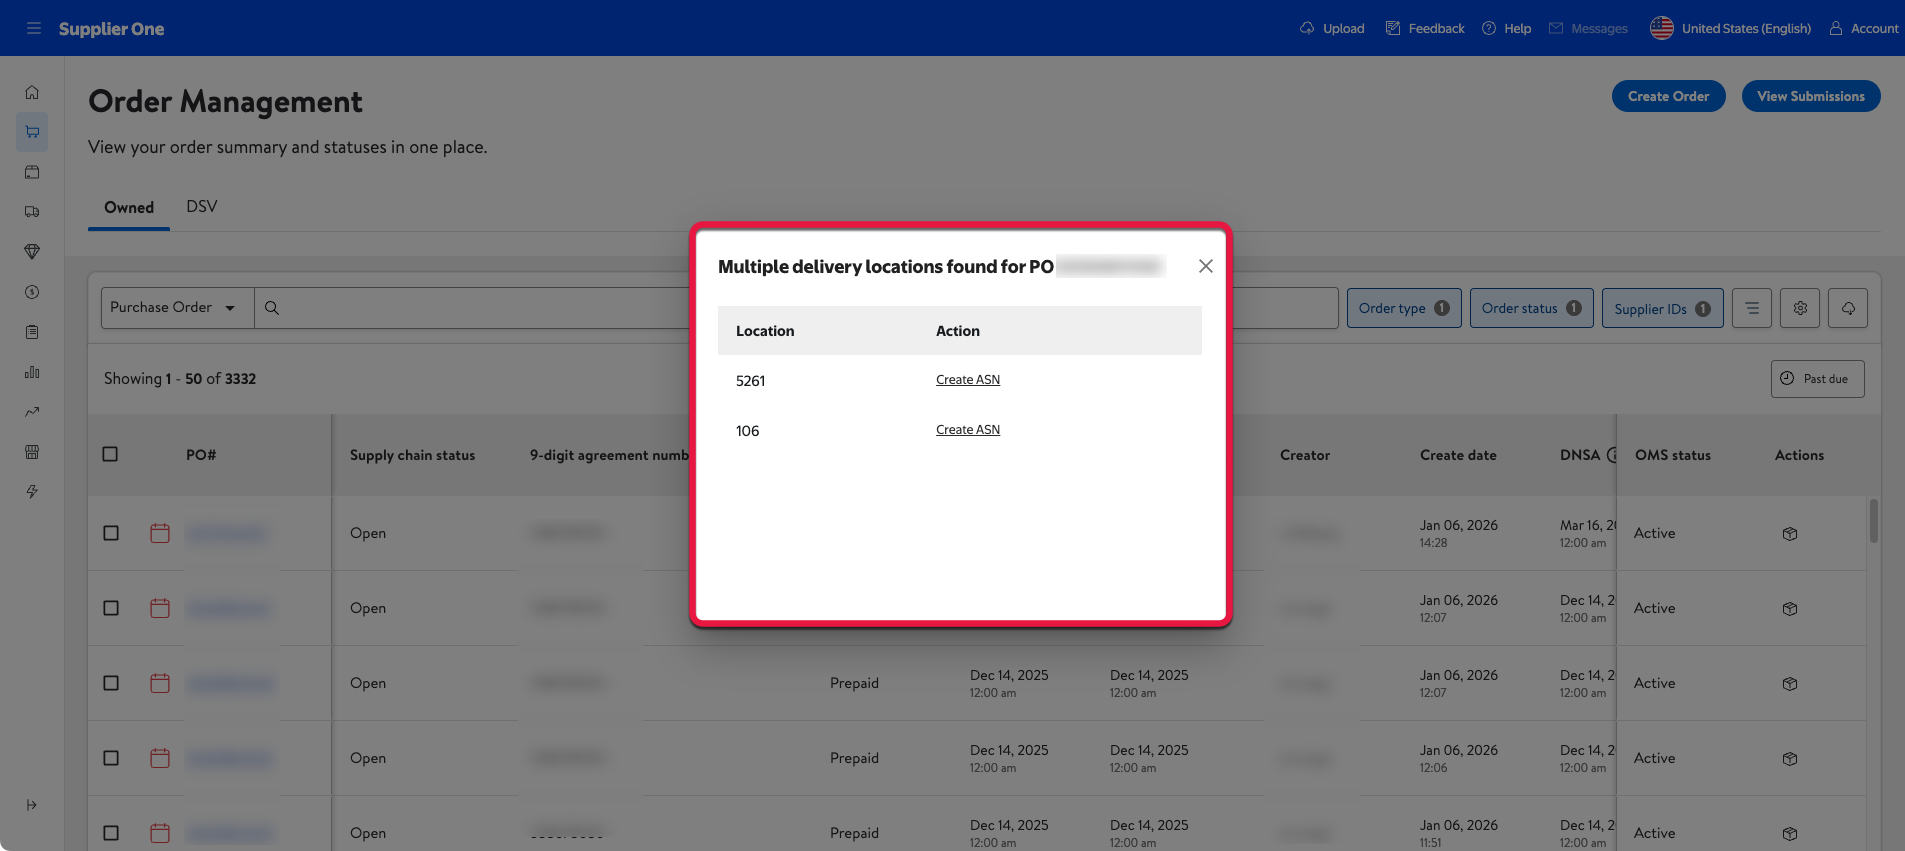
For POs with multiple delivery locations, select the box icon. A popup displays the delivery locations that need an ASN for this PO.
Select Create ASN next to the location number you’d like to create an ASN for. This opens the Create ASN page so you can start the ASN label creation process for this PO for this location.
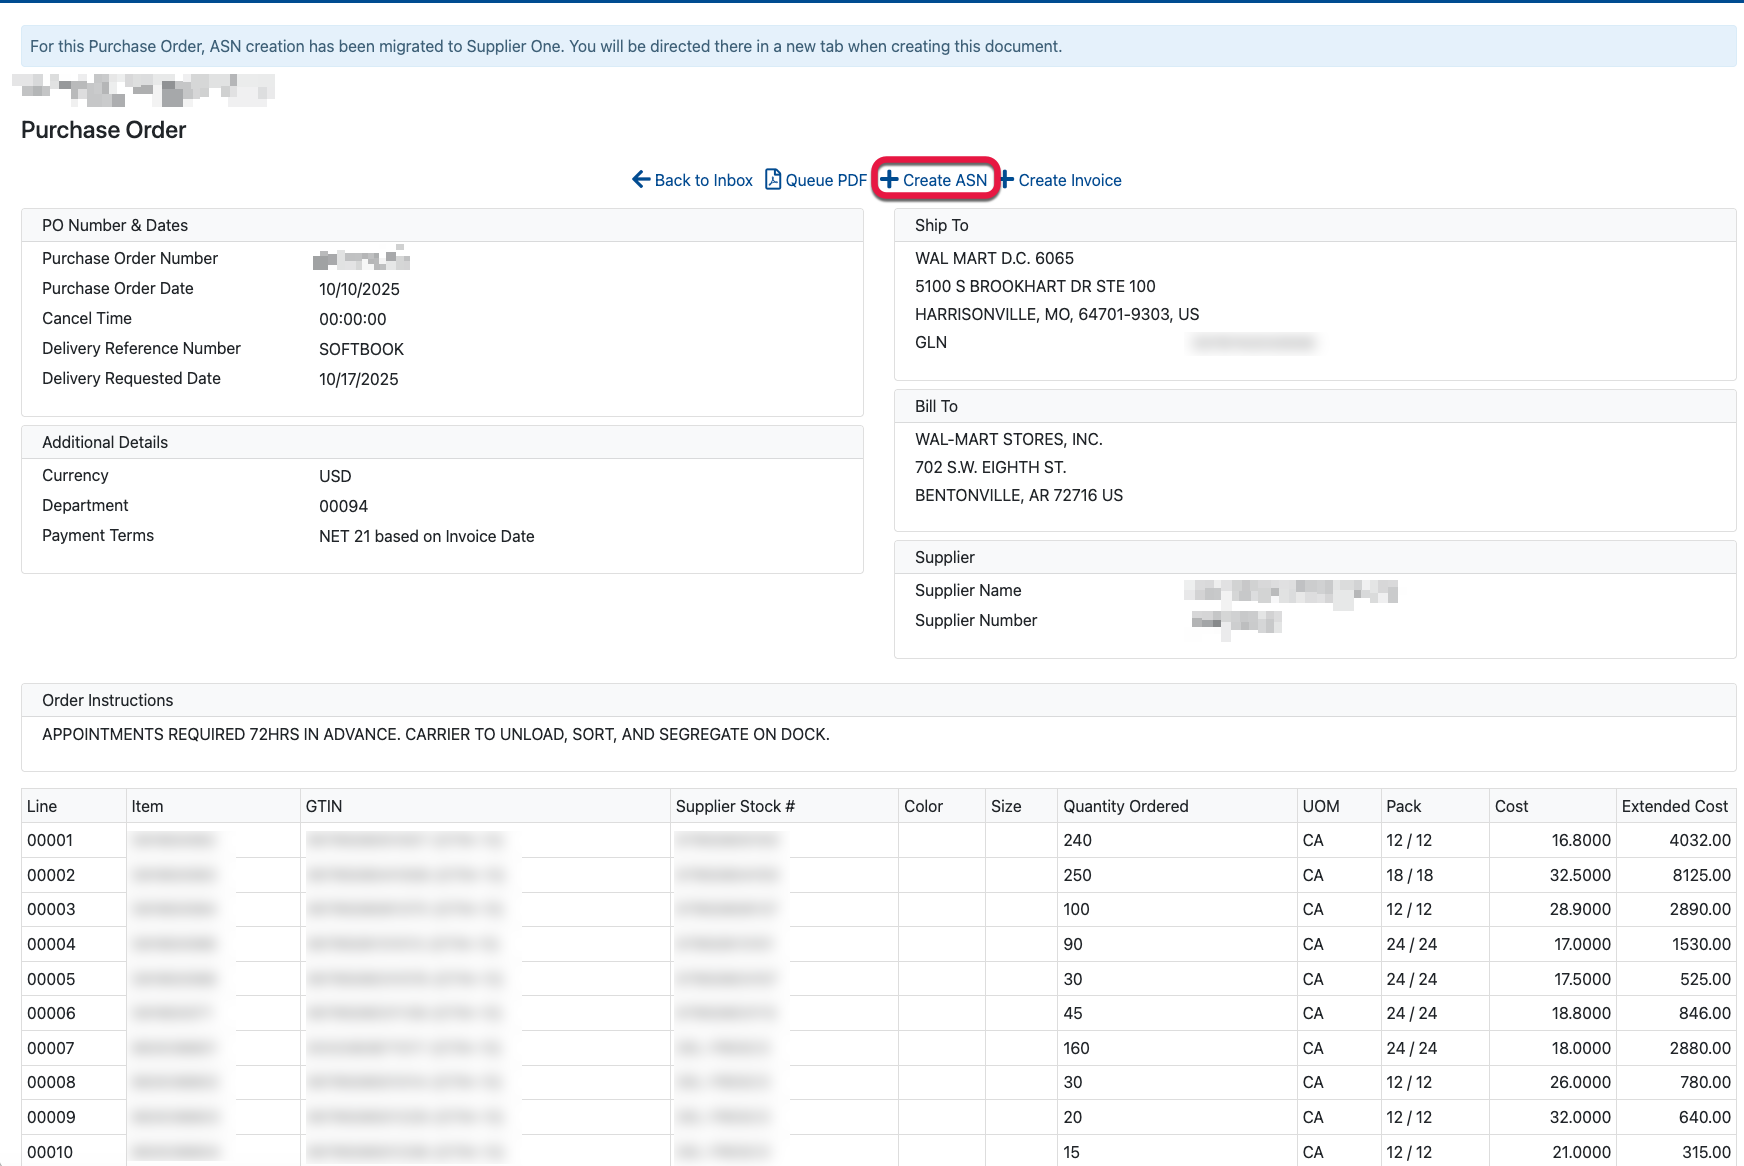
Accessing the Create ASN page through the existing WebEDI app
If you’re using the existing WebEDI website, you can navigate to the Purchase Orders page. Here, you can select +Create ASN at the top of the page. This will take you directly to the Create ASN page in Supplier One.
Create ASN page
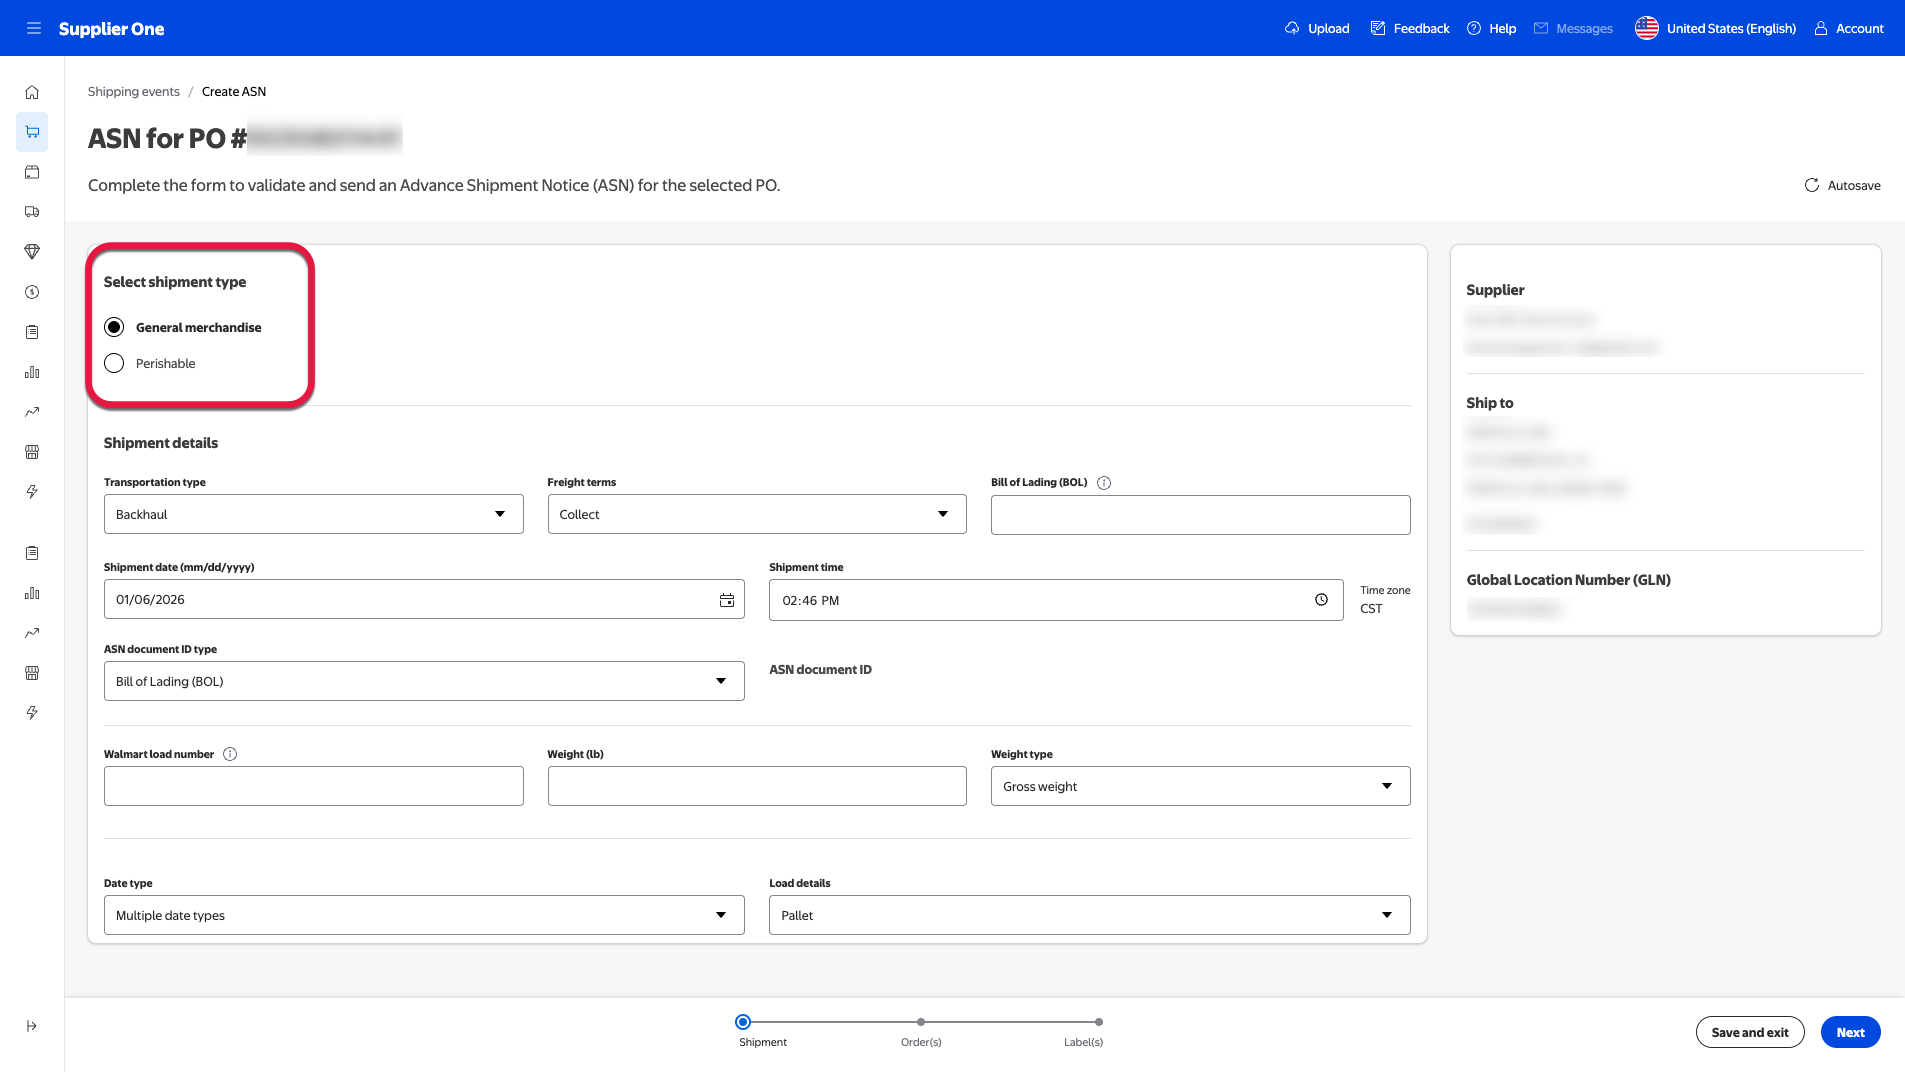
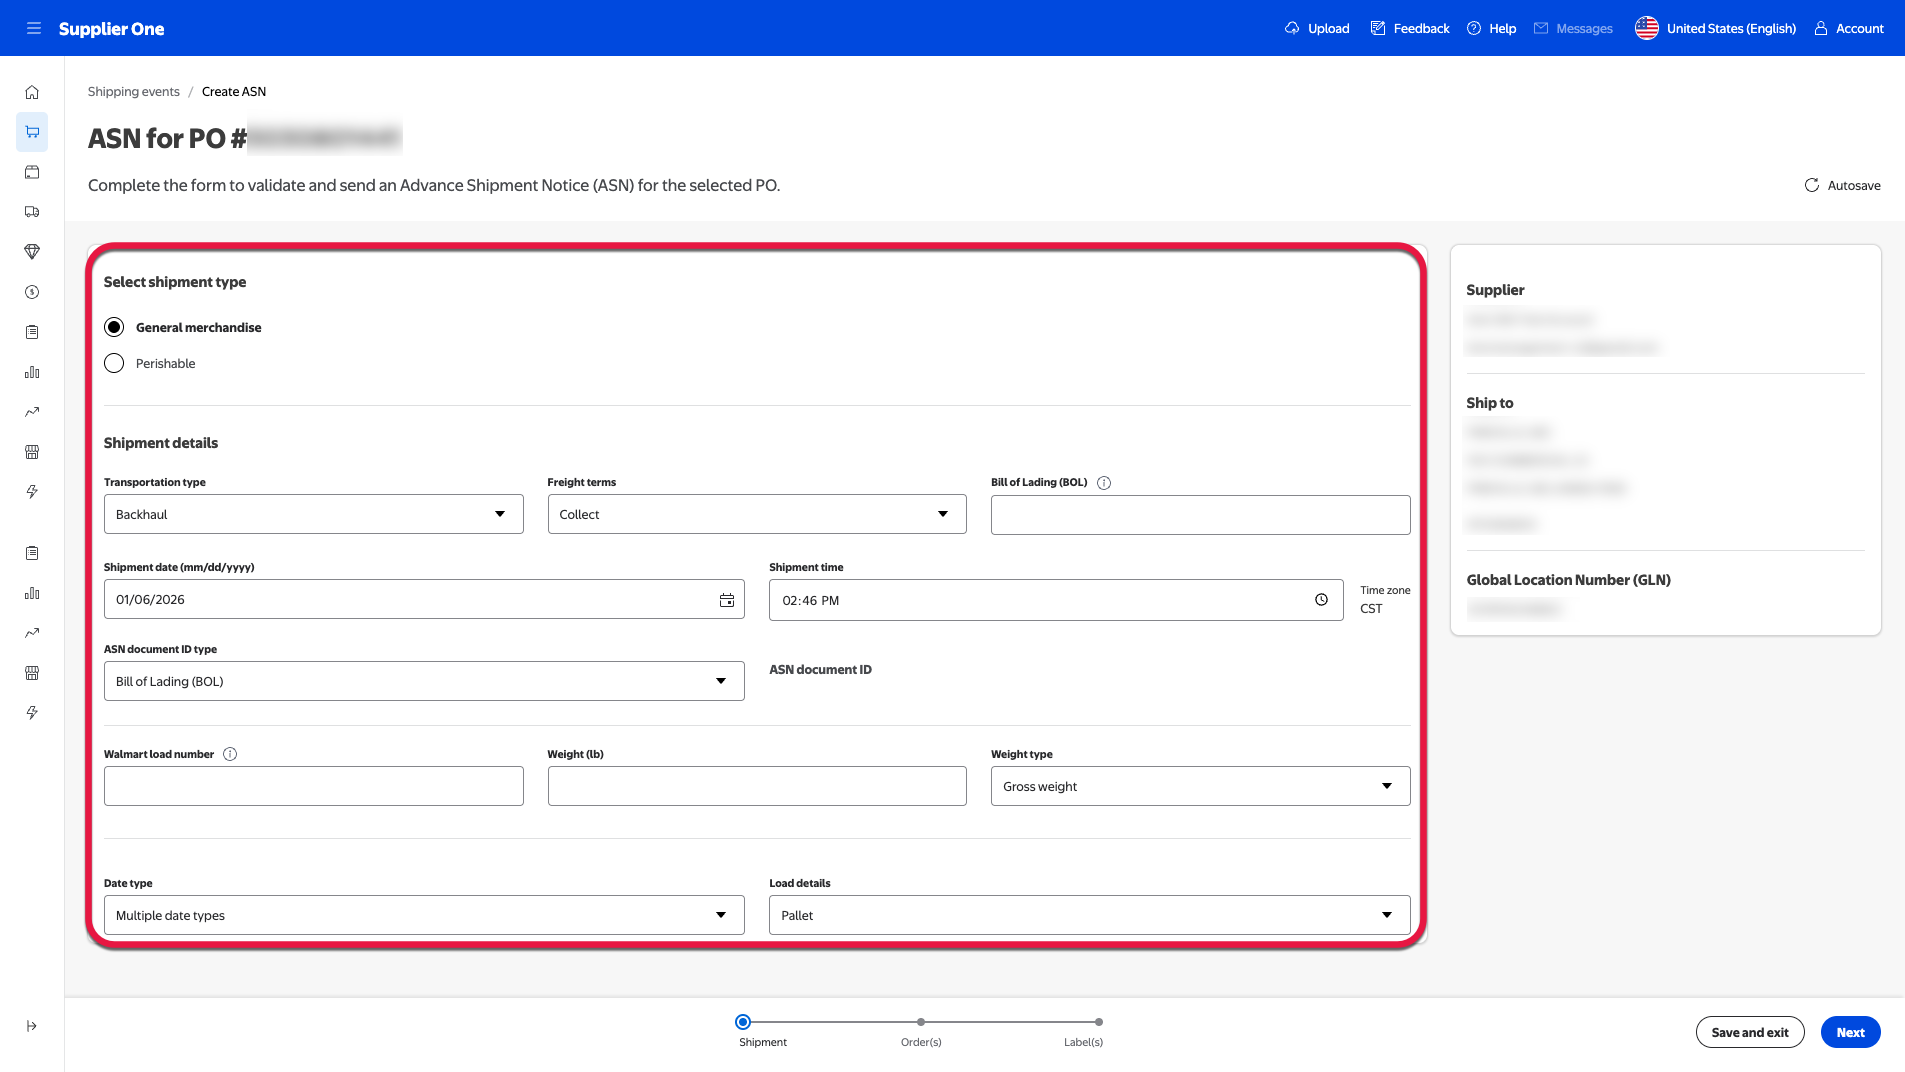
Selecting the shipment type
Before beginning the ASN process, the page will prompt you to select an ASN type (General merchandise or Perishable). Select the correct shipment type to ensure the required attributes are accurate for your ASN. If the pre-selected value doesn’t match your shipment, make sure to update it before continuing.
For Walmart’s purposes, General Merchandise are non-perishable goods and durables including electronics, apparel, and home items. Perishable is defined as department 94 (fresh produce) items and items from all other departments with a limited shelf life and specific storage and temperature needs.
Select an ASN type, either General merchandise or Perishable, based on your shipping product type.
If the pre-selected value doesn’t match your shipment, update it before continuing.
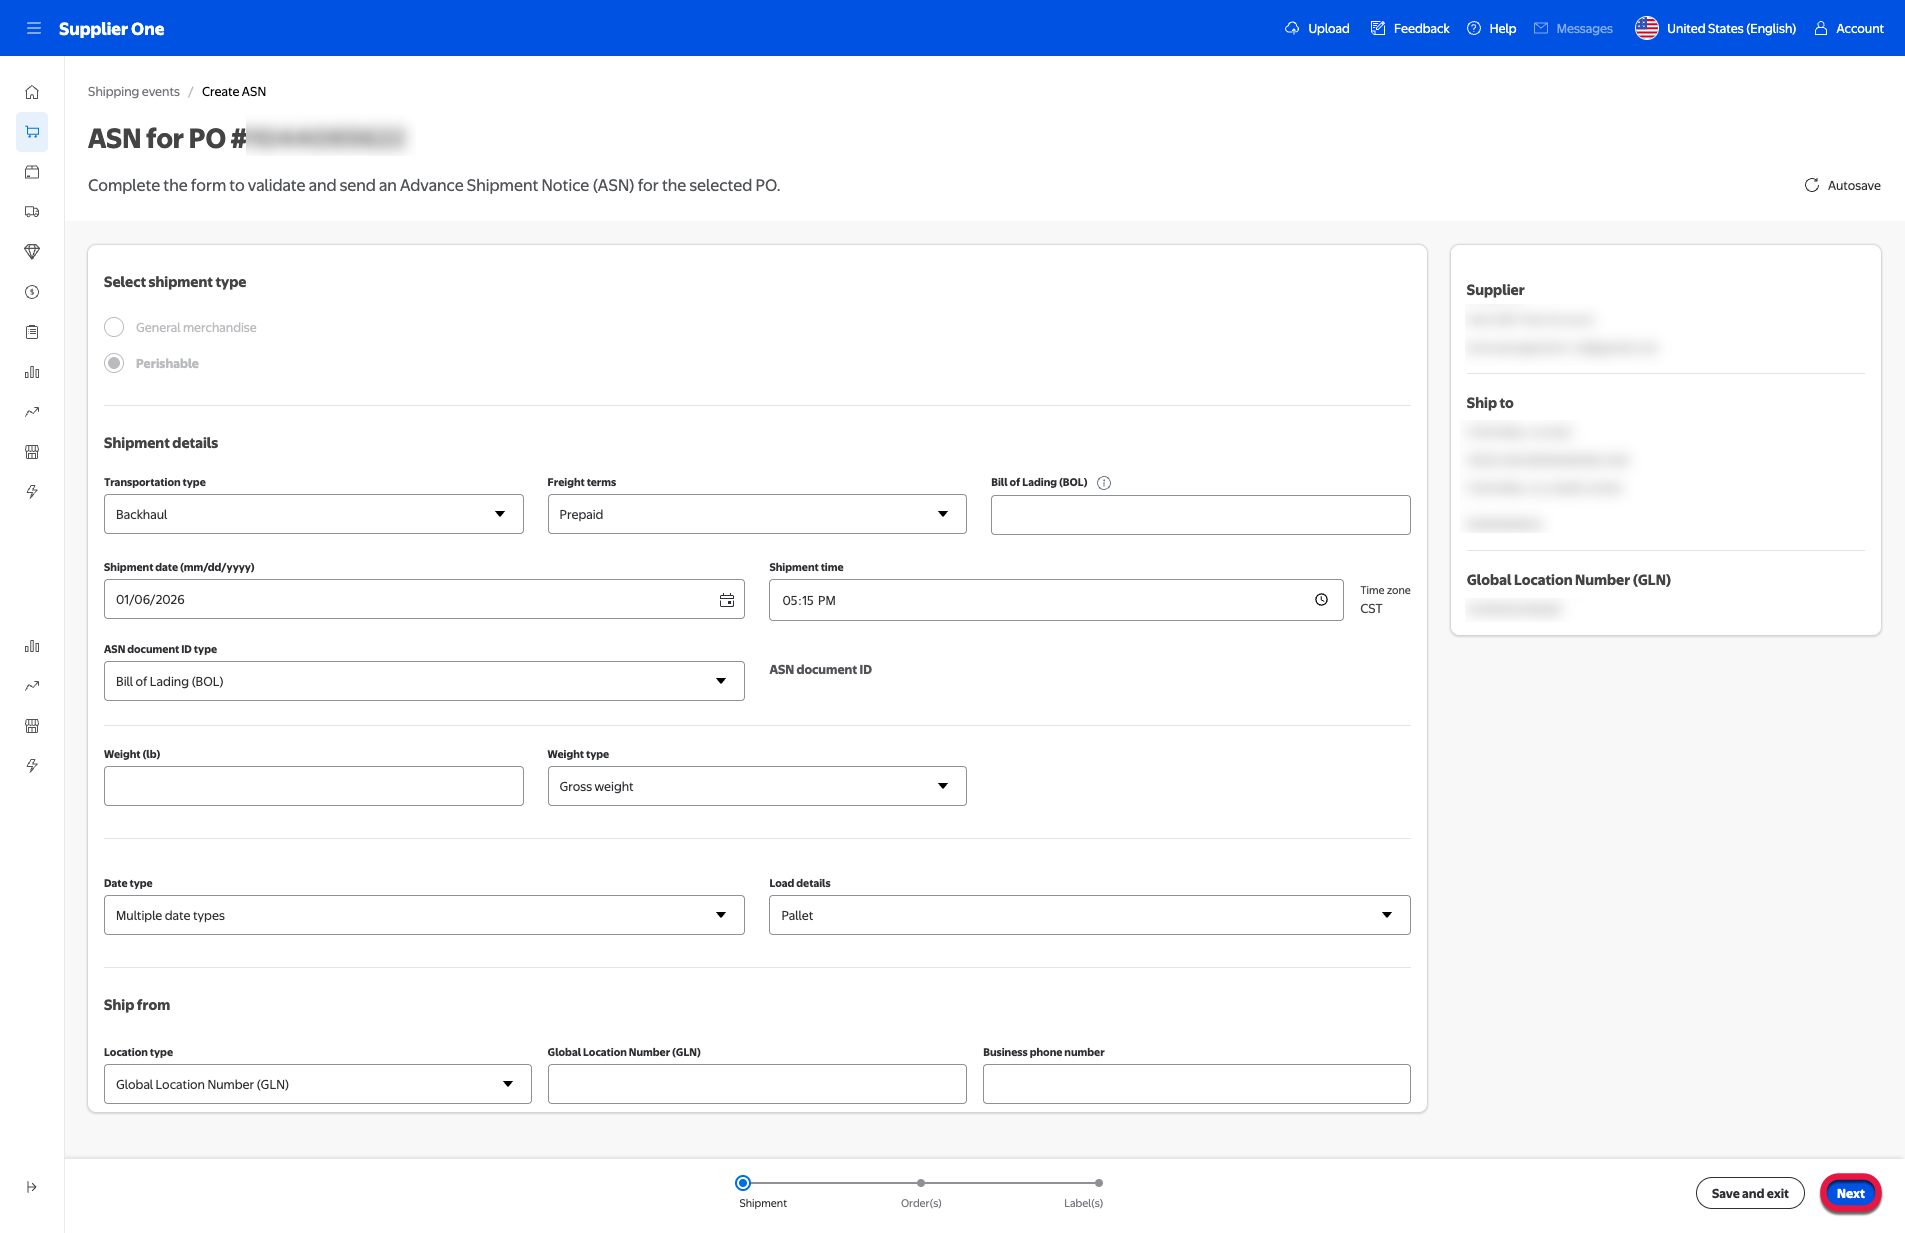
Shipment details section
After you select the shipment type, the Shipment details section automatically populates below. Some fields use drop-downs, while others require you to manually enter information.The table below outlines the fields and their corresponding definitions.
* = Only appears if selecting General merchandise under ASN type.
Field
Definition
Transportation type
Backhaul: A private fleet assigned by Walmart.
Motor: A company or individual that transports goods or passengers via motor vehicles, typically trucks. They may operate regionally or nationally and can be for-hire or private.
Private parcel service: A non-governmental courier or delivery company (e.g., FedEx, UPS, DHL) that handles small package deliveries, often offering tracking and express services.
Less-than-truckload: A shipping method used when freight does not require a full truck. Multiple shipments from different customers are combined in one truck, making it cost-effective for smaller loads.
Freight terms
Prepaid: This indicates that the shipper has paid the freight charges before shipment. The carrier bills the shipper directly, not the consignee.
Only fields entered in the scheduler app are pre-populated. Enter transportation-related attributes manually.
Collect: The freight charges are paid by the consignee (receiver) upon delivery. The carrier collects payment from the consignee.
Some available fields are pre-populated based on scheduler app data. Review and update these fields as needed.
Bill of Lading (BOL) number
Provide the BOL assigned to the shipment.
BOL - A unique sequence of up-to 50 alpha numeric digits.
VICS BOL - A Voluntary Interindustry Commerce Solution (VICS) BOL is a unique sequence of 17 digits containing only numbers.
The Bill of Lading (BOL) field title will change to VICS Bill of Lading (BOL) once the criteria for a VICS BOL is met.
Appointment number*
Specify the appointment number for this ASN.
This field is optional if the shipment type is set to General merchandise with Prepaid freight terms.
Appointment date*
Specify the date the shipment is expected to be delivered at the distribution center. Use the mm/dd/yyyy format.
Appointment time*
Specify the time the appointment will take place, adhering to the time zone listed under Time zone. Select the time of day, either AM or PM.
Shipment date
Specify the date your items will be shipped.
Shipment time
Specify the time your items will be shipped.
ASN document ID
Bill of lading (BOL) number: A legal document issued by a carrier to a shipper that details the type, quantity, and destination of the goods being transported. It serves as a receipt and a contract of carriage.
PO number: A unique identifier assigned to a purchase order, used to track and reference procurement transactions between a buyer and a supplier.
Custom: You can select Custom to input your company’s 17-digit custom identifier as the ASN document ID.
A custom ID must be up-to but not exceed 17 digits.
Walmart load number
A unique identifier assigned to a shipment or freight load. It helps track and manage the shipment throughout its journey.
This field is only available if selecting Collect under Freight terms.
Master tracking number*
If selecting private parcel, this is a tracking number associated with the package. If your shipment includes multiple items, they will share a single master tracking number.
Weight type
Gross weight: The total weight of a packaged item, including the product and all packaging materials.
Net weight: The weight of the product alone, excluding any packaging.
Weight (lb)
Specify the weight of the objects in the ASN load. Use pounds as the measurement (lb).
Date type
Multiple date types: Specify which date type best applies to your shipment. Note: Certain options will appear depending on whether you’ve selected General merchandise (*) or Perishable.
Expiration*: Walmart requires this date type for FSMA goods. It indicates how long the product should be displayed for sale and must match the date printed on the packaging or the GS1 Sell By (16) label.
Lot number expiration*: This date type is required for FSMA goods and Infant Formula. It reflects the last recommended date for using the product at peak quality and should match the GS1 Use-by (17) label.
Shelf-life expiration*: Required for FSMA goods, this date shows when the product is expected to be at its best flavor or quality. It should match the GS1 Best by (15) label.
Lot number expiration: Walmart requires this date type for product blends used in further processing or direct consumption. It reflects the latest usable date based on the earliest spoiling ingredient and should match the GS1 Use-by (17) label.
Production: This date type is required for minimally processed animal products. It indicates when the product was placed into cold or frozen storage or collected and should match the GS1 Production Date (11) label.
Date packed: Walmart requires this date type when a process alters the product’s shelf life after production. It applies to items like cold-stored produce, processed meats, dairy, and nuts, and should match the GS1 Package Date (13) label.
Shelf-life expiration: This date type is required for blended or finished products ready for consumption. It reflects the latest usable date based on the earliest spoiling component and should match the GS1 Best Before (15) label.
Collection: Walmart requires this date type for harvested, minimally-processed goods. It indicates the expiration date and should match the GS1 Production Date (11) label.
Package date: The date this item was packaged.
Lot number expiration: The expiration or best by date for the item.
Production date for animal goods: The day this animal goods item was produced.
Load details
Floor-loaded: Individual items, such as boxes, are stacked from the floor to the ceiling of the container.
Pallet: Items are stacked on a wooden, plastic, or metal pallet and secured with shrink wrap or straps to create a single, stable unit.
For more information on the field logic breakdown in the Create ASN process, refer to the Input Field Logic Excel file.
Fill out the editable fields. Make sure the information you’re entering is valid.
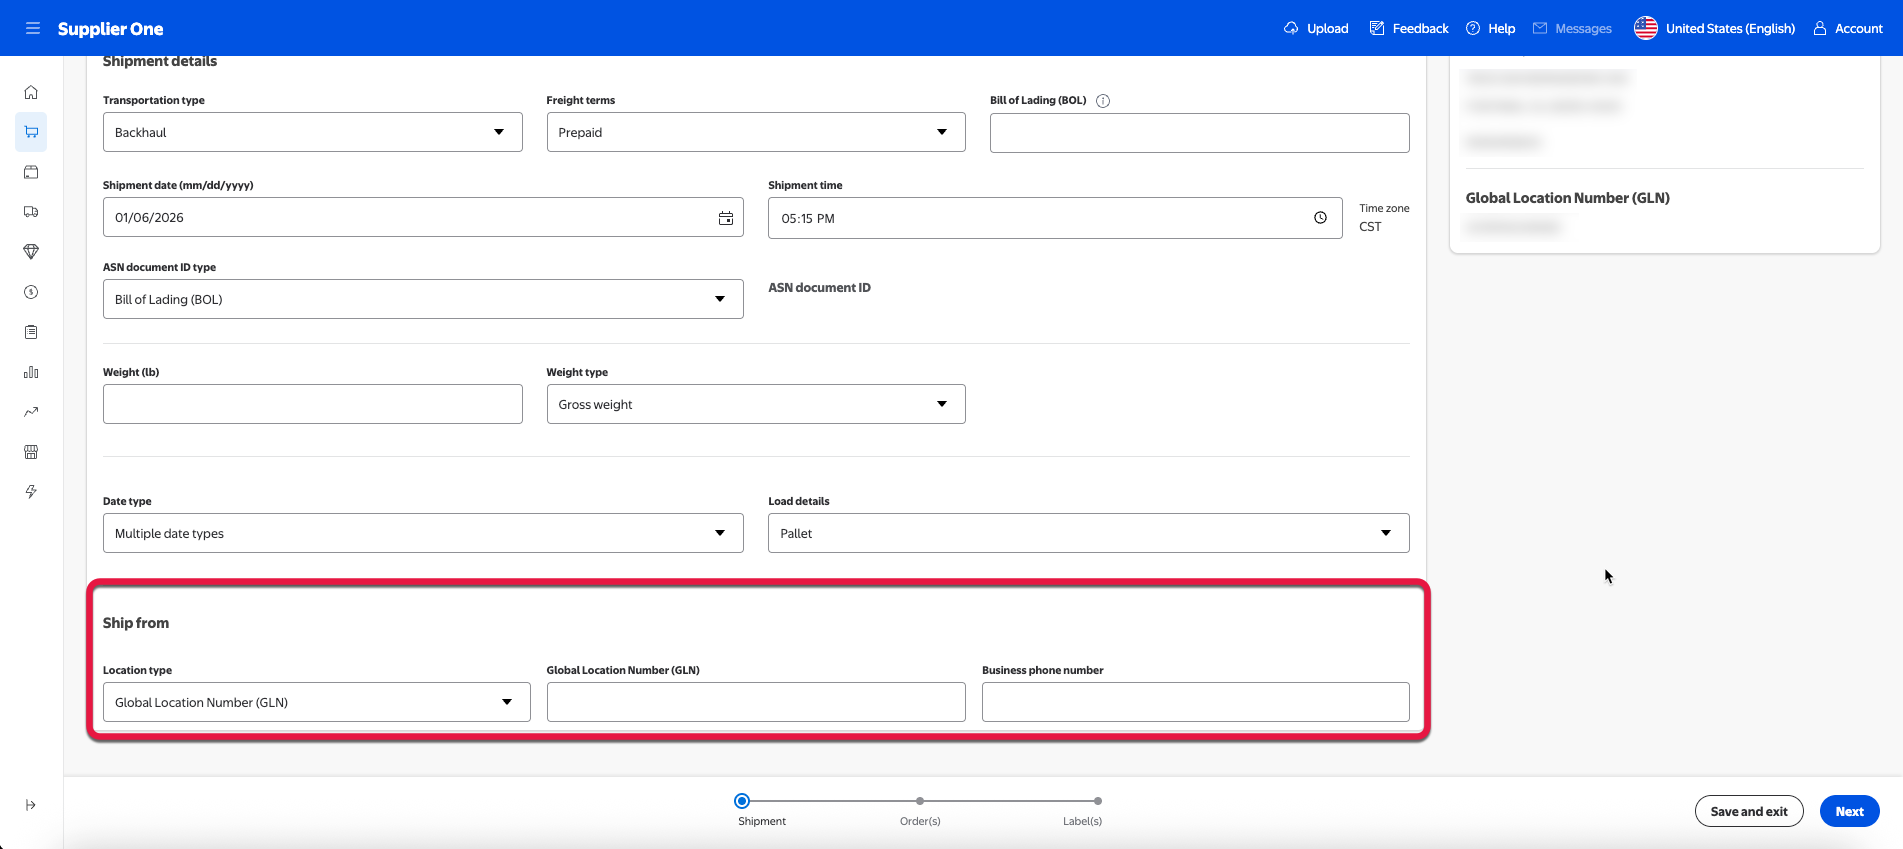
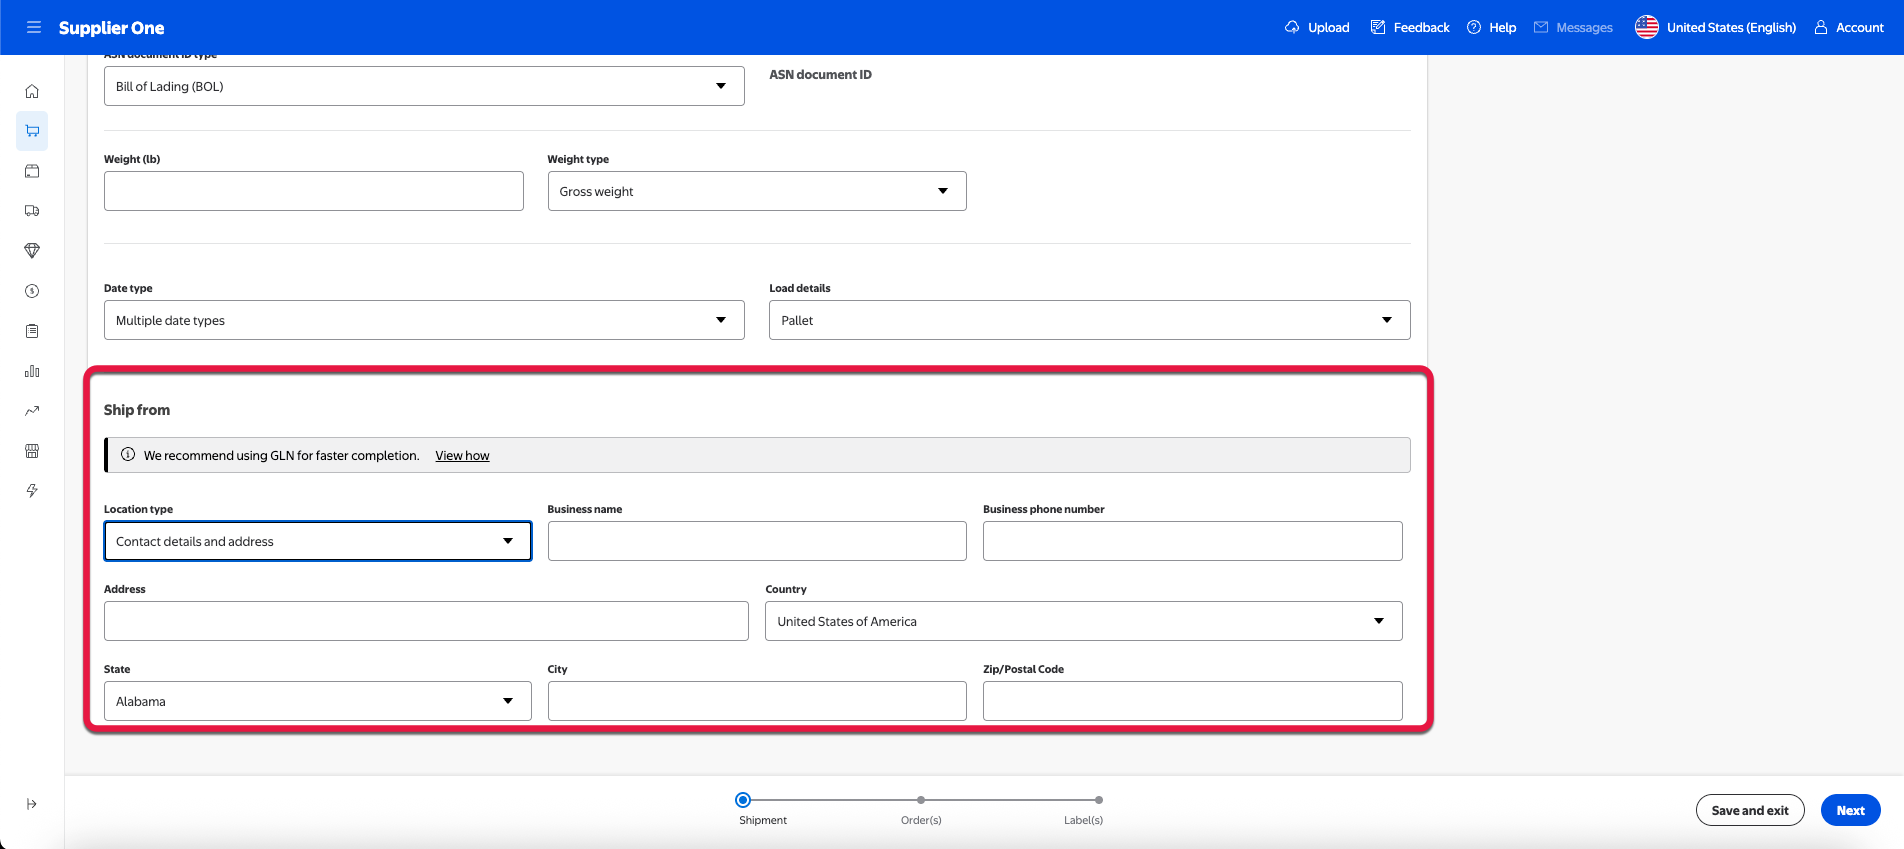
Ship from section (for FSMA-elligable ASNs)
If the POs you’re creating an ASN for are FSMA-eligible, a Ship from section will appear under Shipment details.
Select the suitable traceability reference type for your shipment.
If you select Global Location Number (GLN), you’ll need to enter the correct 13-digit code for your product, as well as a business-specific phone number attached to the GLN.
The GLN code must contain no more or less than 13 digits, otherwise you’ll receive an error.
If you select Contact details and address, you’ll need to enter the business-specific name, phone number, and address where the shipment will be shipped from.
Make sure that the address entered is the shipment’s origin, not its destination.
Once you've completed all required fields, select Next.
You can select Save and exit to save your edits in the submission process. You can only access and edit draft ASNs while on the PO submissions page.
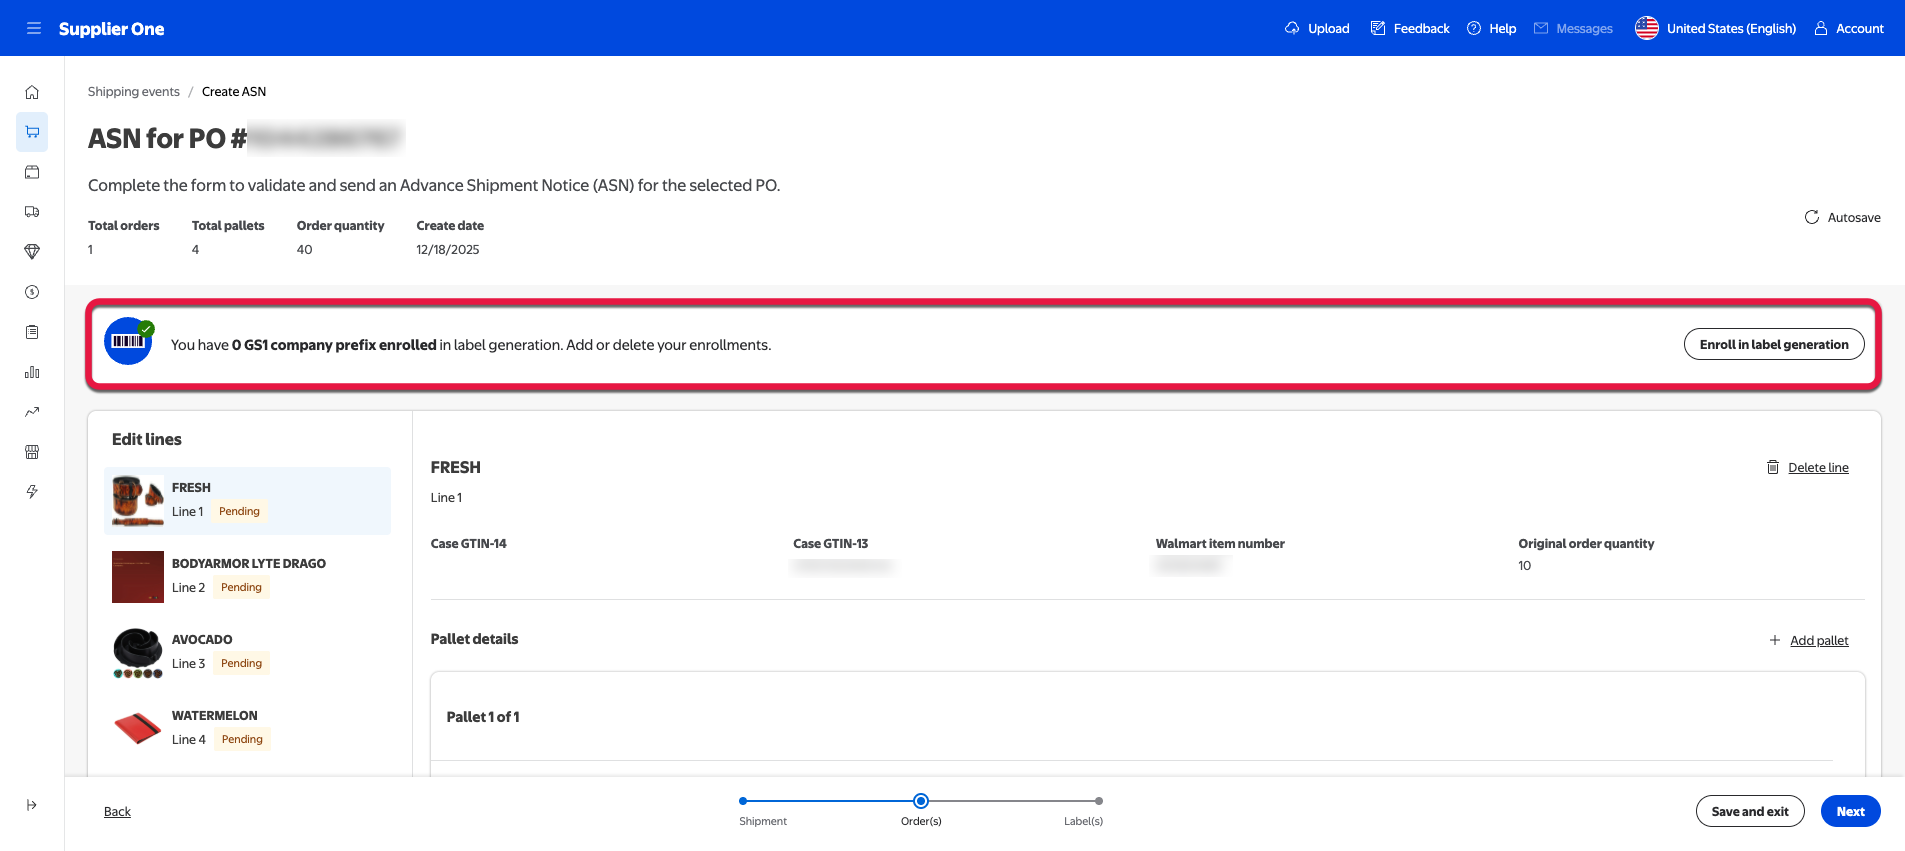
ASN for PO page
Validation
At this point in the process, your information has been checked to ensure consistency with the values allowed in each field, a process known as validation. If you’ve reached the PO page, it means you’ve passed the validation process. If you’ve received an error message in any of the manual entry fields, please double-check the information you’ve entered.
You’ll notice some of the information you entered in the previous page is now at the top of the PO page. These fields are fixed, meaning they can no longer be changed.
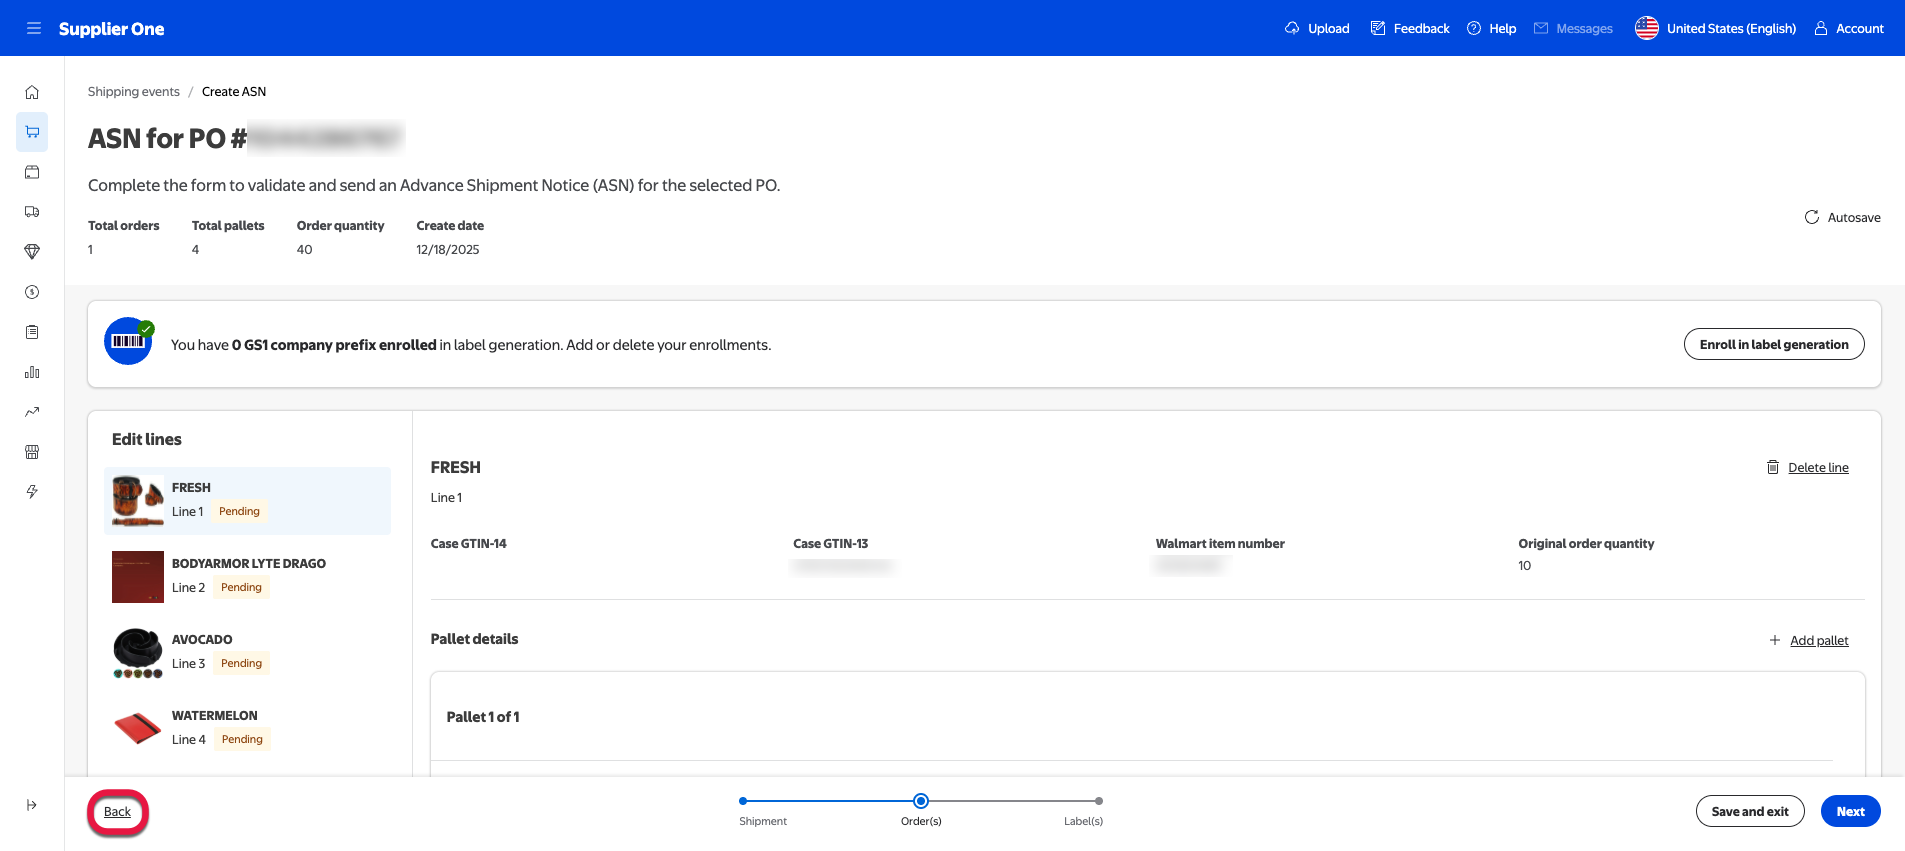
Select the Back button you need to correct an error. Any new entries will have to be validated again.
Regarding the Load details section
If you selected Floor-loaded, continue to the next section. If you selected Pallet, jump to the Pallet section.
Floor-loaded
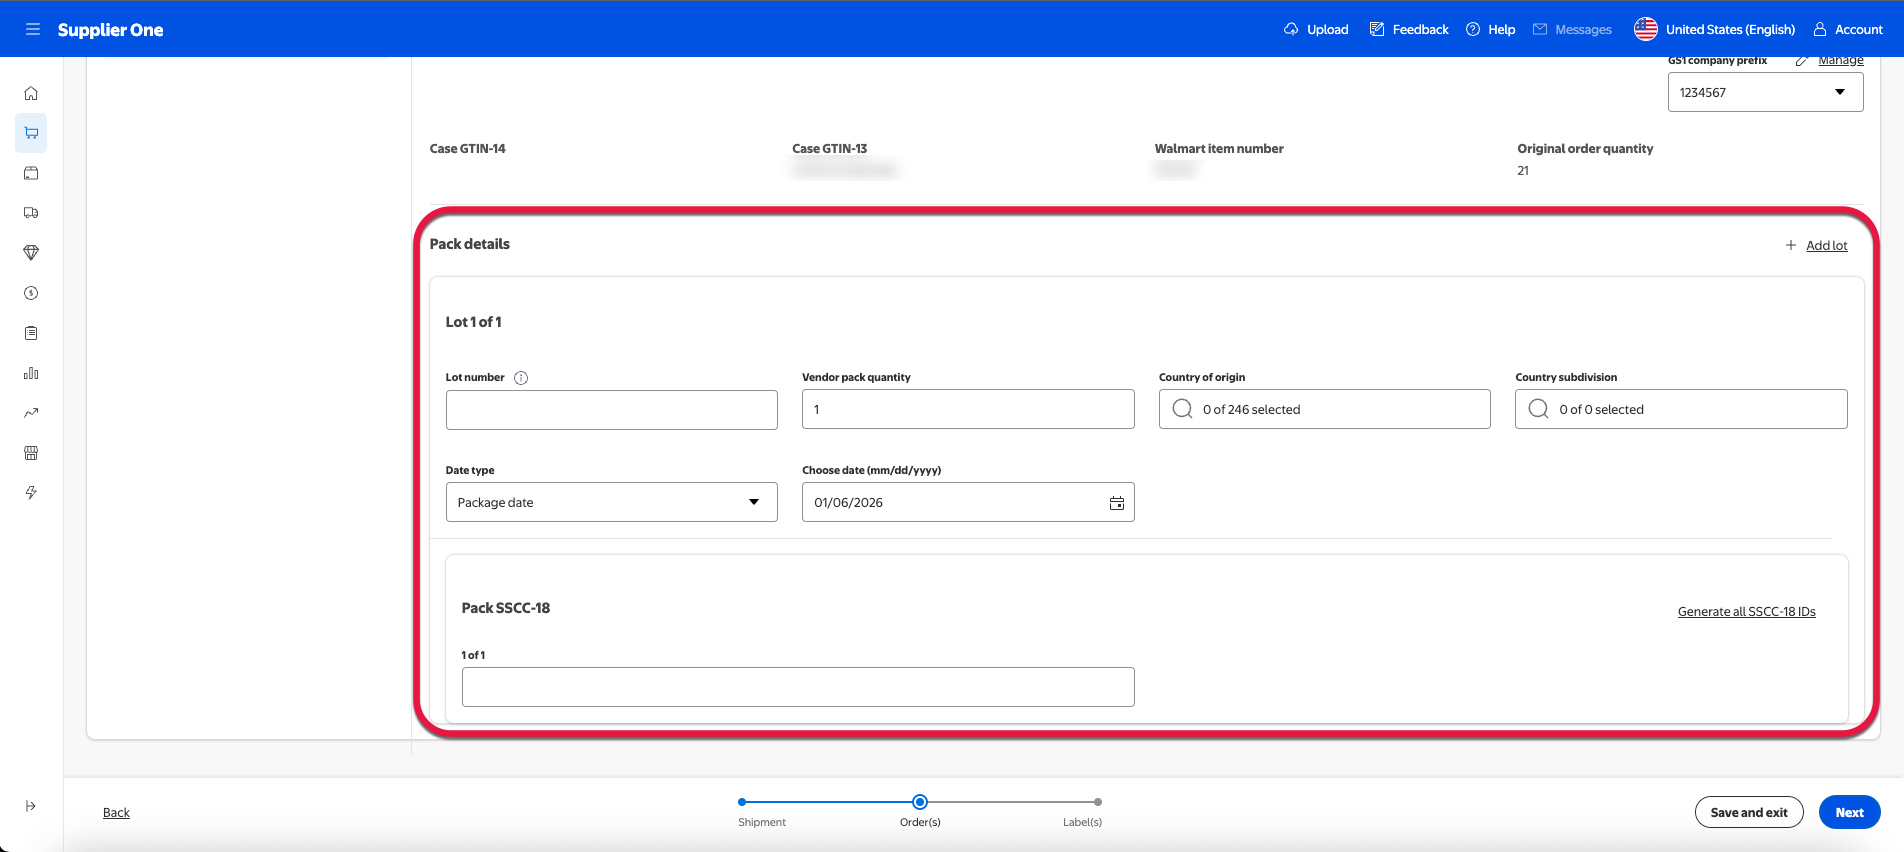
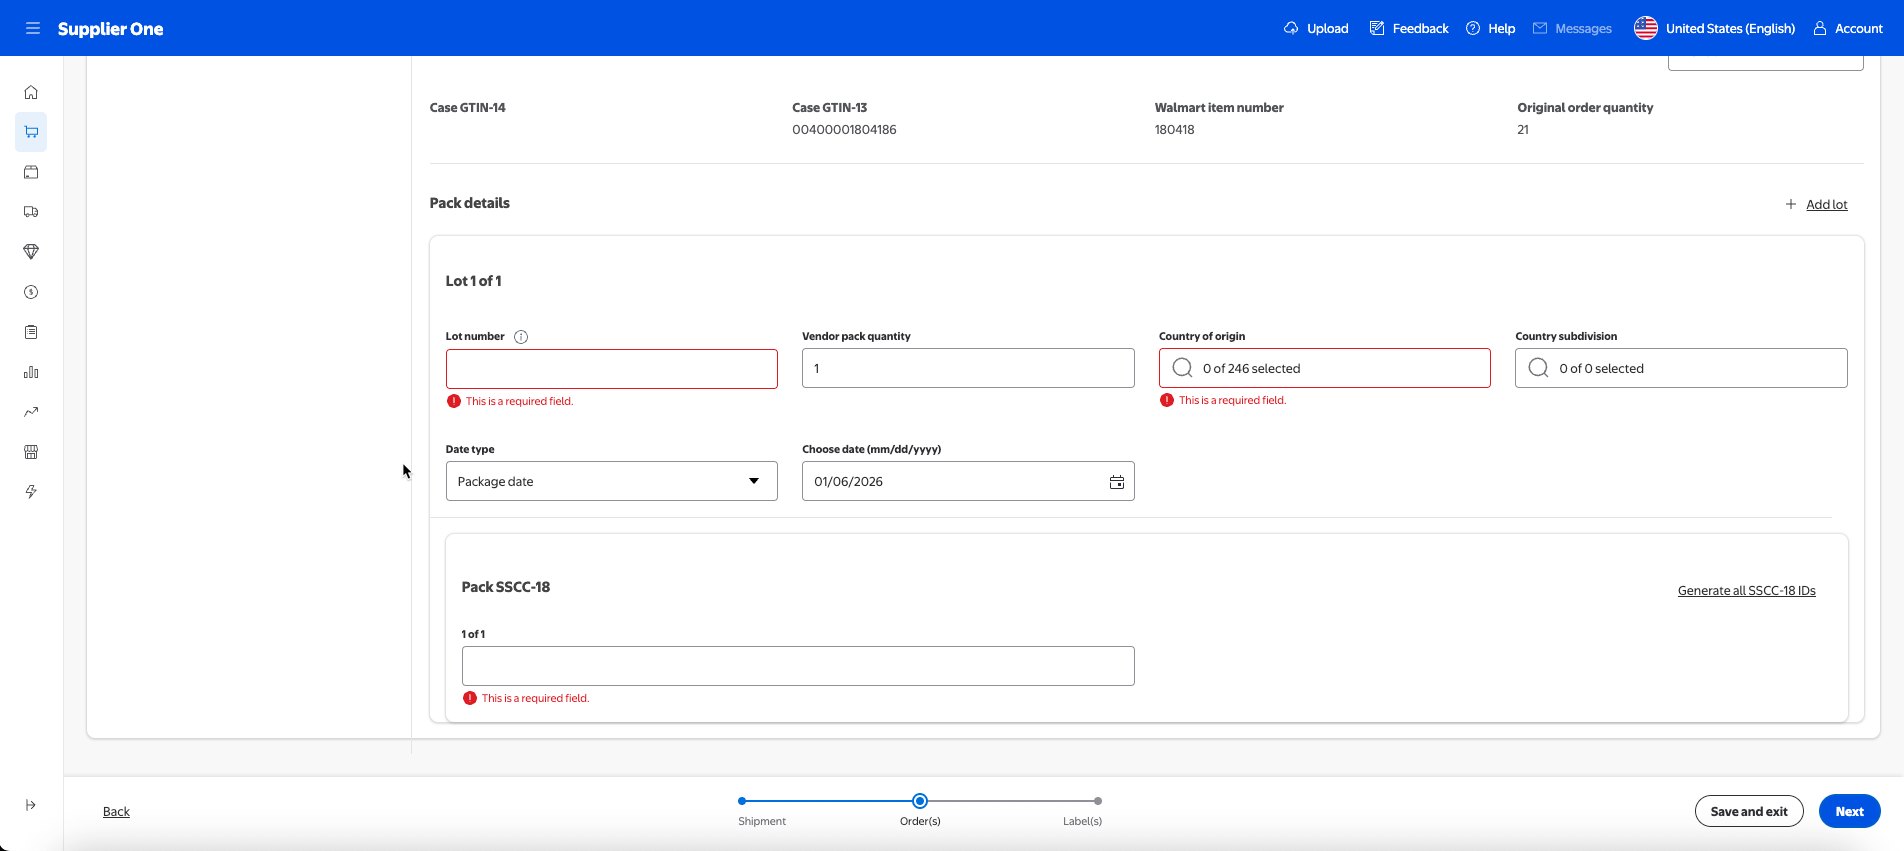
Pack details section
In the Pack details section, you’re able to continue entering lot-specific information concerning your shipments.
The table below outlines the fields and their corresponding definitions.
Field
Definition
Lot number
This is the code/number used to uniquely identify a traceability lot and is often assigned when the food is initially packed. This should match the case label Application Identifier (AI) of Batch or Lot (10).
Vendor quantity pack
Specify the amount of the lot. Could also be described as cases.
Country of origin
Specify the country from which the lot comes from.
Country of subdivision
Specify the subdivision of the country you’ve selected.
Date type
Specify the date, either the production date, expiration date, or best-by date.
Choose date
Specify the corresponding date the lot is being shipped.
To help you complete the required input for all items within your PO, review the Edit lines section in the left panel to track your progress. When a PO line is completed, the status updates to Filled. If any fields are missing, the status changes to Errors and displays the number of missing fields for that PO line.
Fill out the editable fields. Make sure the information you’re entering is valid.
Depending on whether your submission is for a single lot or multiple lots, you’re able to adjust the lot amount by pressing the Add lot button on the upper-right corner of the Pack details section.
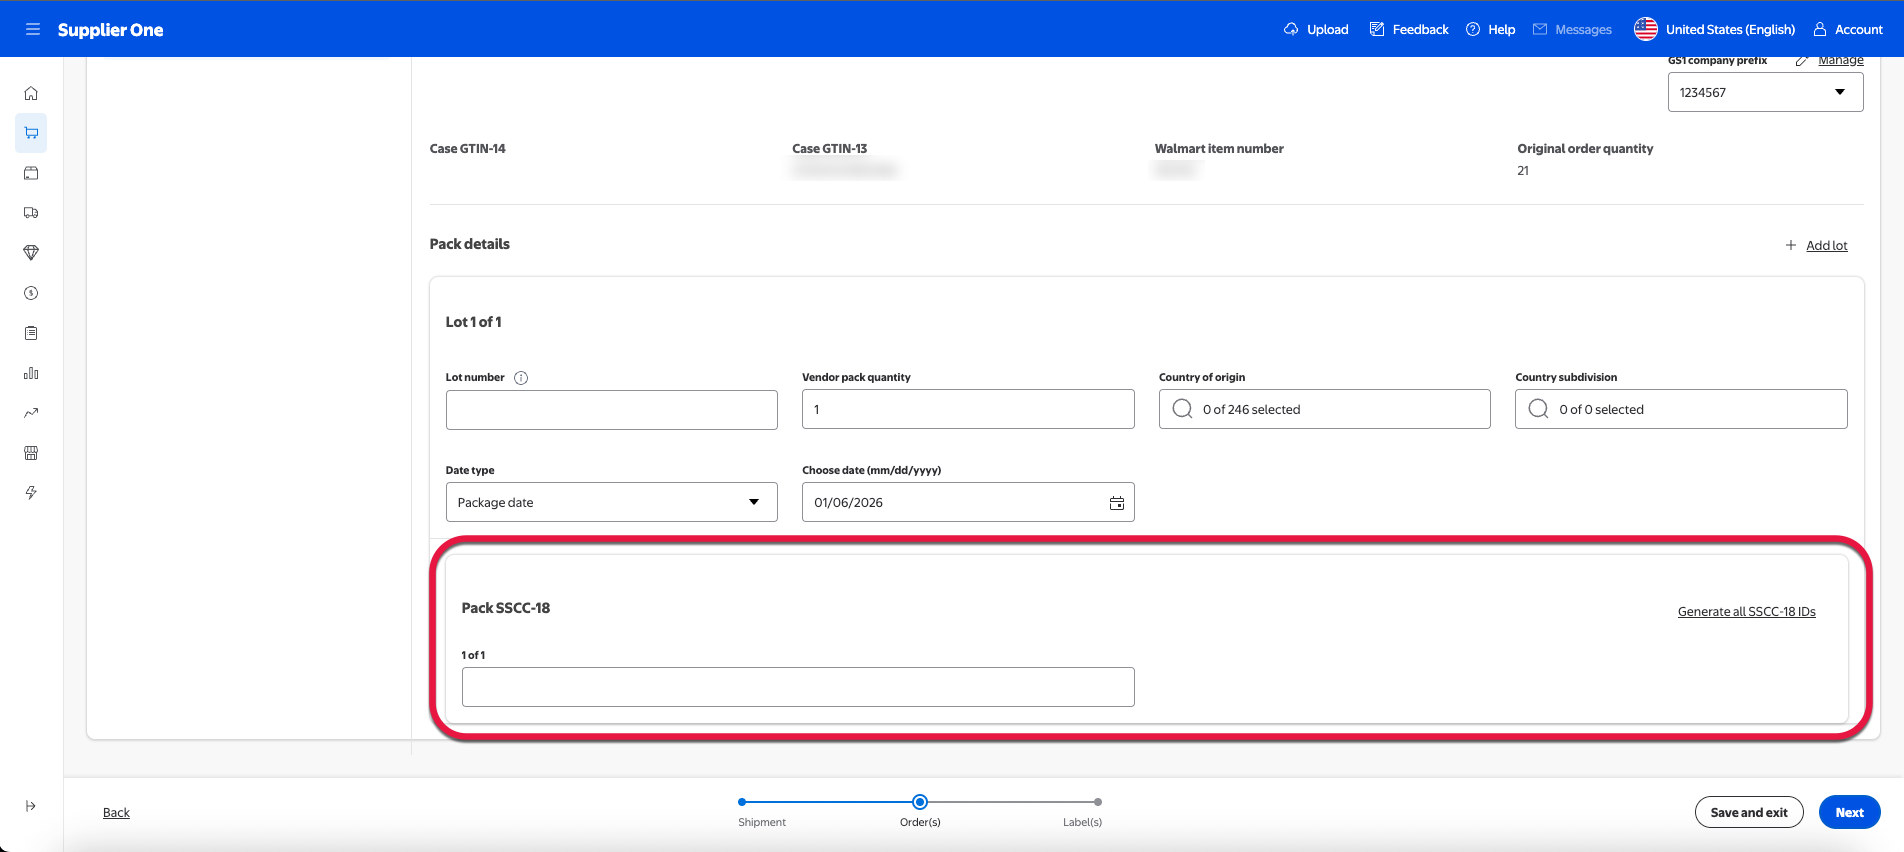
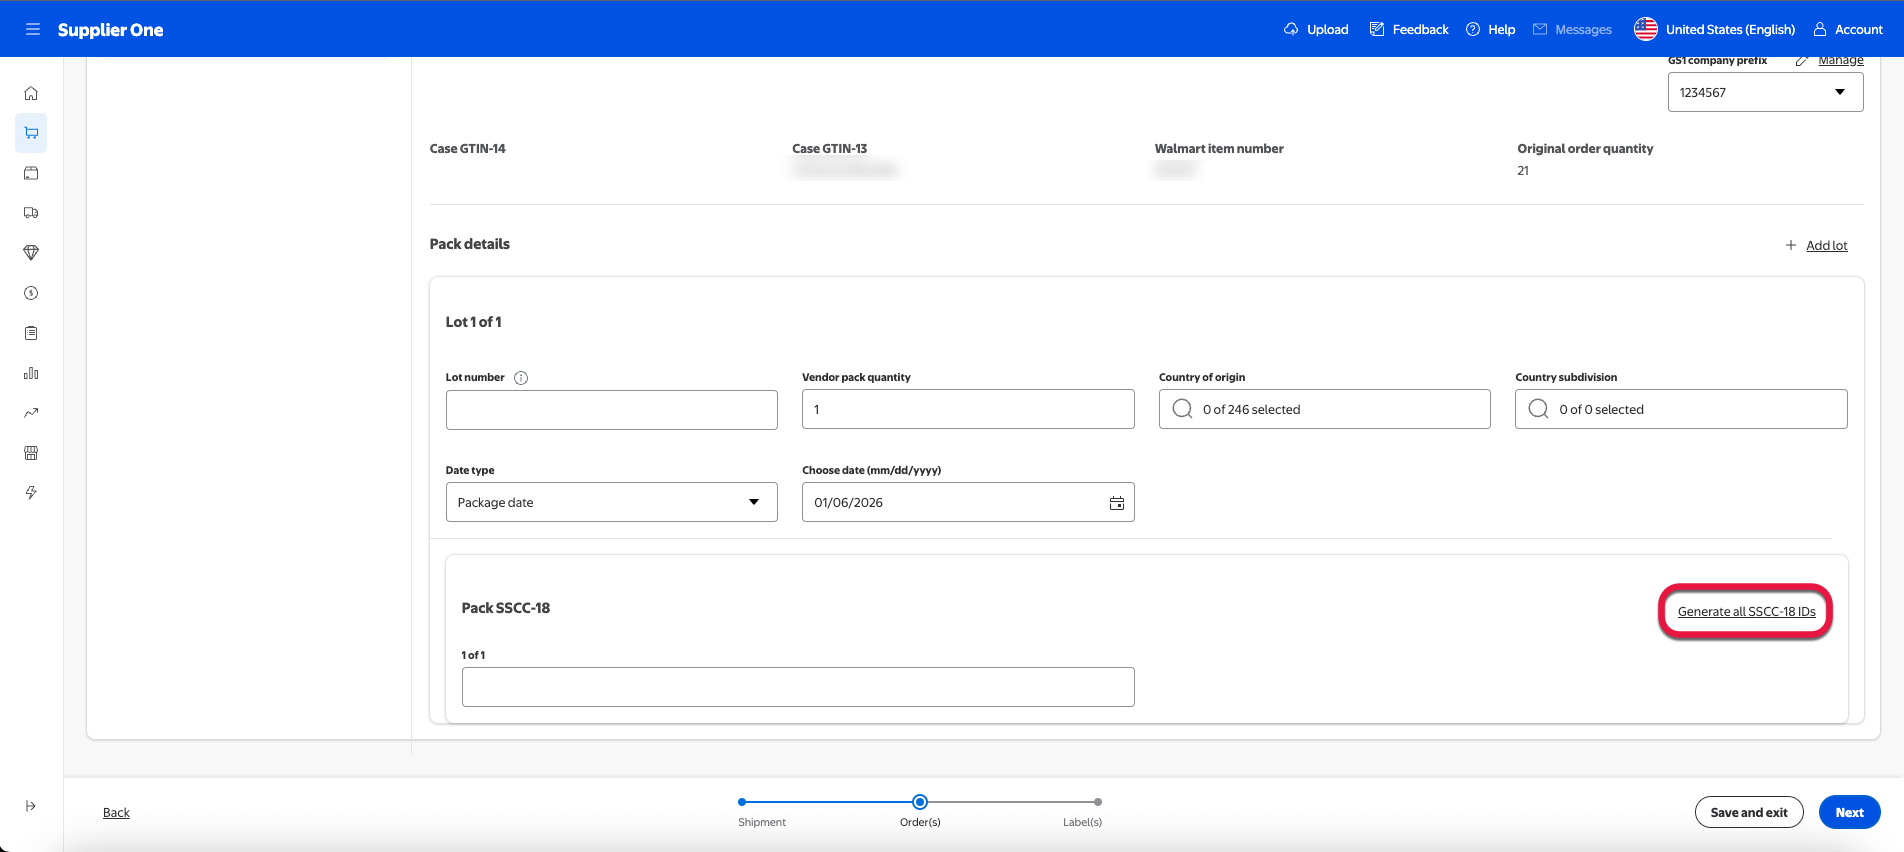
Fill out the Pack SSCC-18 field by manually entering the information.
For suppliers onboarded to the managed SSCC-18, you can select Generate all SSCC-18 IDs to auto populate an SSCC-18 code. For more information regarding managed SSCC-18 or if you’d like to learn how to enroll, refer to the SSCC-18 section of this guide.
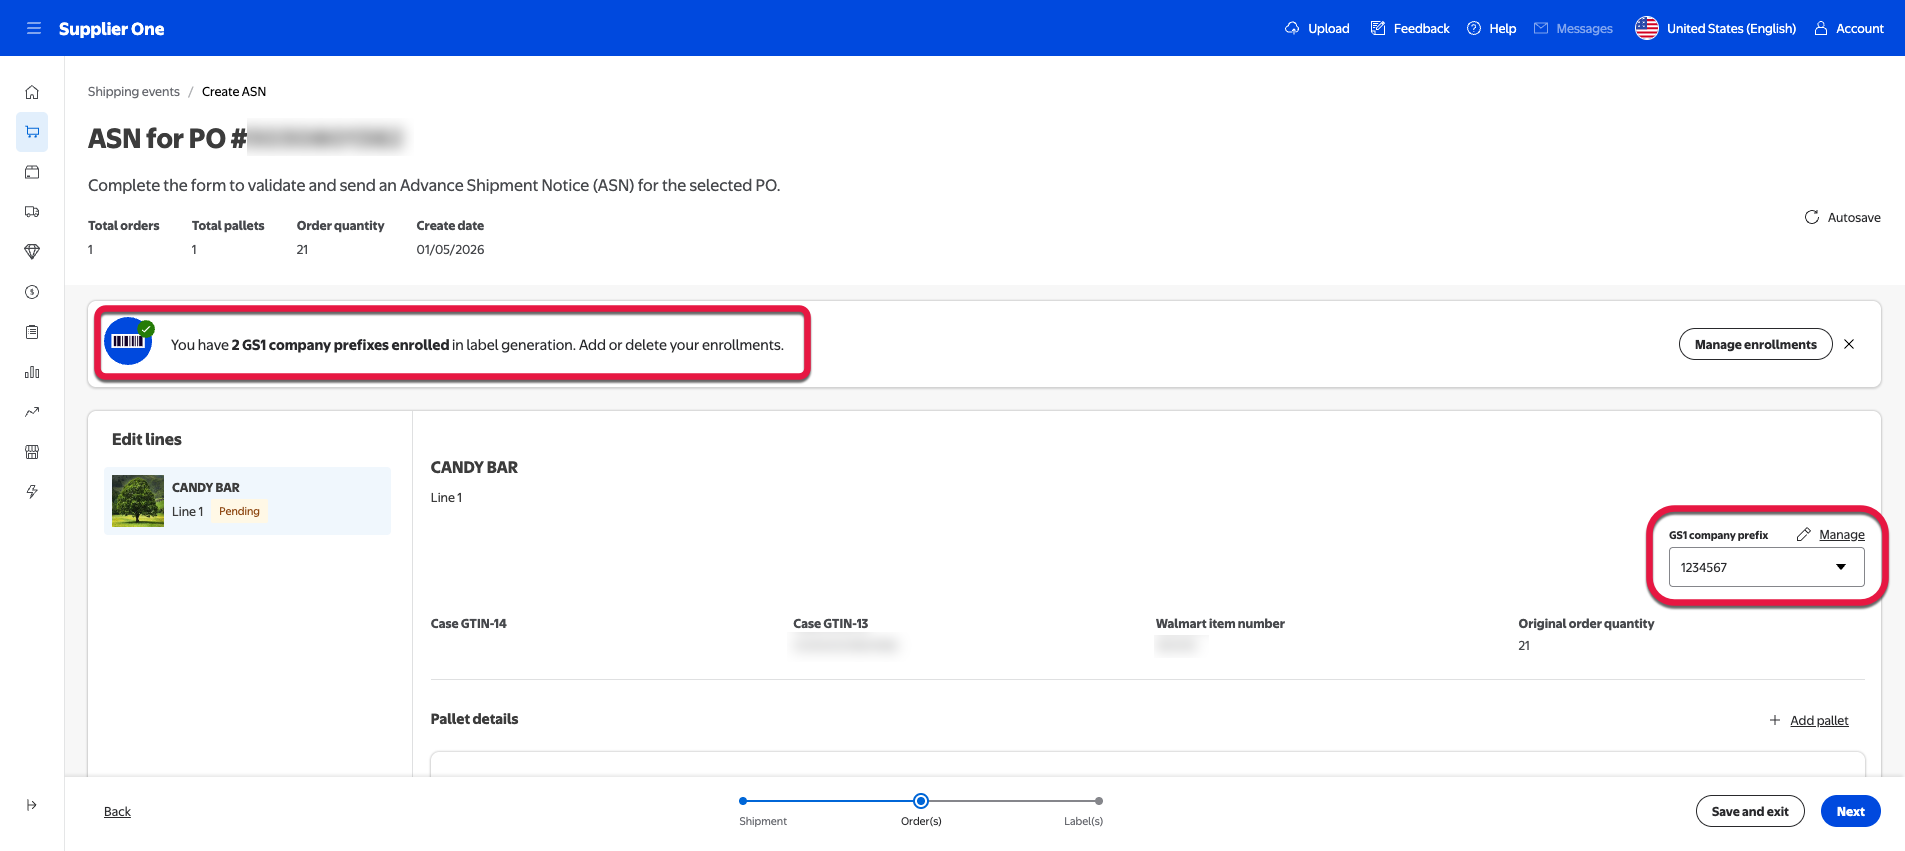
For suppliers with more than one company prefix, you can choose which company this item will belong to by selecting the company prefix from dropdown menu.
Select Next.
After selecting Next, your information will go through a validation process. To learn more about validation process, go to the Validation section of this guide.
You can select Save and exit to save your edits in the submission process.
Pallet
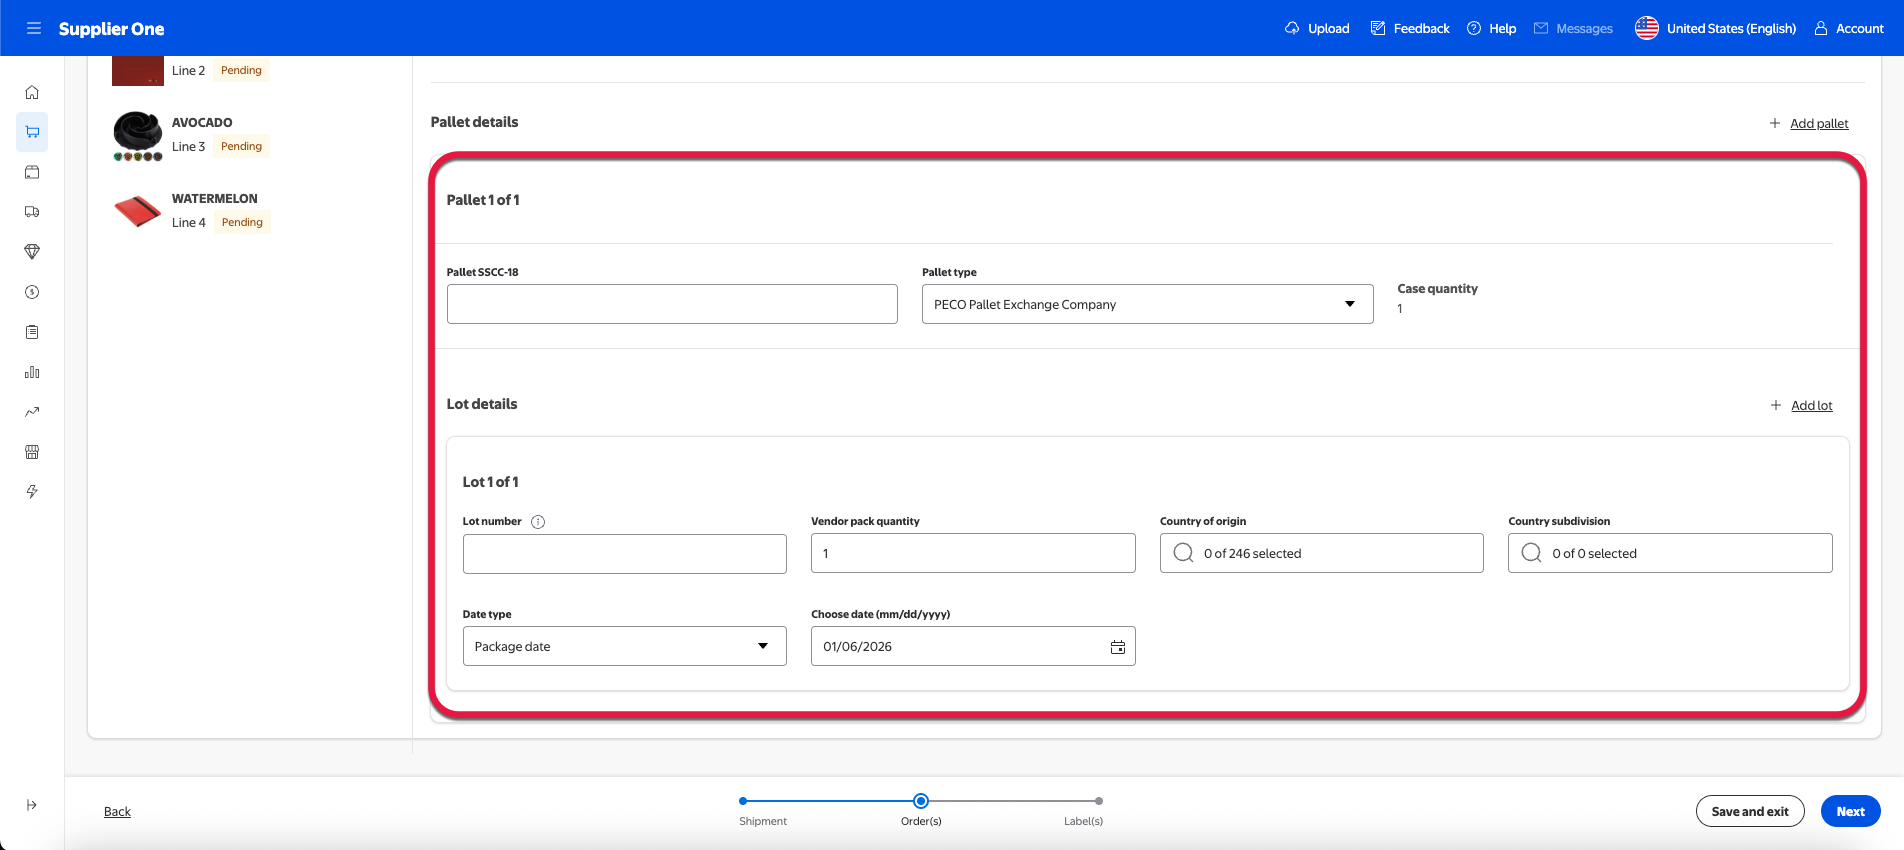
Pallet details section
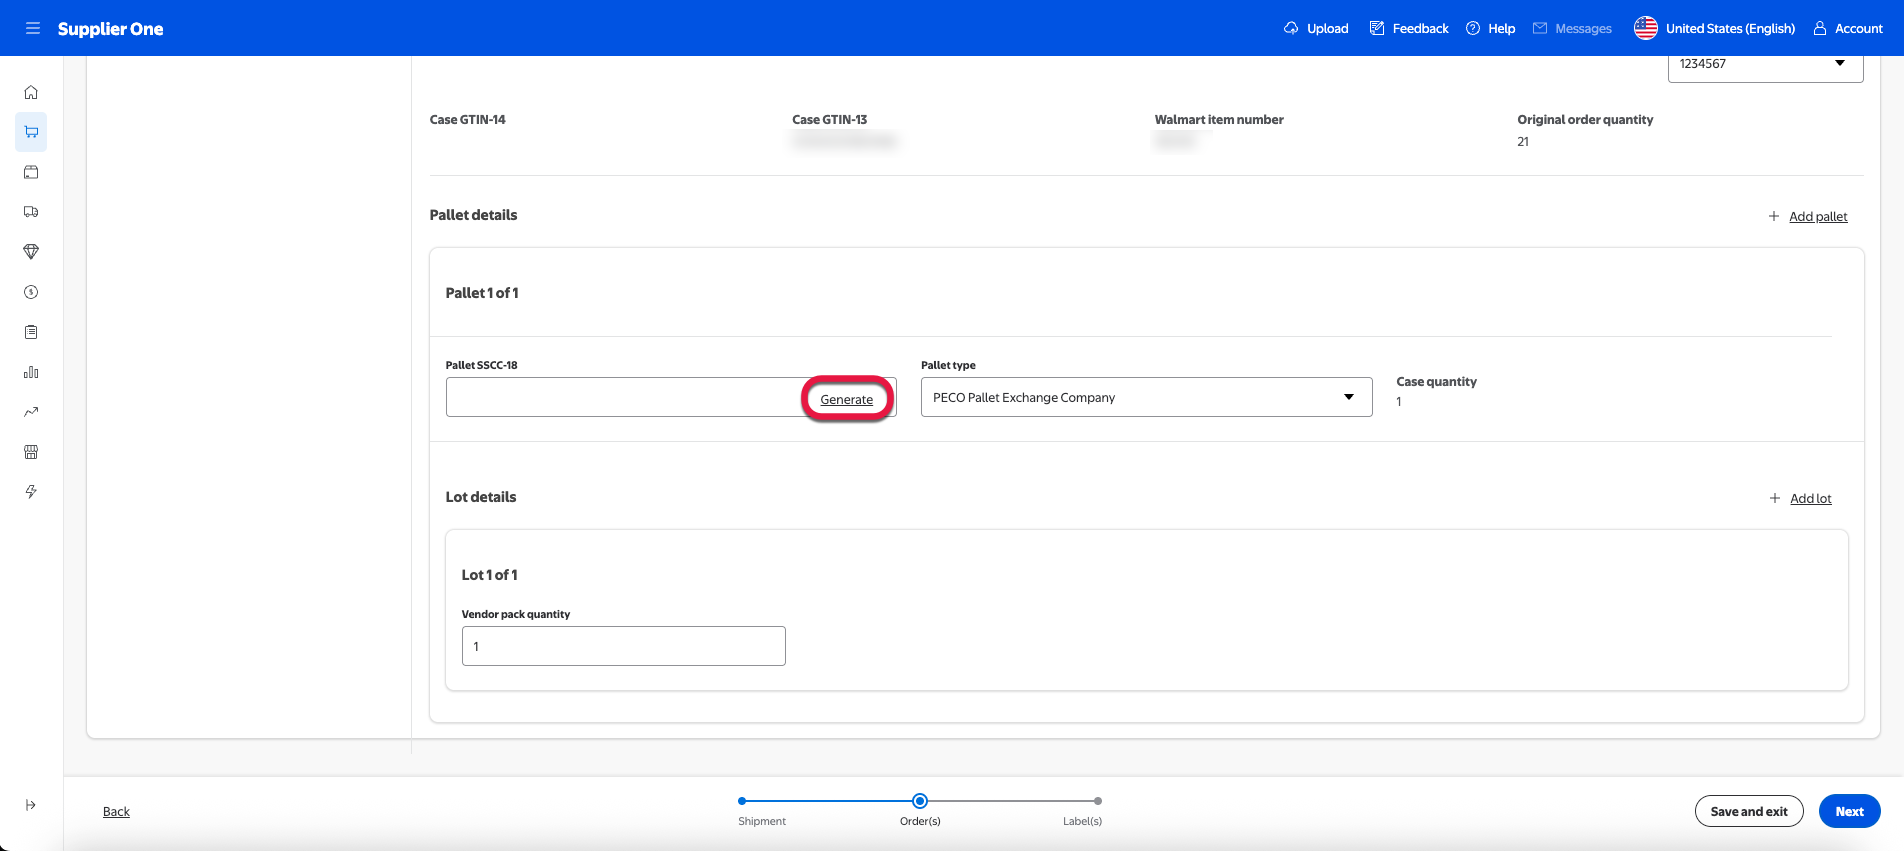
Fill out the Pallet SSCC-18 and corresponding Pallet type fields by manually entering the information.
For suppliers onboarded to the managed SSCC-18, you can select Generate in the Pallet SSCC-18 field to auto-populate an SSCC-18 code. For more information regarding managed SSCC-18 or if you’d like to learn how to enroll, refer to the SSCC-18 section of this guide.
Under Pallet type, select one of the approved pallet providers:
Commonwealth Handling Equipment Pool (CHEP)
iGPS Logisitics
PECO Pallet Exchange Company
White Wood General Exchange, non-rental pallet
For more information regarding approved pallet providers and pallet types, refer to the Pallet Standards section in Walmart’s Supply Chain Standards guide.
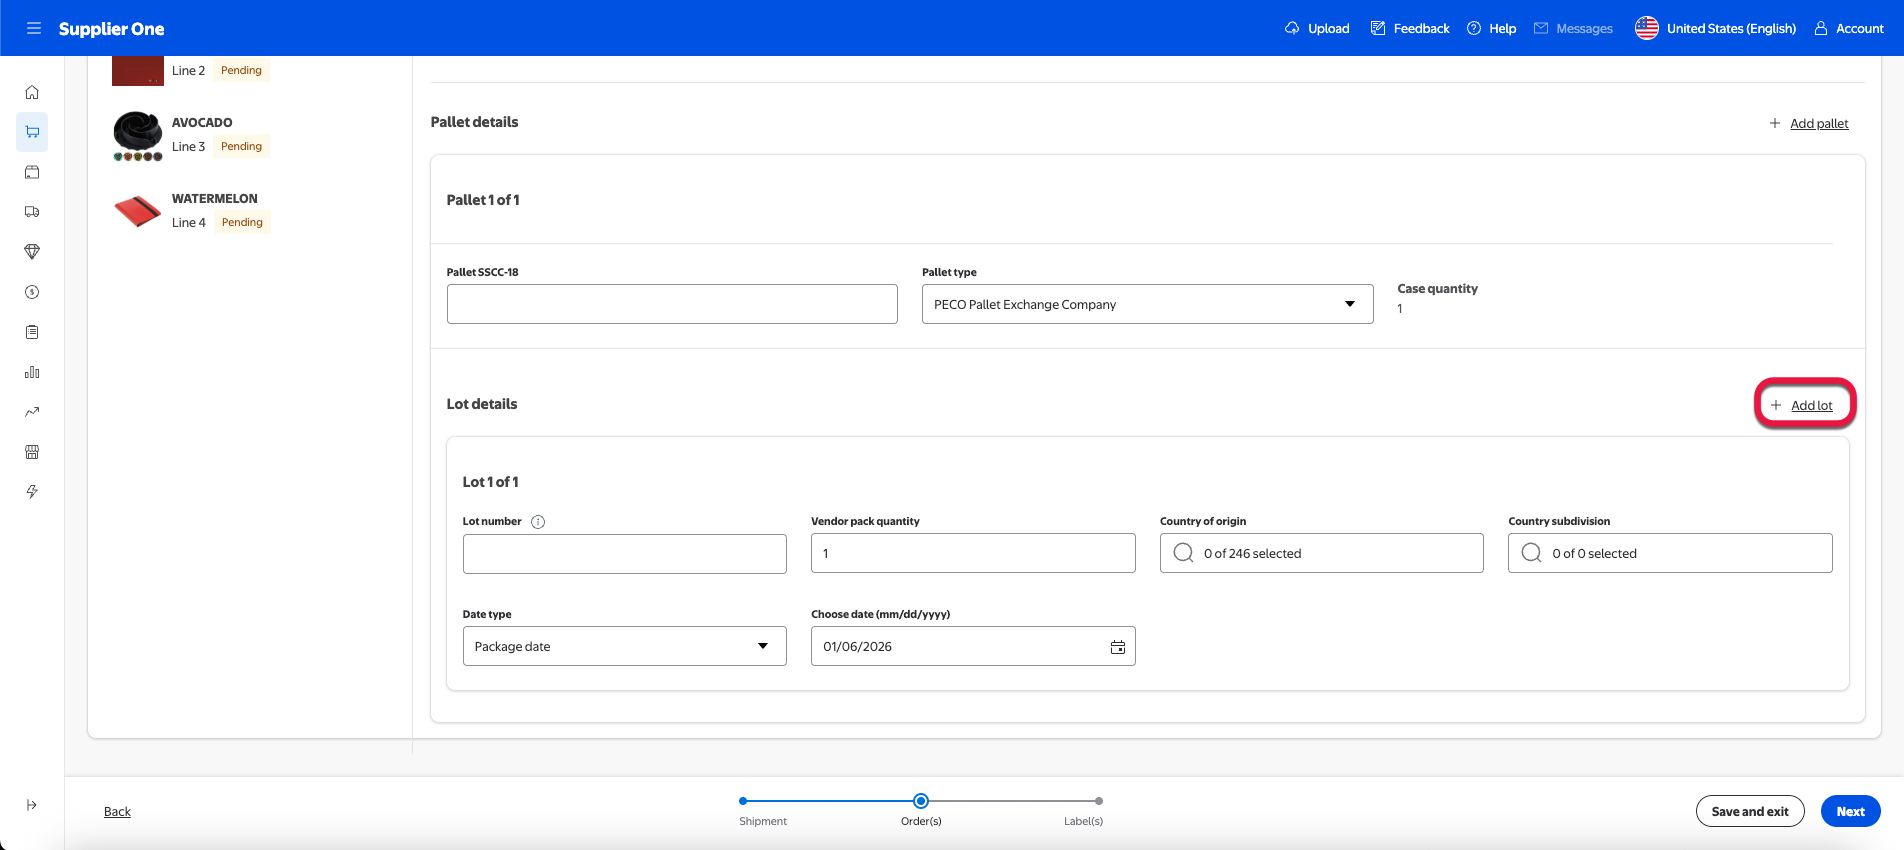
Depending on whether your submission contains a single pallet or multiple pallets, you’re able to adjust the pallet amount by pressing the Add pallet button on the upper-right corner of the Pallet details section.
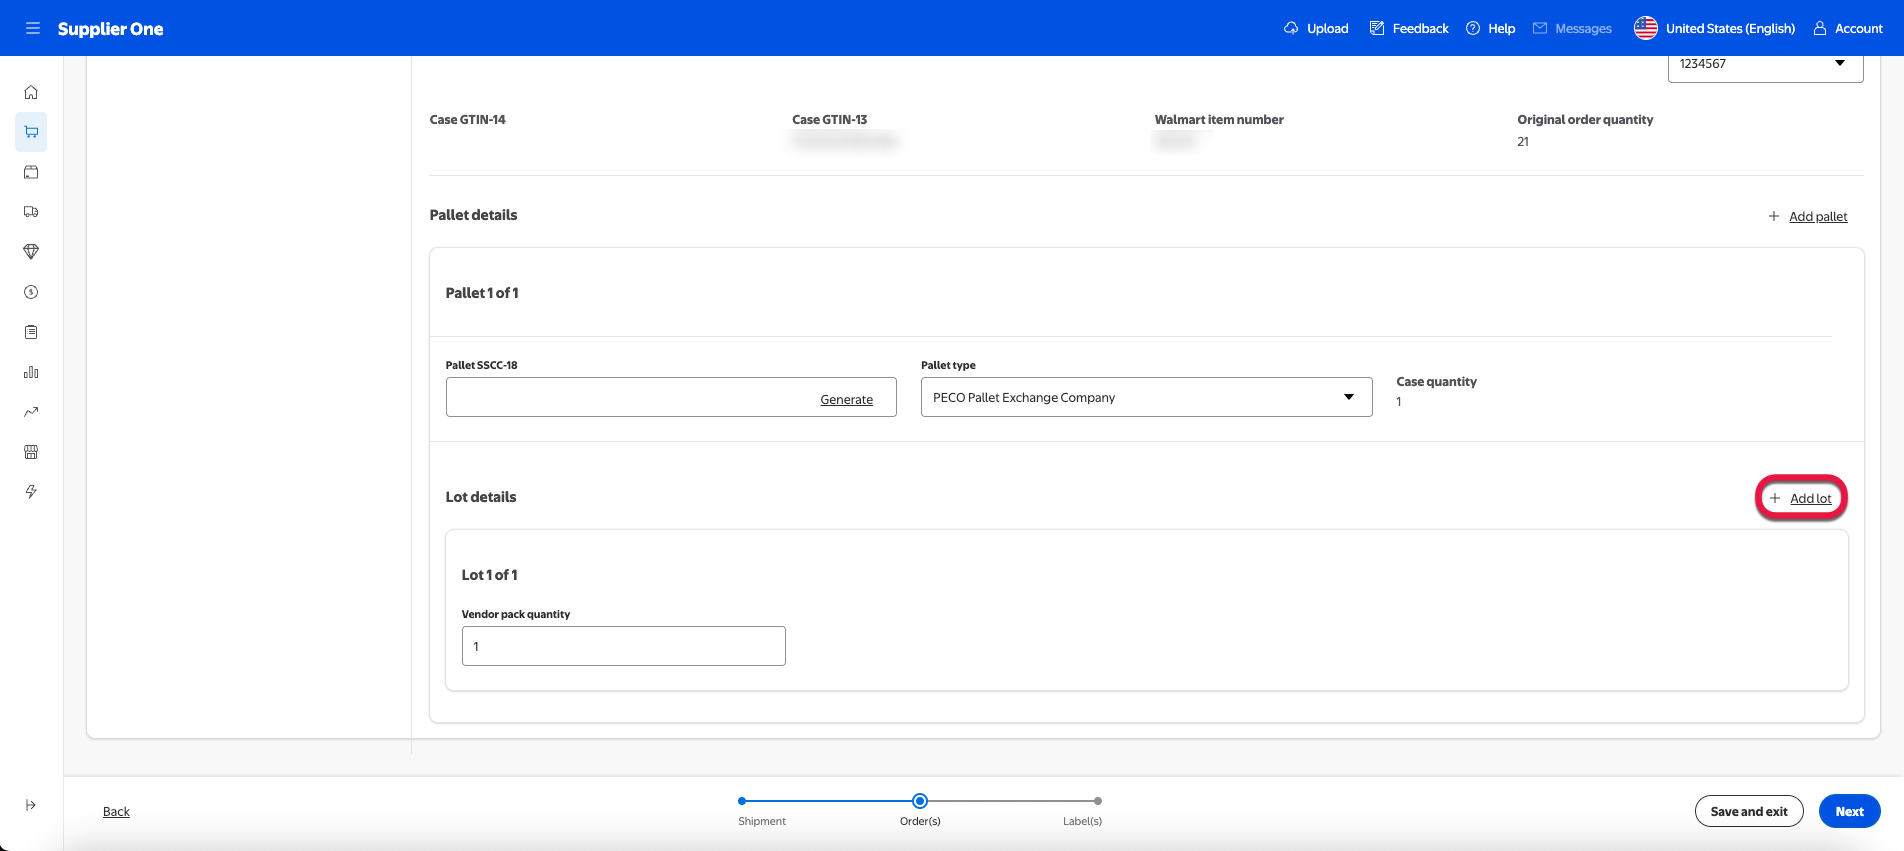
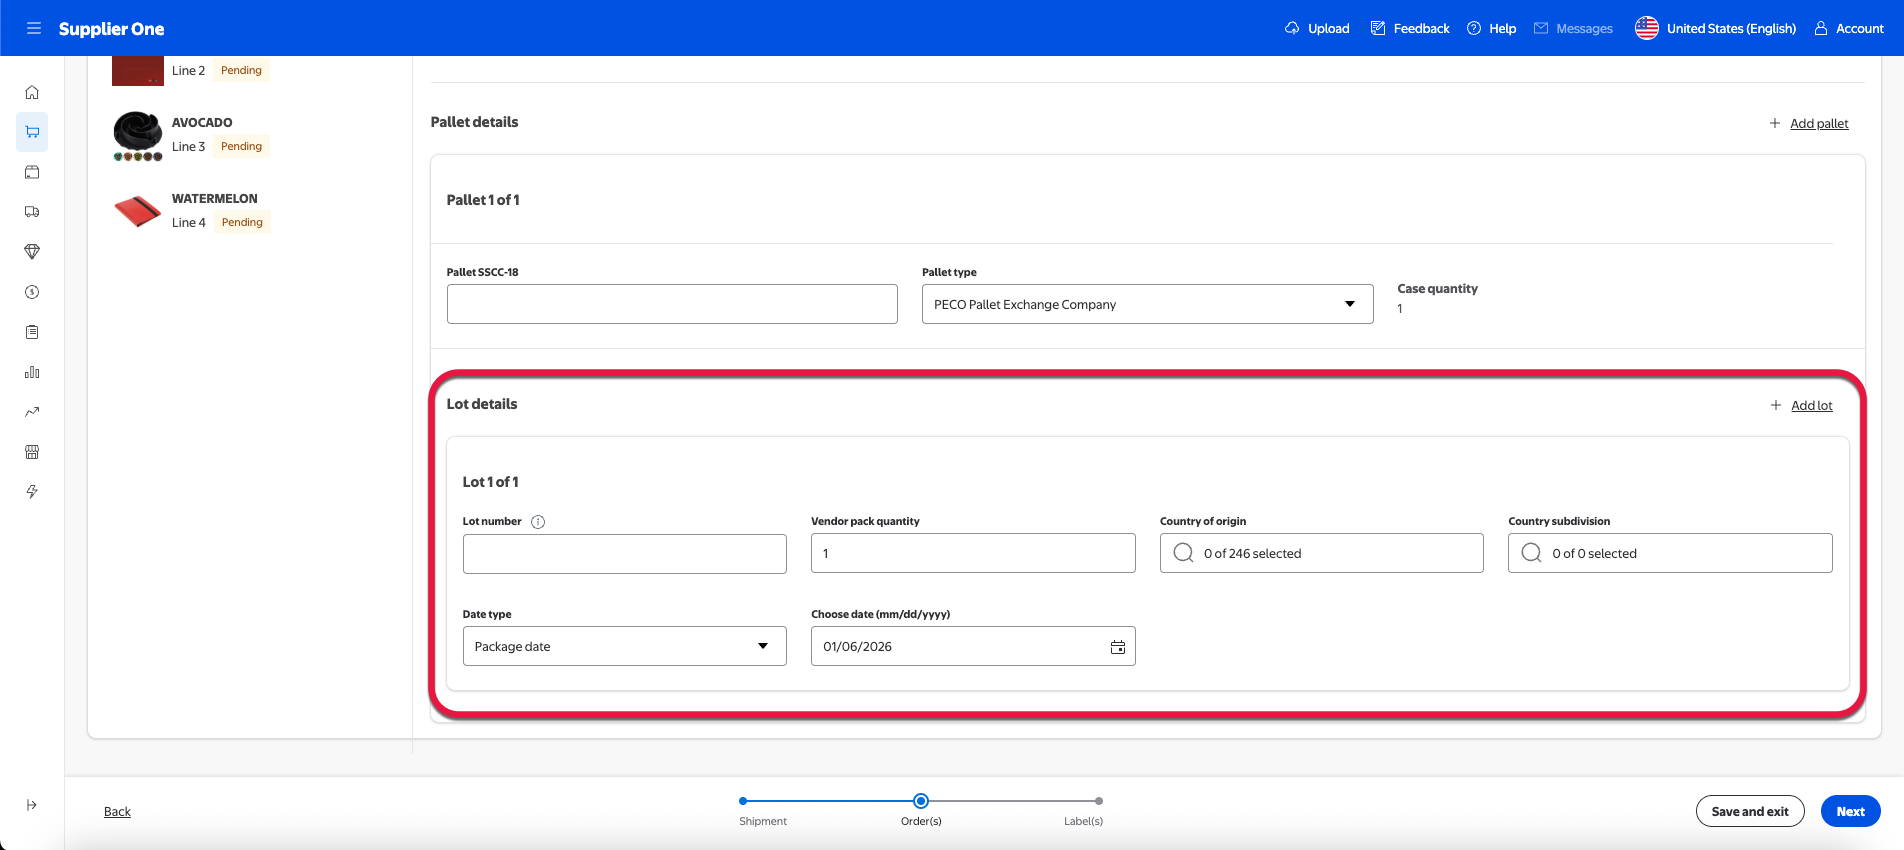
Lot details section
Located within Pallet details section, the Lot details section requires you to enter lot-specific information concerning your shipment.
The table below outlines the fields and their corresponding definitions.
* = Only appears for POs with FSMA-eligible items.
Field
Definition
Lot number
This is the code/number used to uniquely identify a traceability lot and is often assigned when the food is initially packed. This should match the case label Application Identifier (AI) of Batch or Lot (10).
Vendor pack quantity
Specify the amount of the lot. Could also be described as cases.
Country of origin
Specify the country from which the lot comes from.
Date type
Specify the date, either the production date, or expiration or best by date.
Choose date
Specify the corresponding date the lot is being shipped.
Traceability Lot Code (TLC) Source*
TLC Source (or the manufacturing plant) is the physical location where the lot code was assigned. Specify the reference location for this lot to be recognized by selecting one of the four identifiers below:
Global Location Number (GLN): A globally unique 13-digit number developed and maintained by GS1 that serves as an identifier for any entity involved in business transactions. This number must be made accessible to Walmart as a trading partner.
URL: A link to a website or webpage. This must be accessible to FDA.
FDA Facility Registration Number: A unique identifier assigned by the U.S. Food and Drug Administration (FDA) to facilities that manufacture, process, pack, or hold food, drugs, or medical devices intended for consumption or use in the United States. This number must be accessible to the FDA.
The business name, phone number, physical location address, and the city, state, and zip code for domestic locations. For foreign location, include any comparable information, as well as the country.
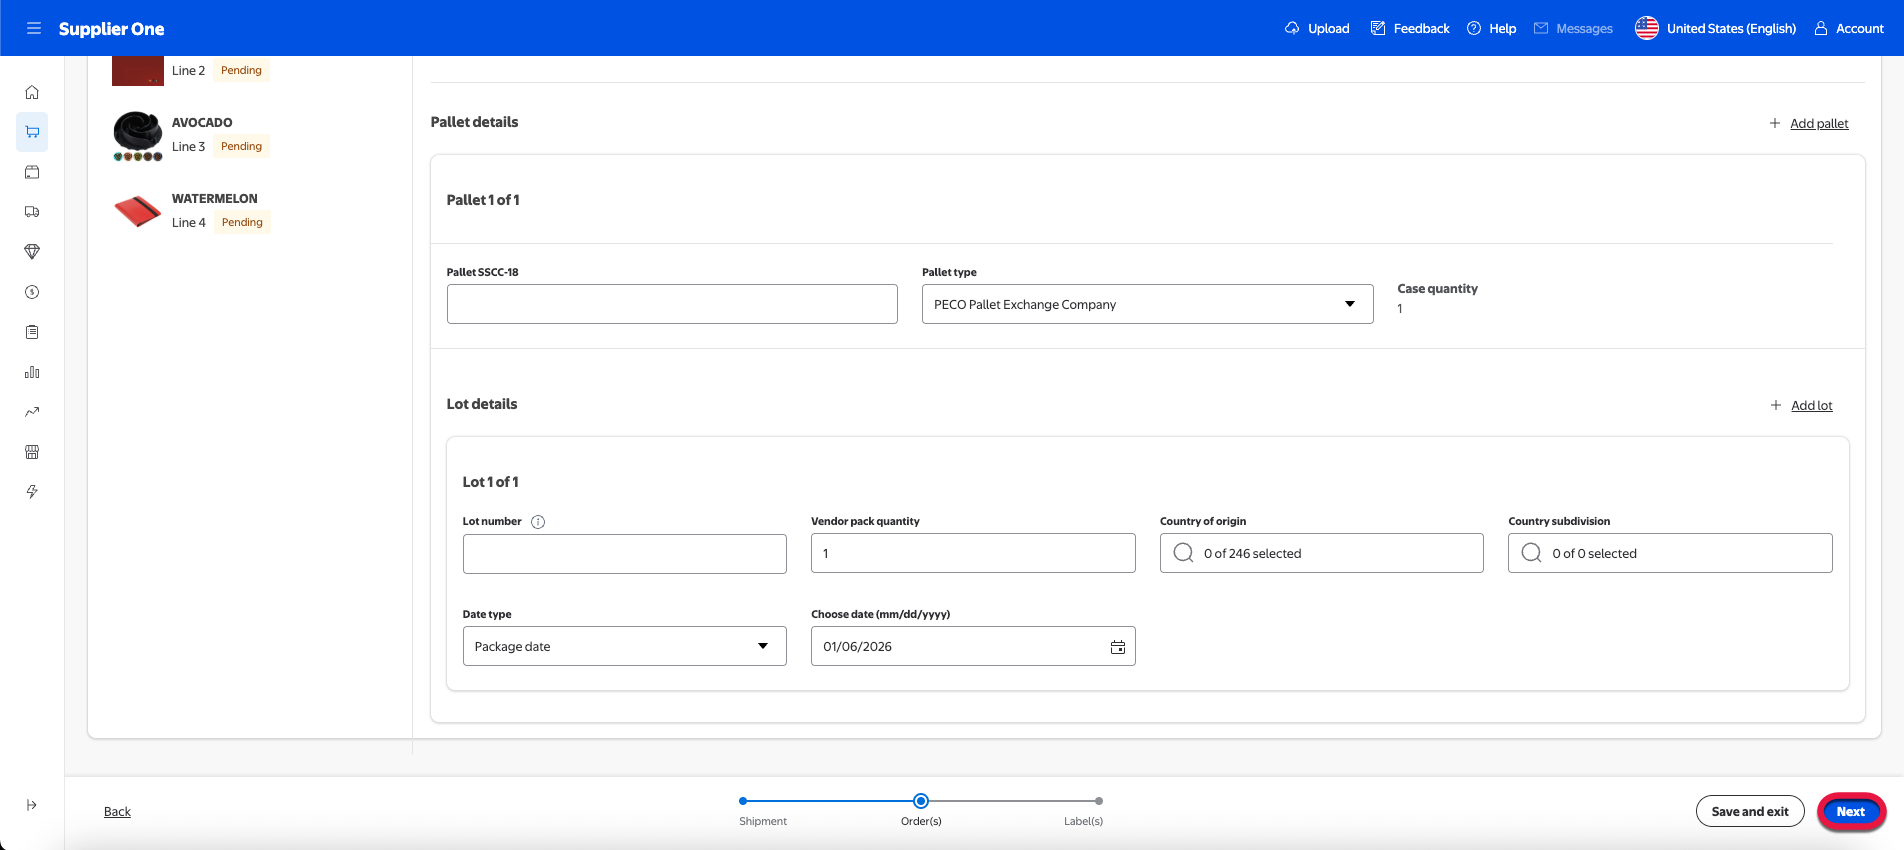
Fill out the editable fields. Make sure the information you’re entering is valid.
Depending on whether your submission is for a single lot or multiple lots, you’re able to adjust the lot amount by pressing the Add lot button on the upper-right corner of the Lot details section. If your ASN consists of multiple lots, please add all unique lot codes within the pallet.
Select Next.
After selecting Next, your information will go through a validation process. To learn more about validation process, go to the Validation section.
You can select Save and exit to save your edits in the submission process.
SSCC-18
A Serialized Shipping Container Code (SSCC-18) is an 18-digit code used to identify shipping containers. As part of Walmart ASN process, suppliers can enroll in managed SSCC-18 label generation to auto-create GS1-compliant pallet labels. This process is especially helpful for suppliers that don’t have an internal capability to create labels for their shipments.
Enrolling in Walmart’s managed SSCC-18 label generation is a simple but necessary process if a supplier wishes to streamline the Create ASN process.
How to enroll in managed SSCC-18
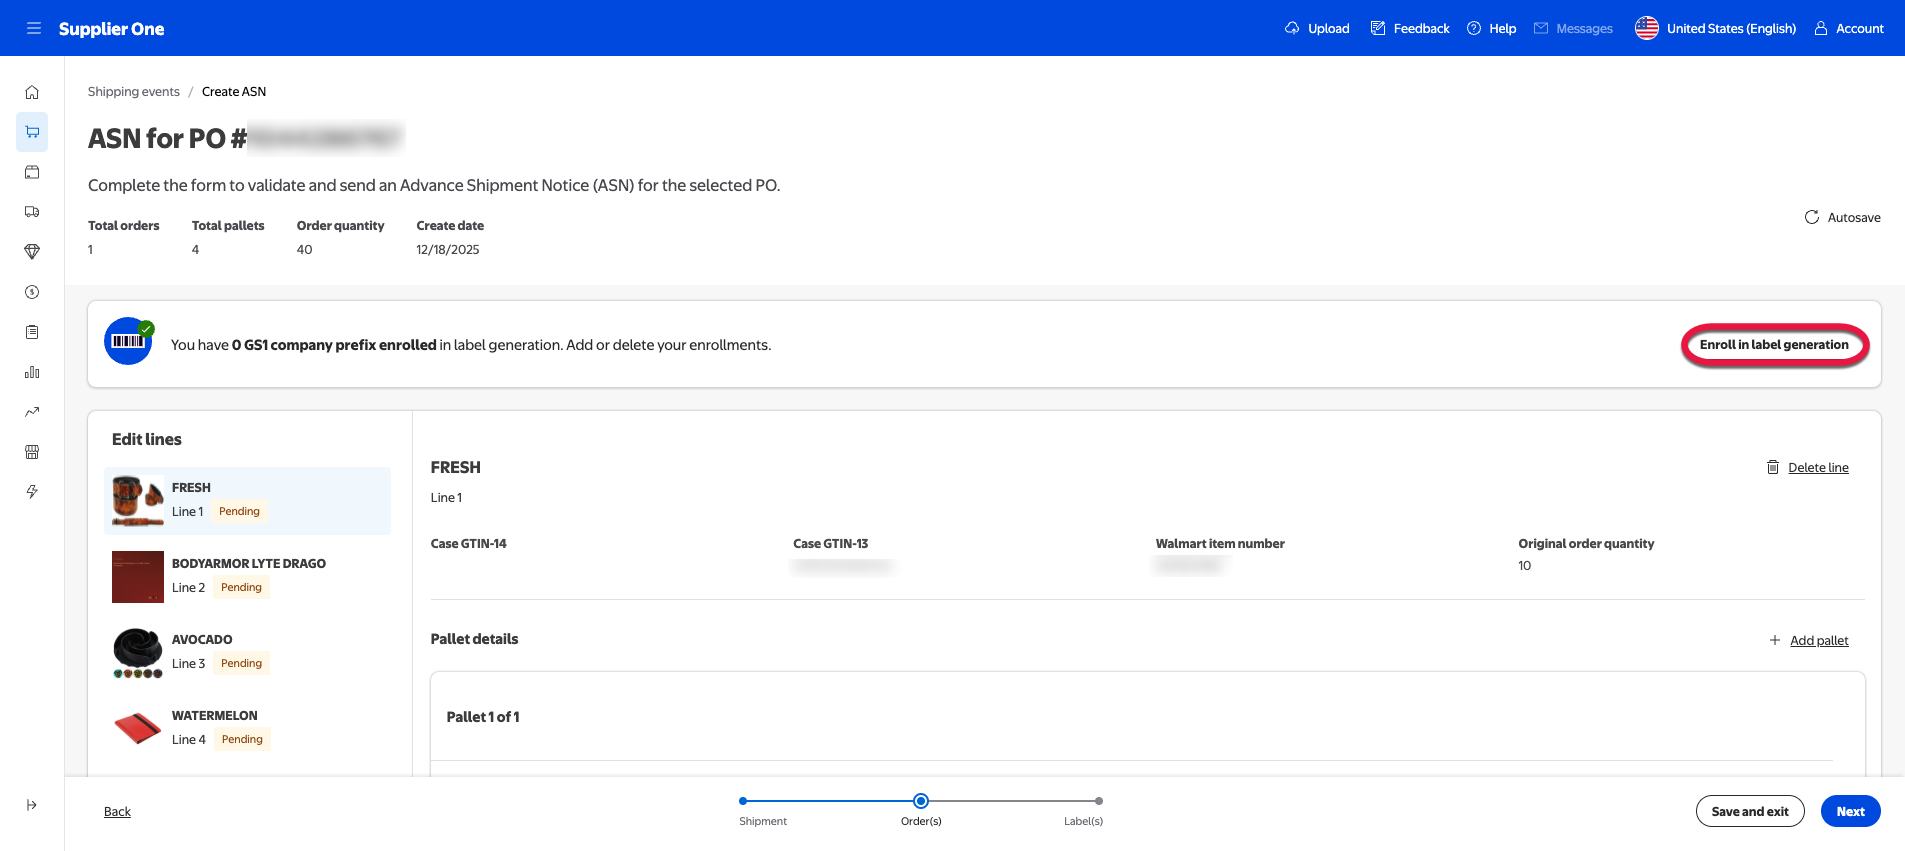
Navigate to the banner regarding GS1-compliant pallet labels at the top of the ASN for PO screen.
Select Enroll in label generation.
Fill out the editable fields in the popup that appears.
Use the image above the fields and the tooltips next to the field titles to guide you through the process. If you need further assistance, submit a support ticket on Supplier One.
Once all the information is entered (and no error messages appear under any of the fields), select Enroll.
You’ll only need to enter information for three of the six attributes (Extension digit, GS1 company prefix (GSC), and Serial reference). The Application identifier attribute will always be “00”, while the GSC or serial reference based on GSC length attribute is automatically incremented and the Check digit attribute is automatically calculated after enrolling.
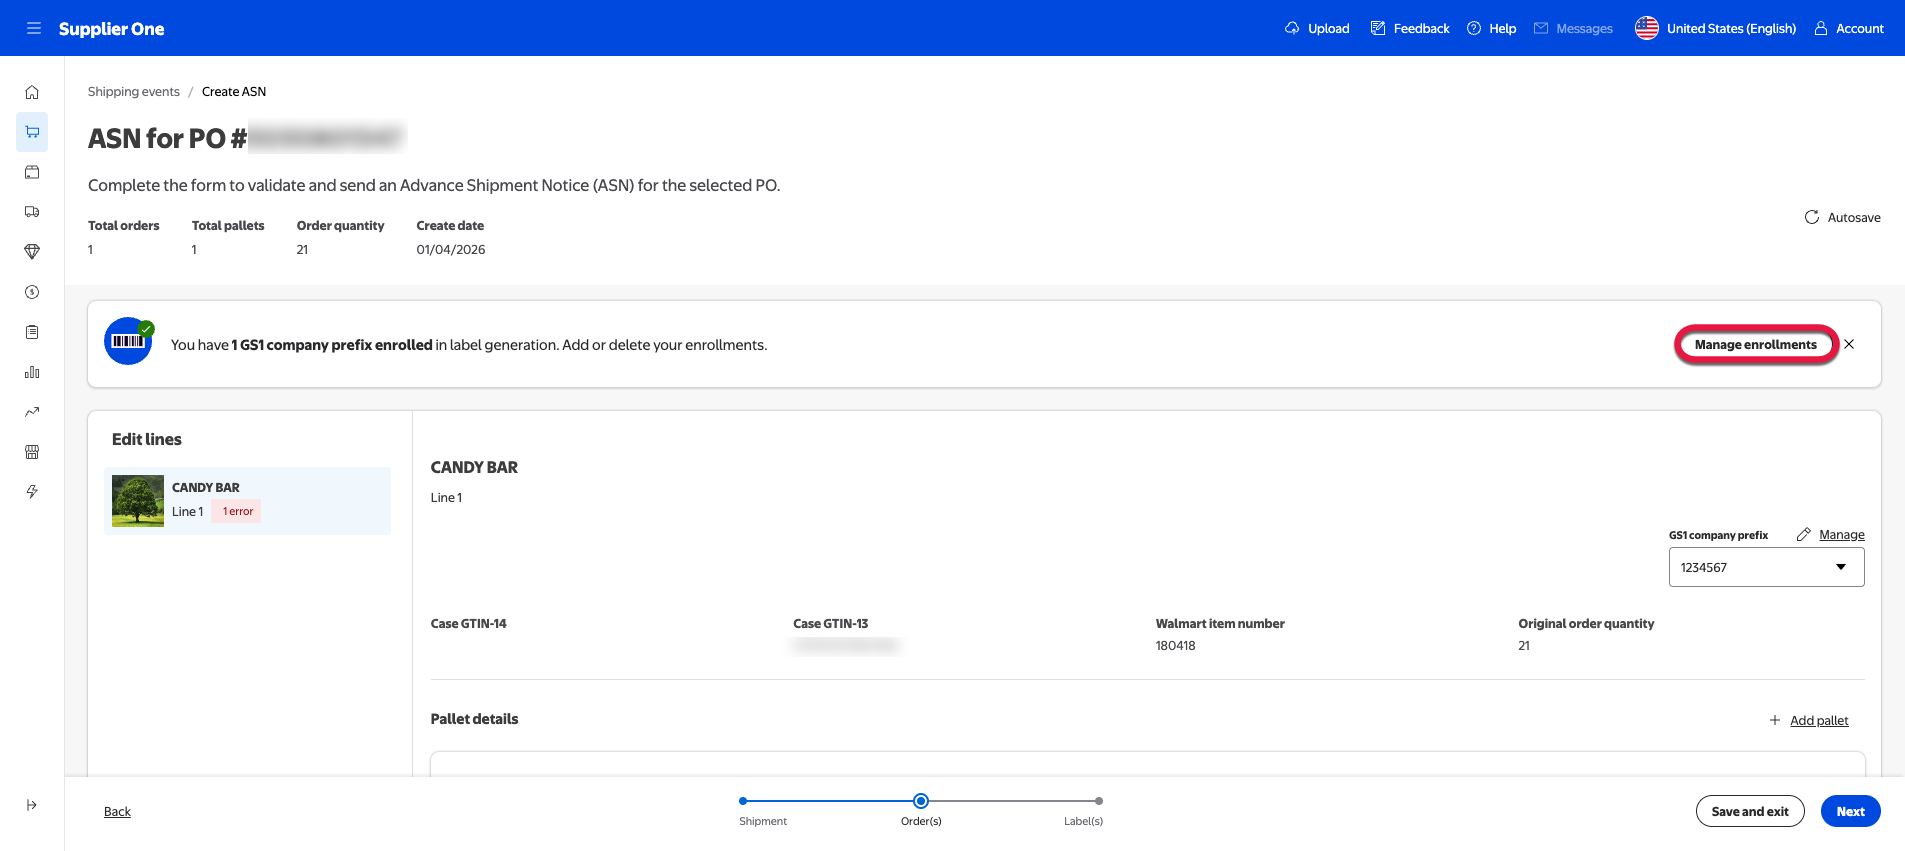
The page will refresh and return you to the ASN for PO page. If the enrollment process was successful, the banner will show how many company prefixes are enrolled.
To view and manage your enrolled GS1 company prefixes, select Manage enrollments.
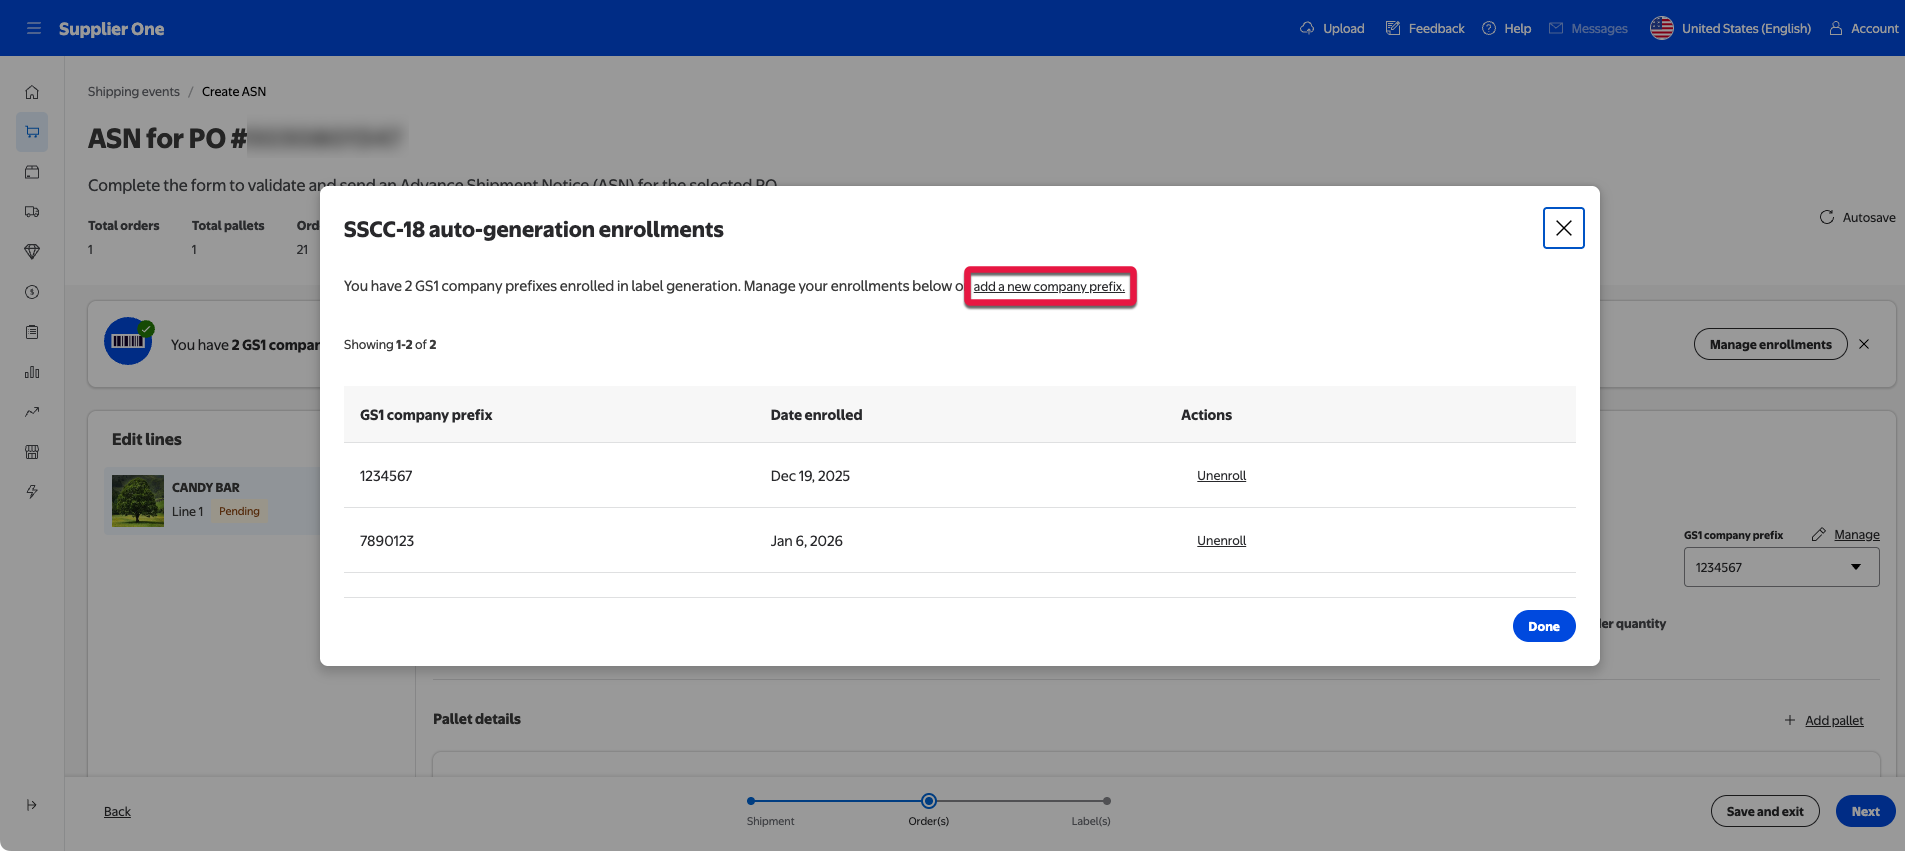
A popup will appear listing the GS1 company prefix(es) enrolled for label auto-generation, the date they were enrolled, and the ability to unenroll the company prefix.
You can also choose to add another company prefix by selecting add a new company prefix linked above the table.
Unenrolling in managed SSCC-18
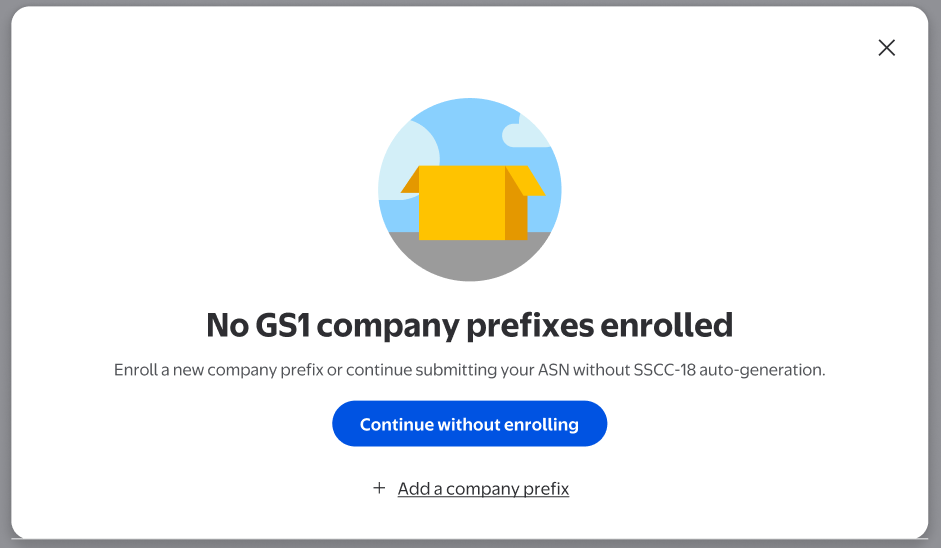
If you select Unenroll, a message will appear informing you that there are no GS1 company prefixes enrolled.
Select Continue without enrolling to continue the Create ASN process without enrolling in SSCC-18 auto-generation.
Select Add a company prefix to enroll in SSCC-18 auto generation. You’ll need to complete the process listed out in the How to enroll in managed SSCC-18 section of this guide.
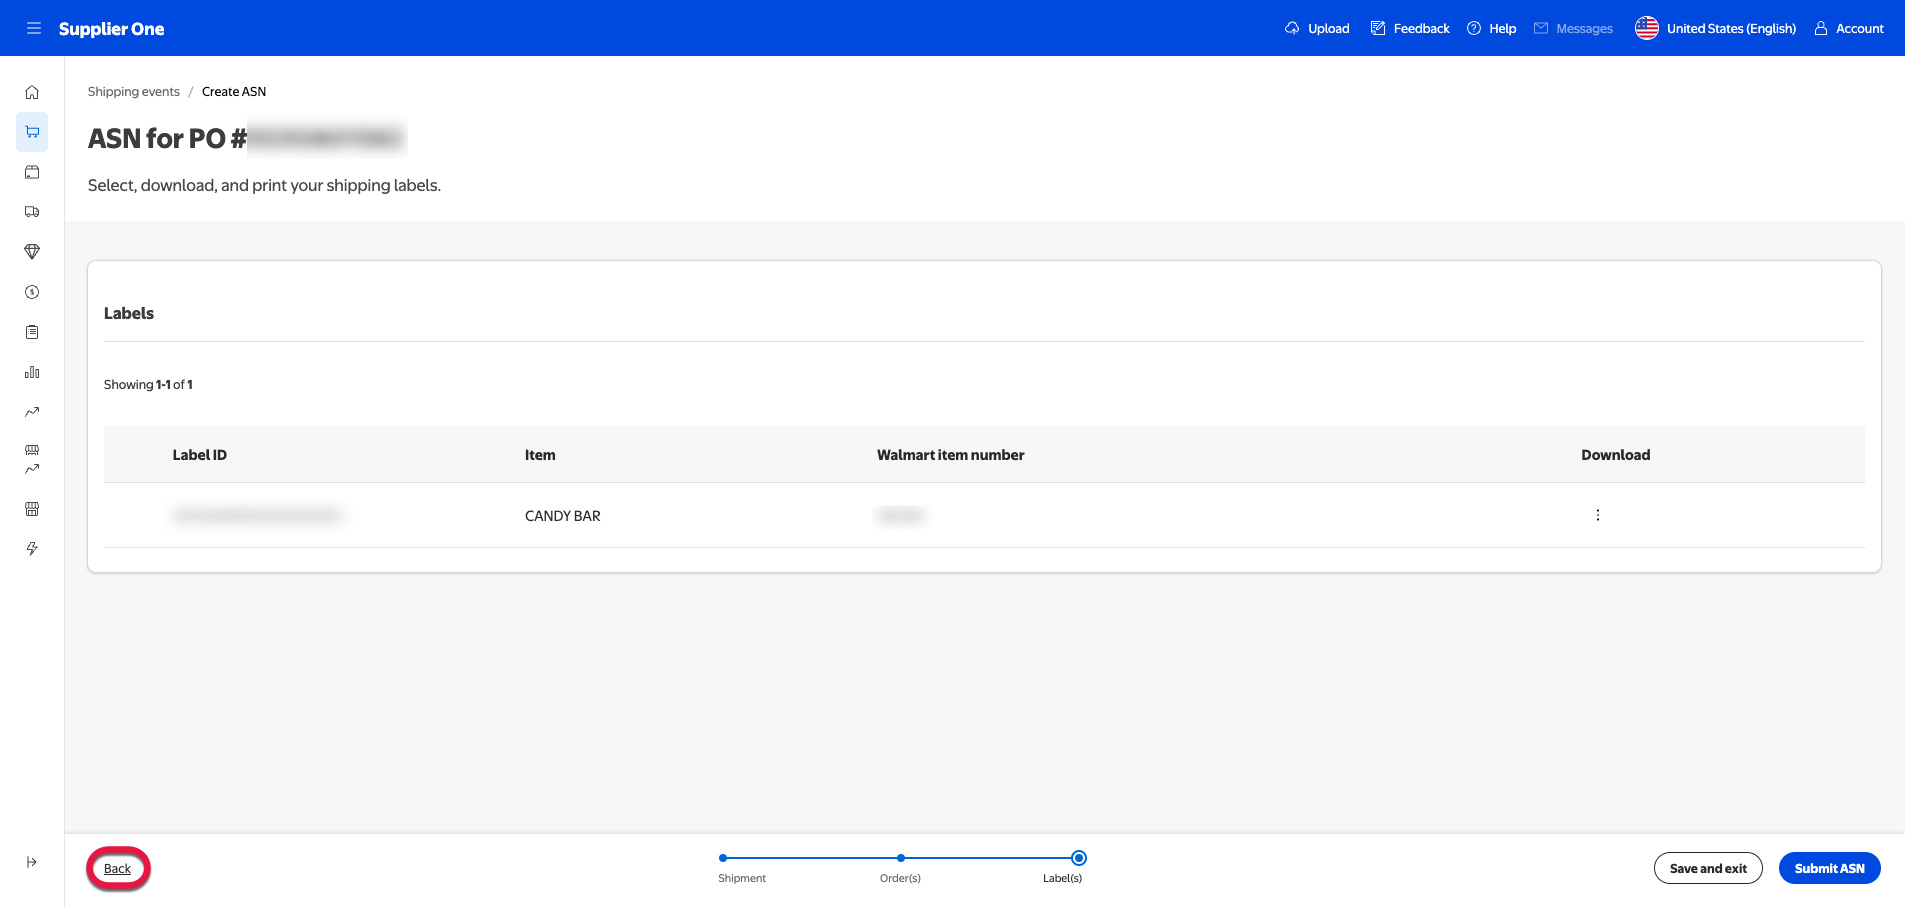
ASN labels page
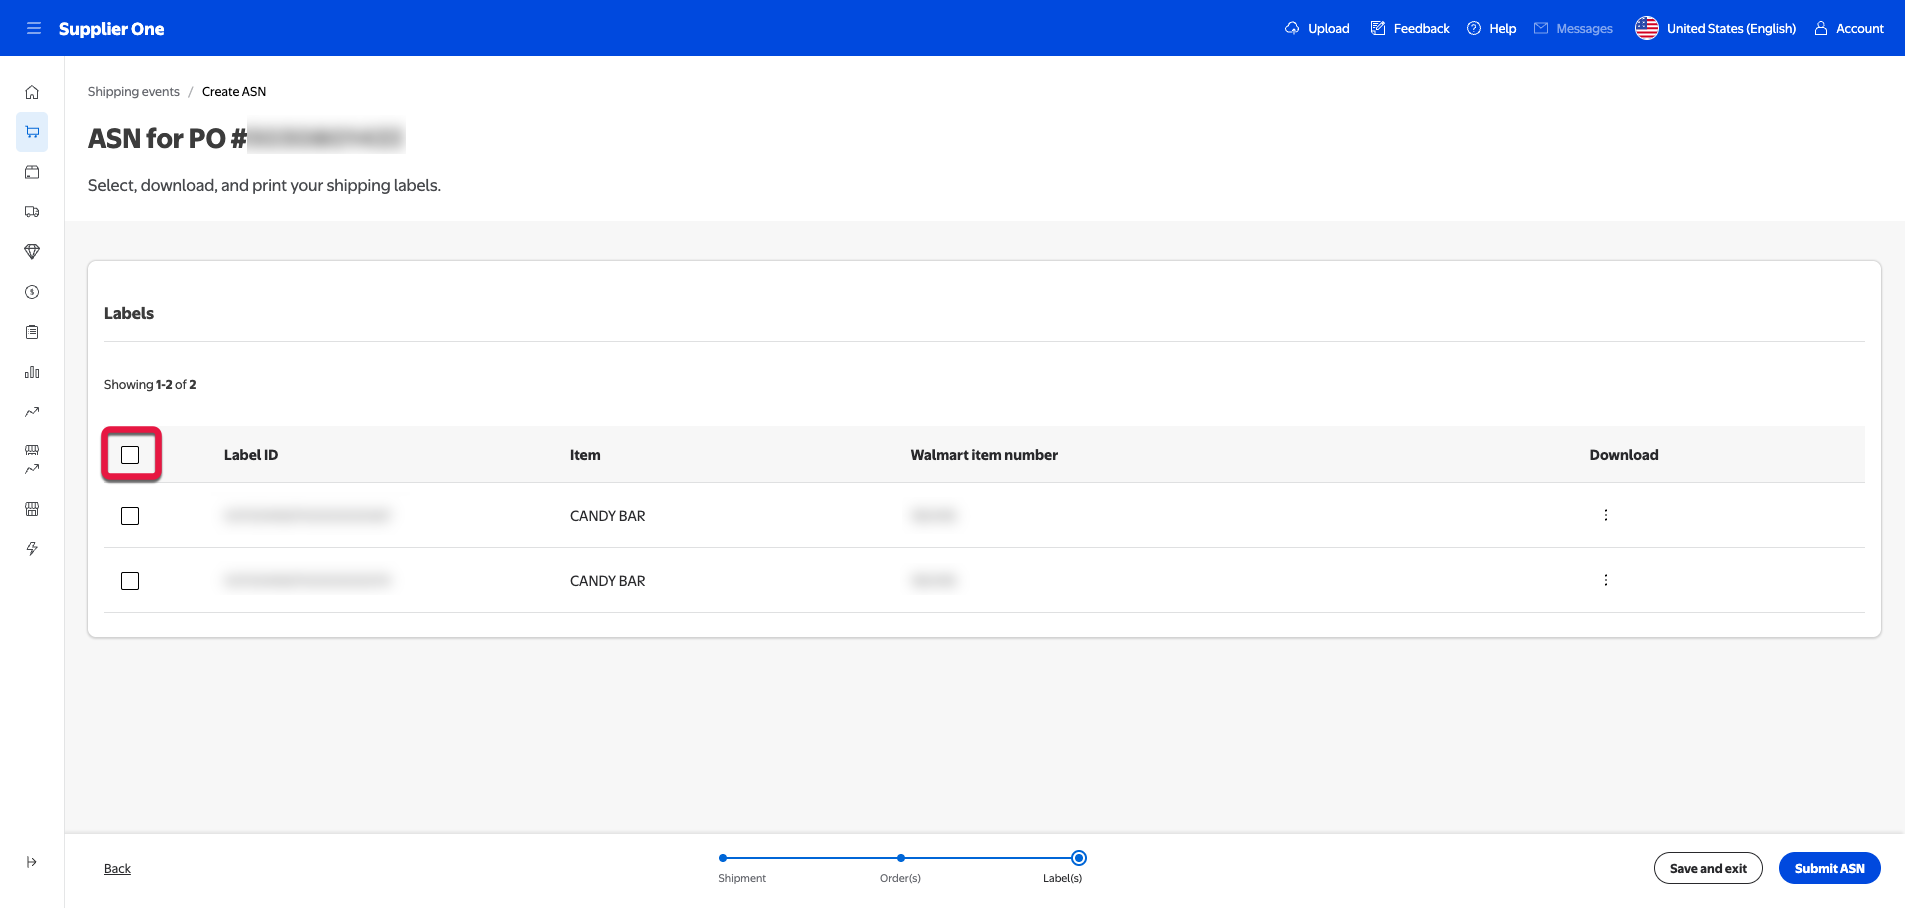
Once validation is complete, you’ll arrive at the Labels page. Here, you’re able to select, download, and print your shipping labels.
Your labels are organized by Label ID, each ID summarized by the items (called Line items) in each label. These are the labels that were created in the previous step. To make changes, select the Back button and review the information you’ve submitted.
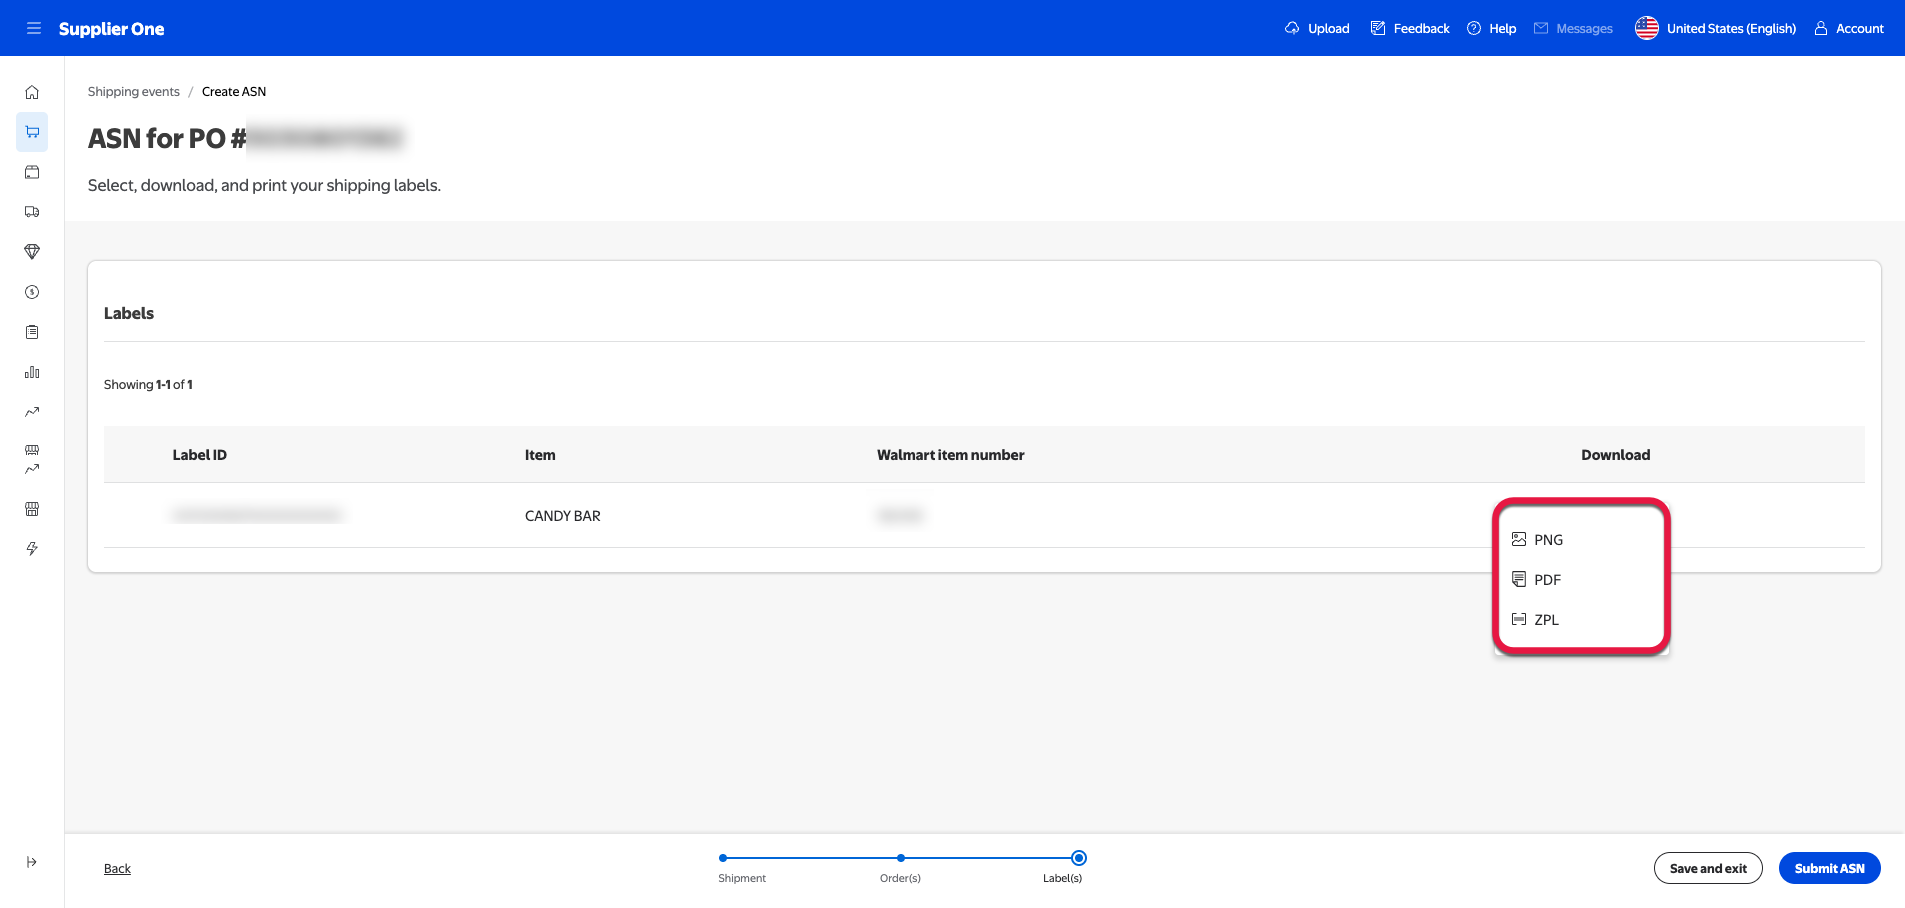
If all the information in the Line item column is correct, you can complete one or more of the following steps:
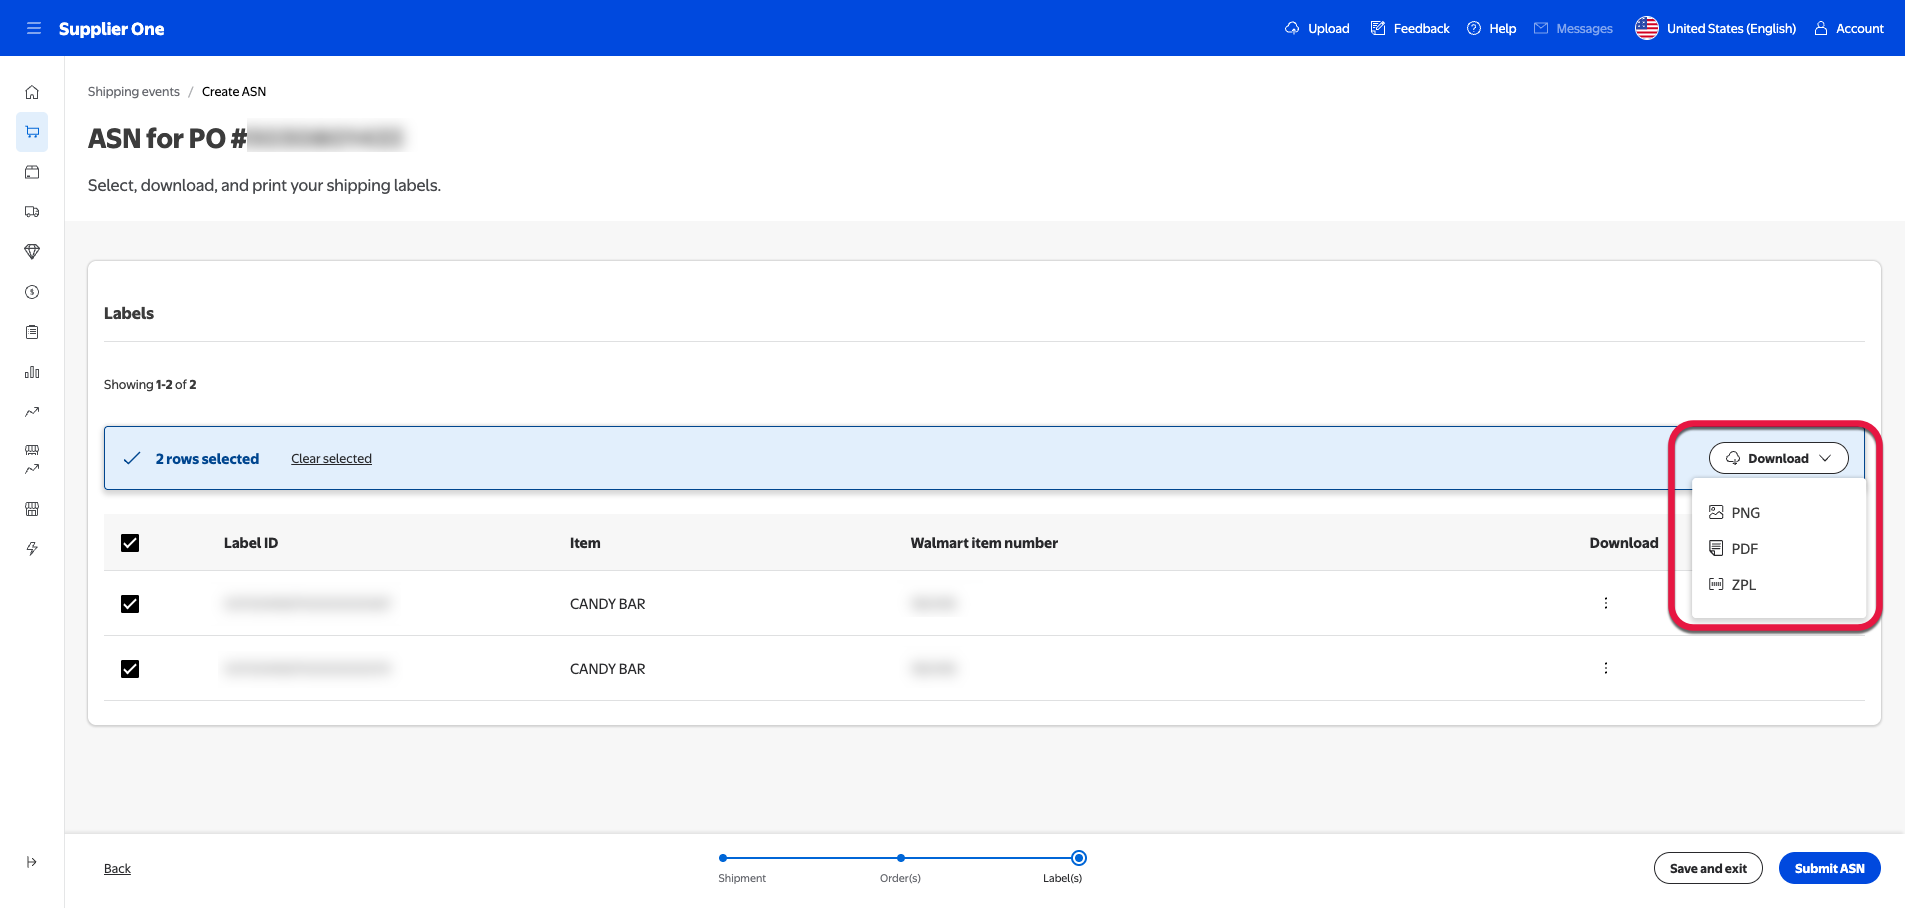
Download the label(s) by selecting the three dots under Download. A menu will appear with three downloadable options: PNG, PDF, or Zebra scannable barcode (ZPL) format. This will download the label(s) on to your device in that format.
If the ASN has multiple labels, you can bulk download the labels by selecting the box next to Label ID, then pressing Download to open a dropdown menu of the possible format types.
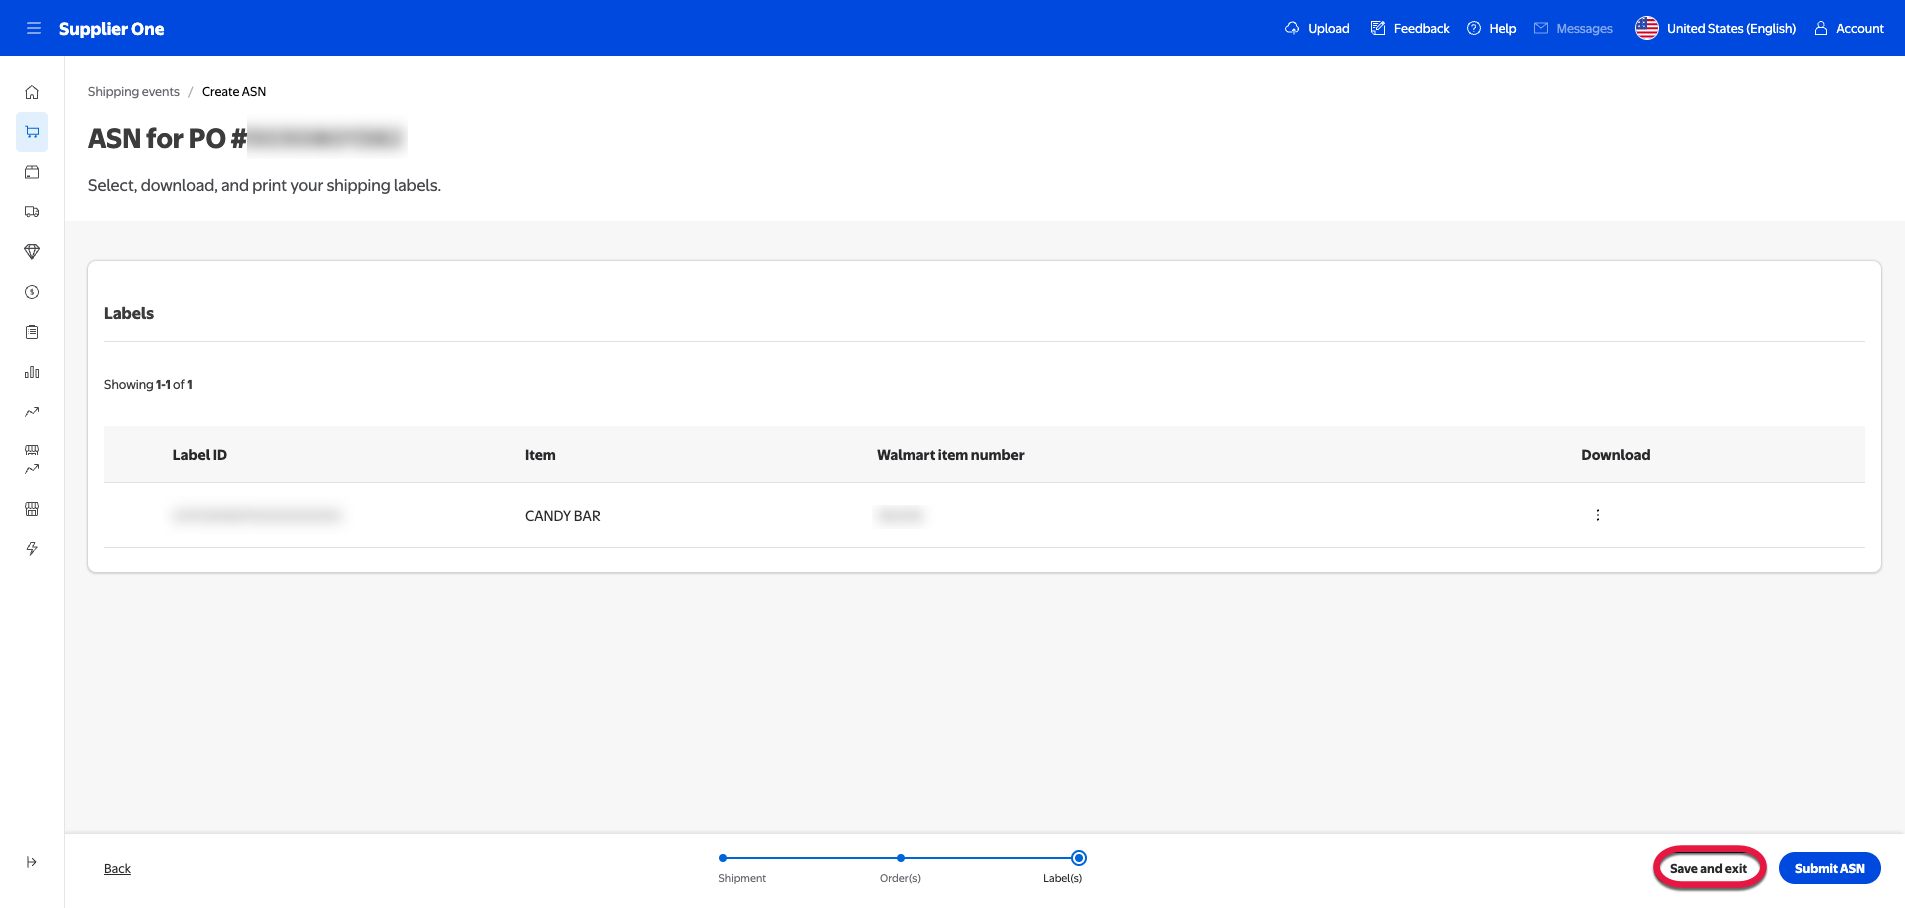
Select Save and exit to save your edits in the submission process.
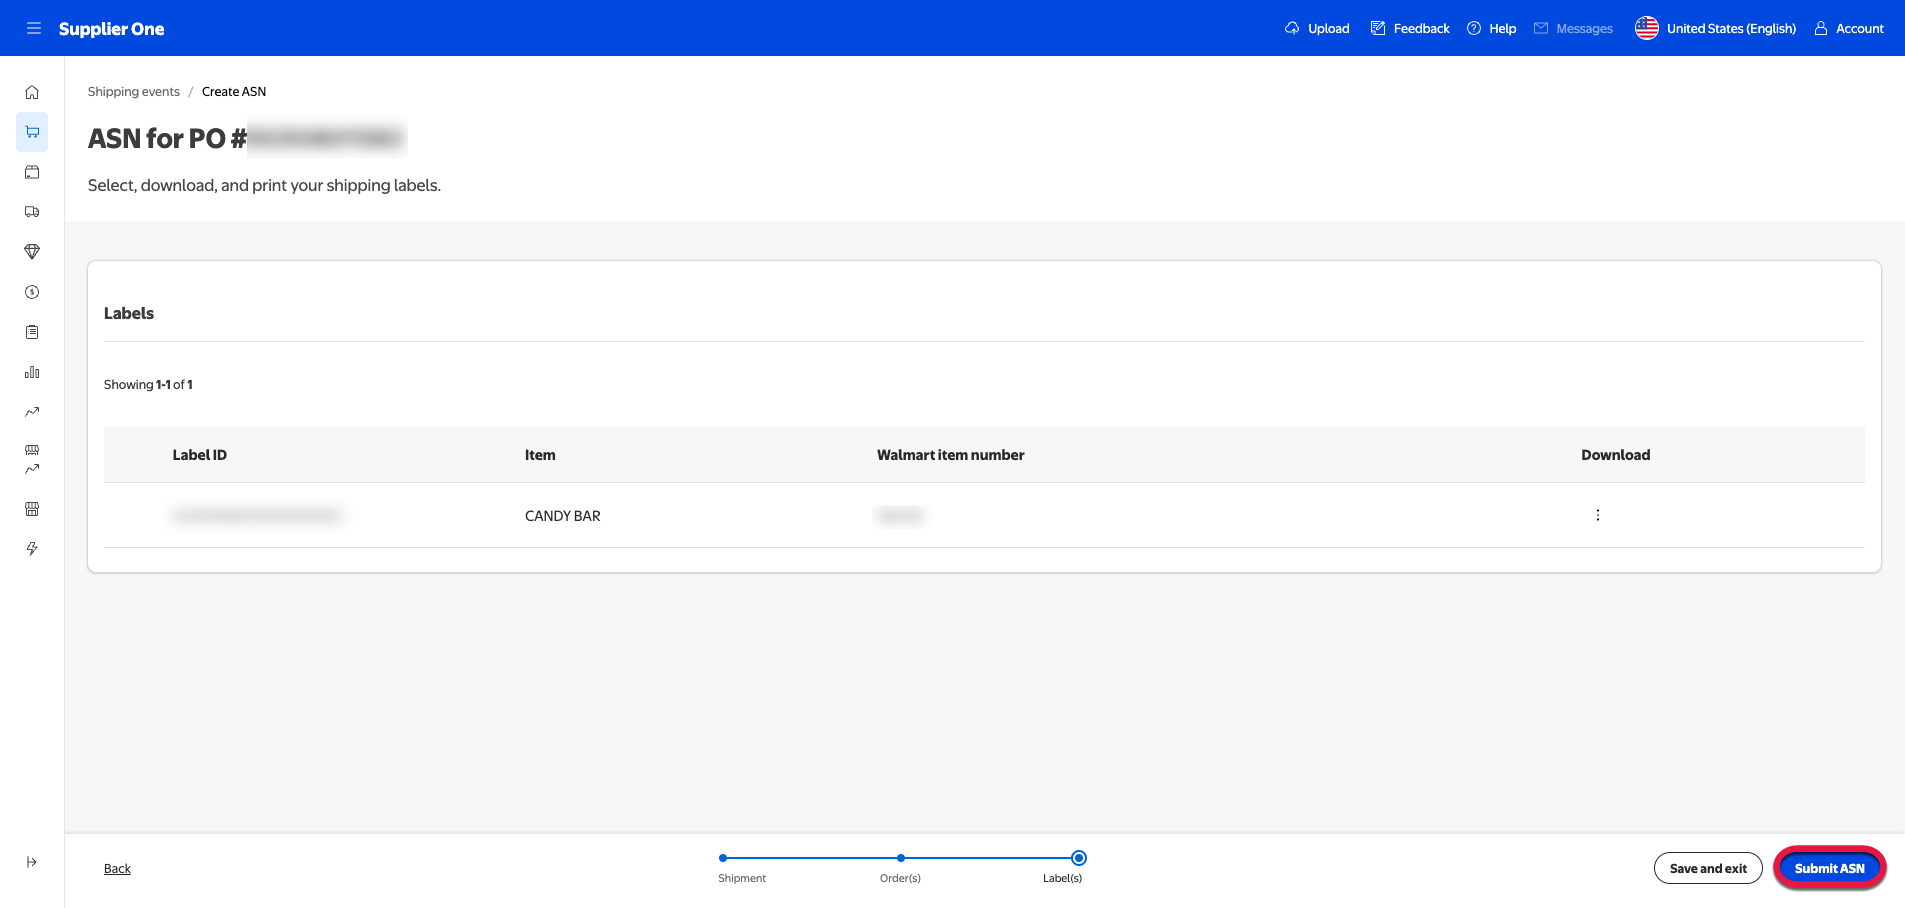
Select Submit ASN to submit the information for storage in Walmart’s system. This will take you to the PO submissions page.
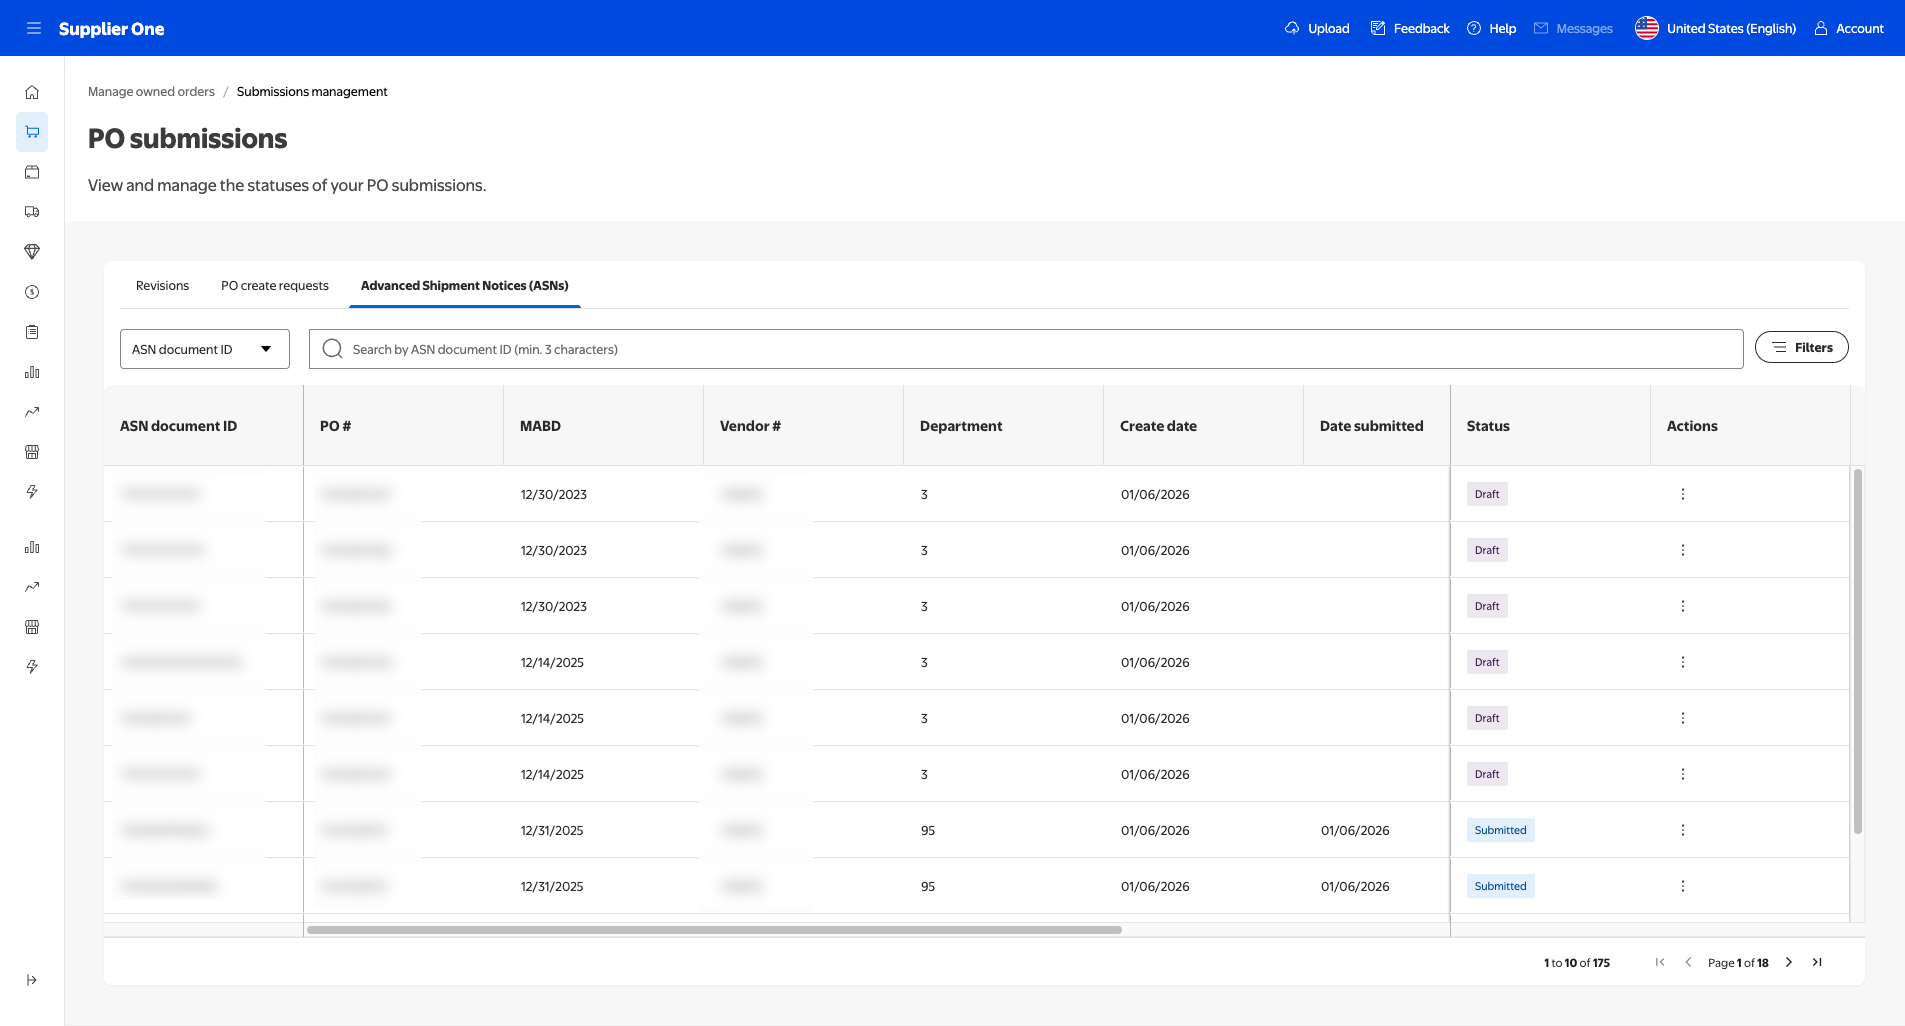
PO submissions page
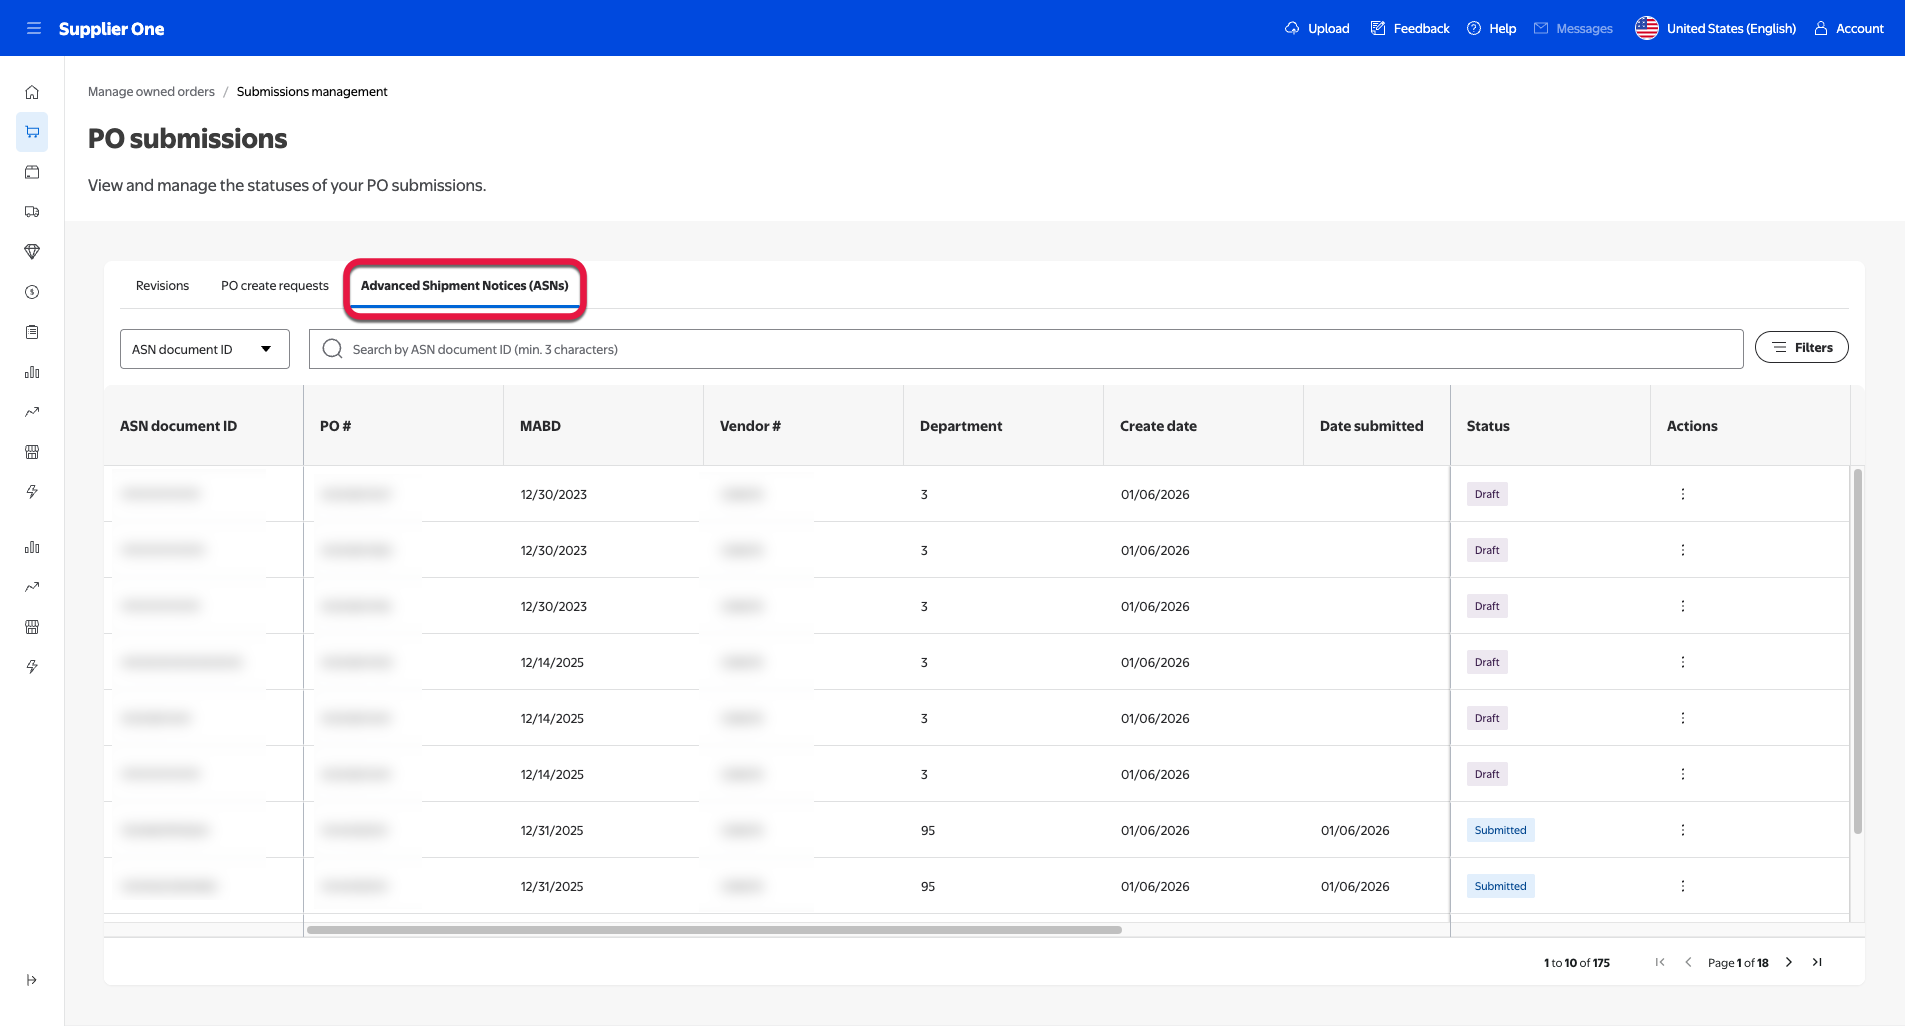
After completing the necessary steps in the Create ASN section, you’ll land on the PO submissions page. Select the Advanced Shipment Notices (ASNs) tab.
This page allows you to view and manage the statuses of your PO submissions. You’ll notice a breakdown of your submissions by either PO or Document ID, with item-specific information like the Must Arrive by Date (MABD), vendor number, submission date, etc.
To ensure you’re looking at your ASNs, select the Advanced Shipment Notices (ASNs) tab.
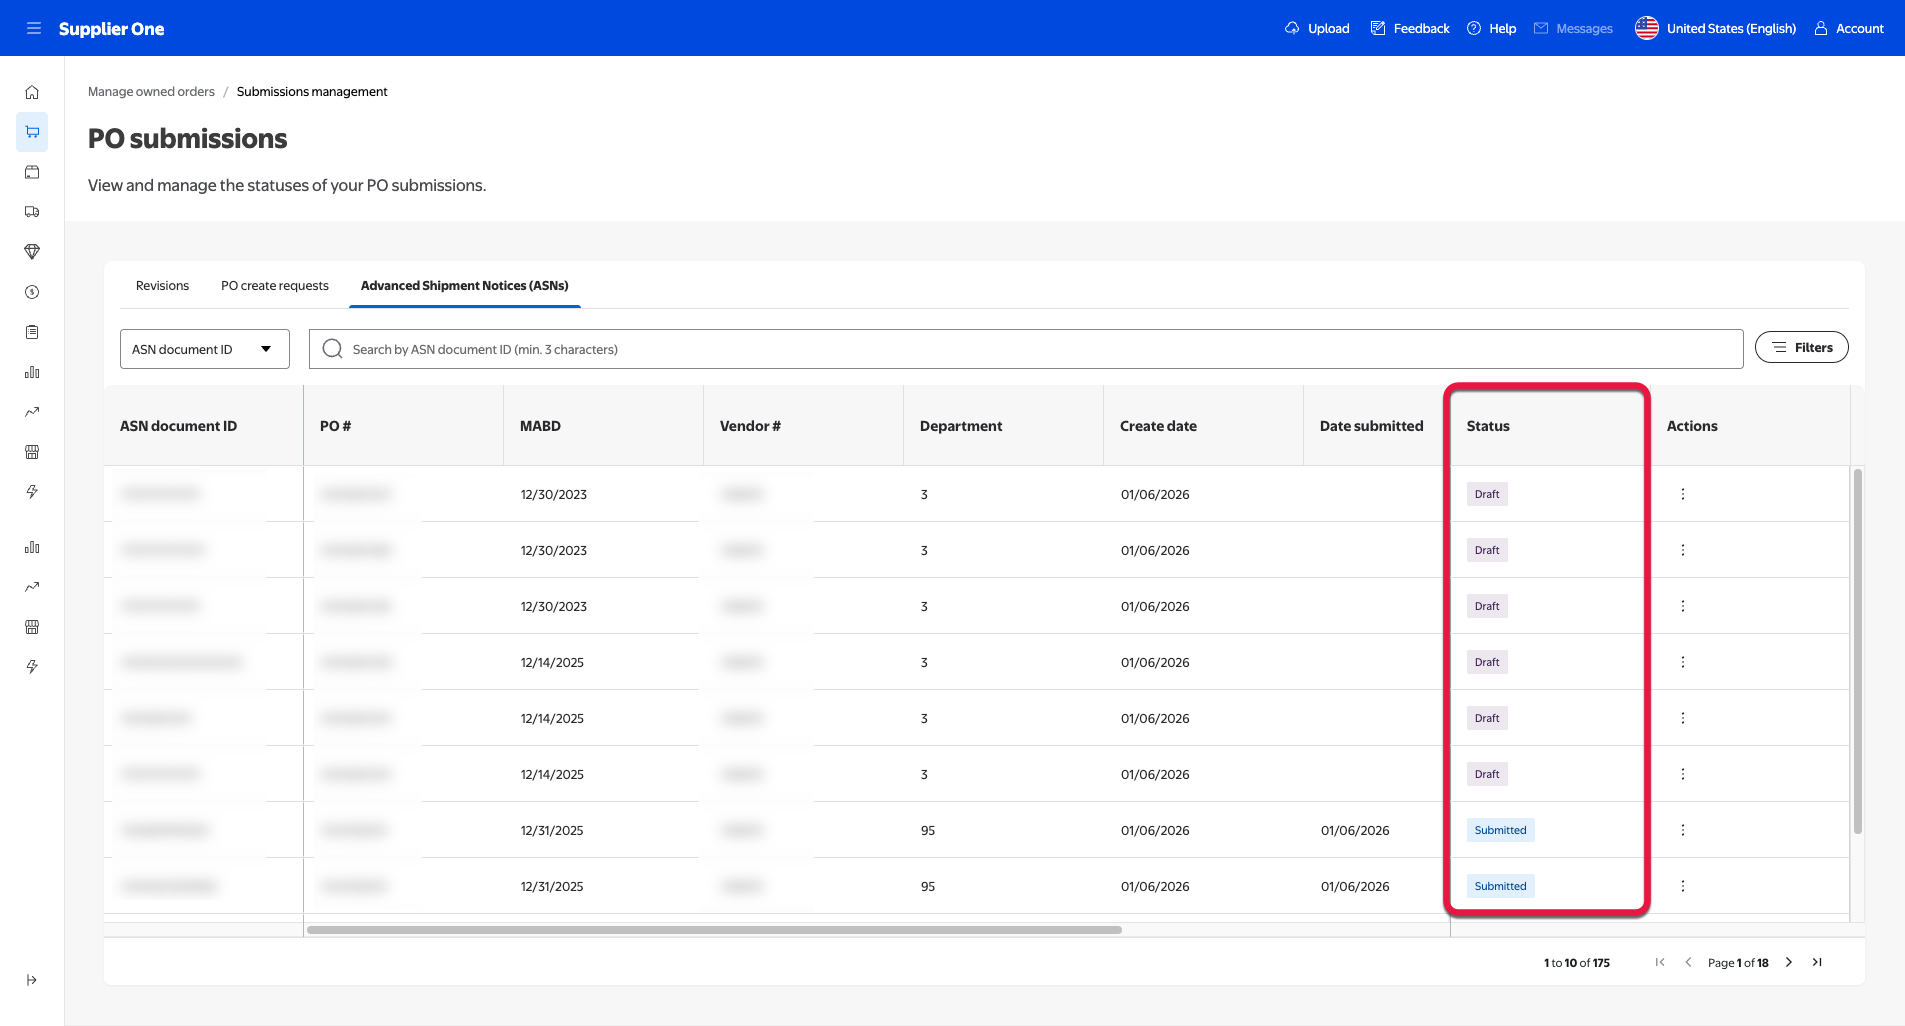
Status column
On the right side of the table, you’ll notice a column labeled Status. The statuses in this column pertain to the current state of that ASN.
The table below outlines the fields and their corresponding definitions.
Field
Definition
In progress
The ASN is in progress and not yet submitted. The user should edit the submission and submit the ASN before the MABD.
Submitted
The ASN is submitted for processing.
Rejected
The ASN was submitted but failed validation during the processing stage. The user should edit the submission and resubmit the ASN before the MABD.
To see a list of errors that affected this ASN, hover over the Rejected status.
Accepted
The ASN was submitted and accepted because it passed all the required validation with no errors.
Accepted (with warnings)
The ASN was submitted and accepted because it passed all the required validation with no errors. However, there are a few attributes that should be updated in future ASNs.
To see the list of warnings that can affect a future ASN, hover over the Accepted status with a warning icon.
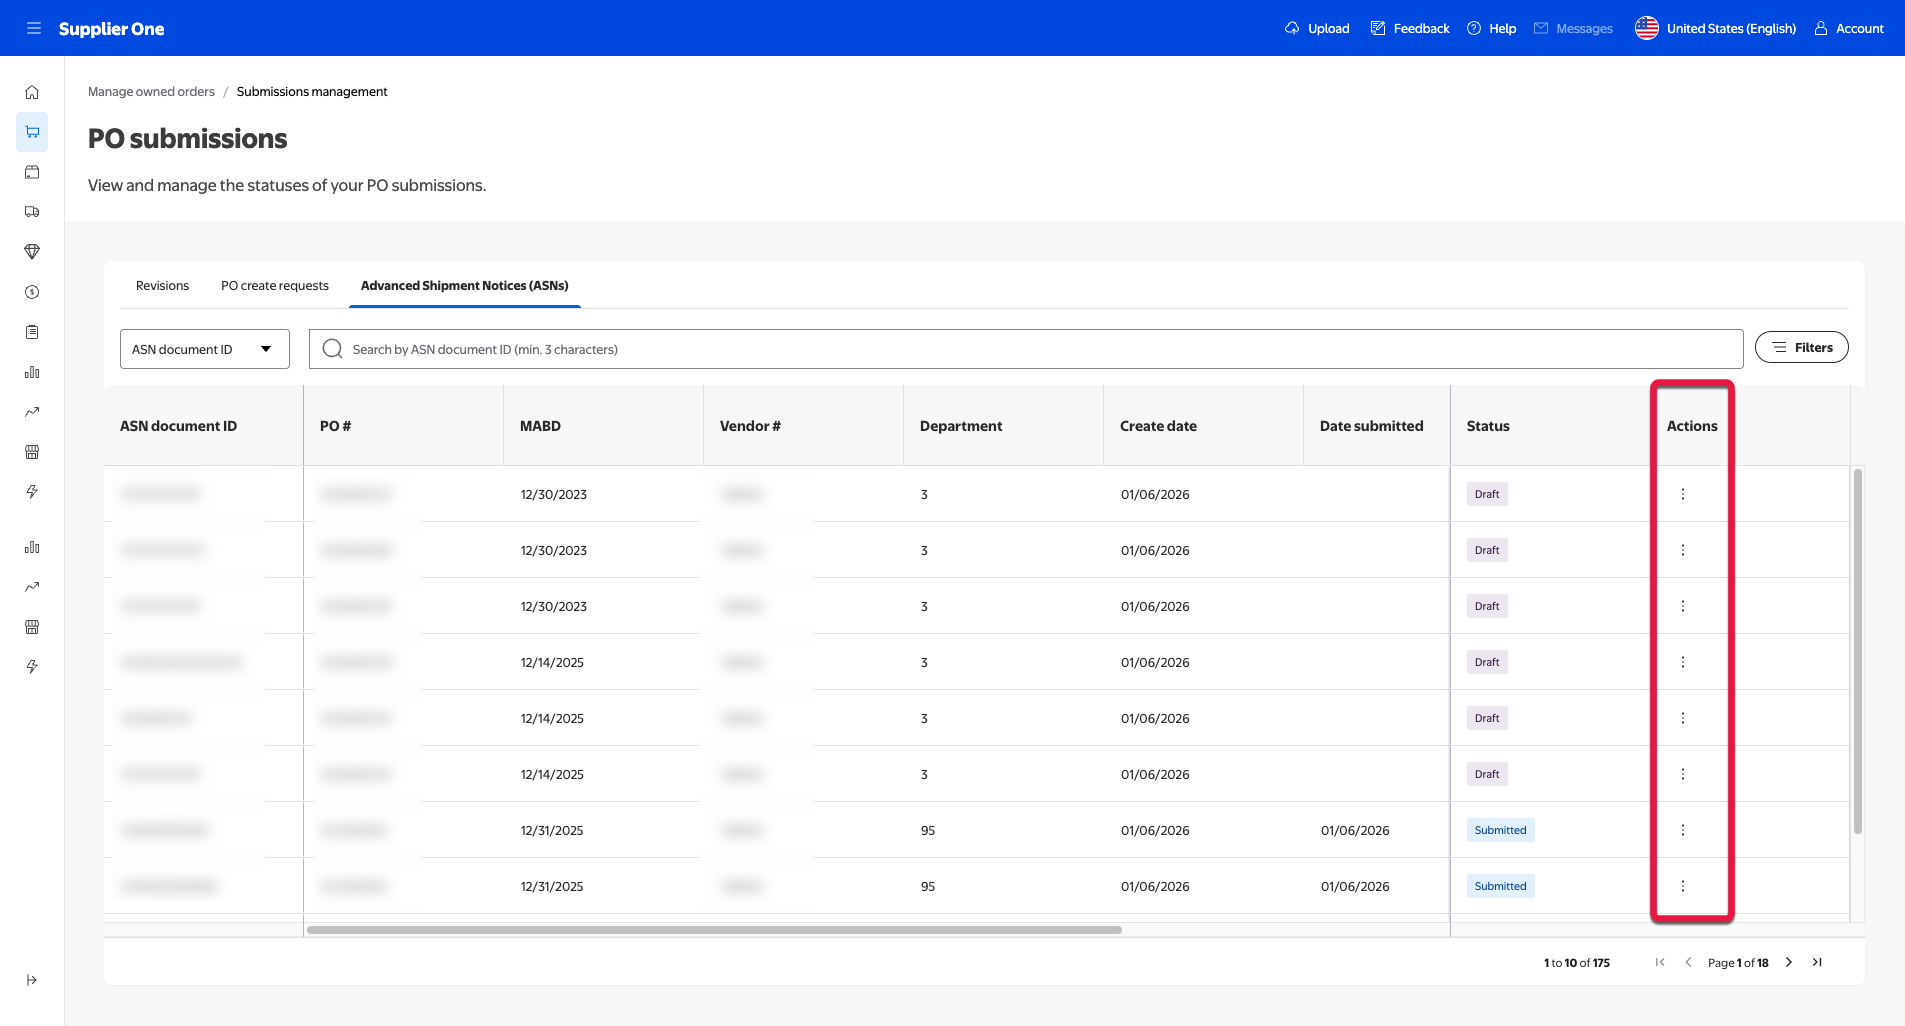
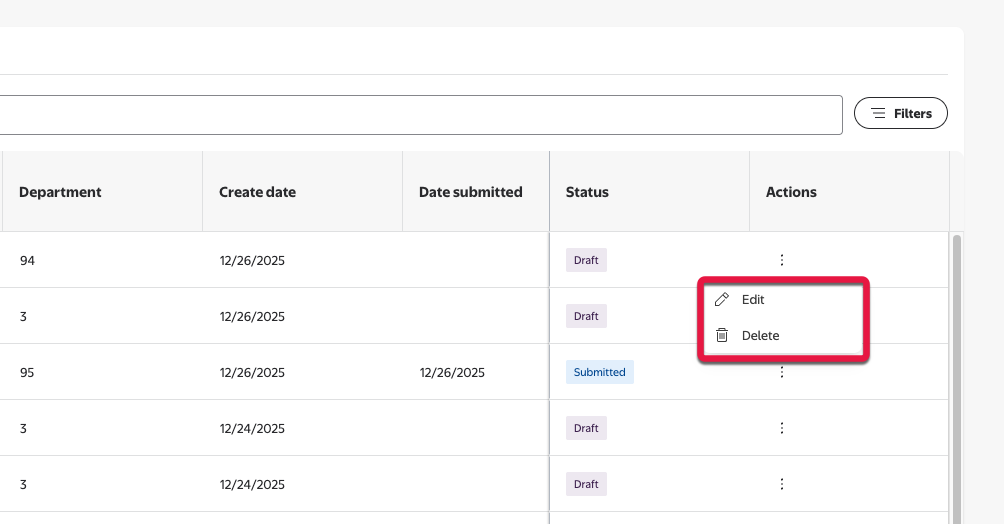
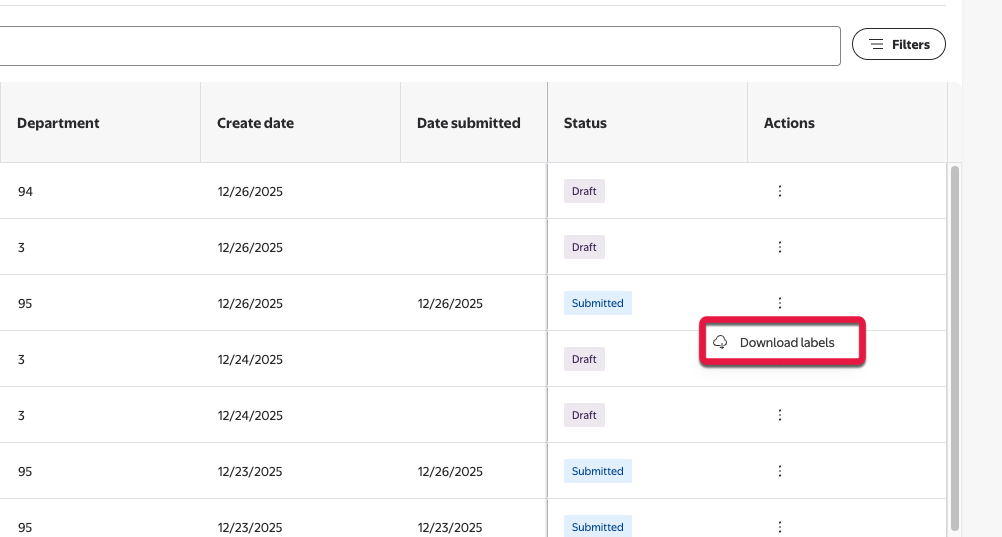
Actions column
Next to the Status column, you’ll see three dots under the Actions column.
Select the three dots to bring up a menu of actions you can take regarding this ASN. The actions differ depending on the status of the ASN.
Edit button
Selecting Edit (pencil icon) allows you to make changes to the ASN. The Create ASN page for that specific ASN will open and you’ll be able to edit or continue the ASN process. Make sure to double-check your information and download/print your labels when you’re complete. A new status should refresh after submitting or resubmitting that ASN.
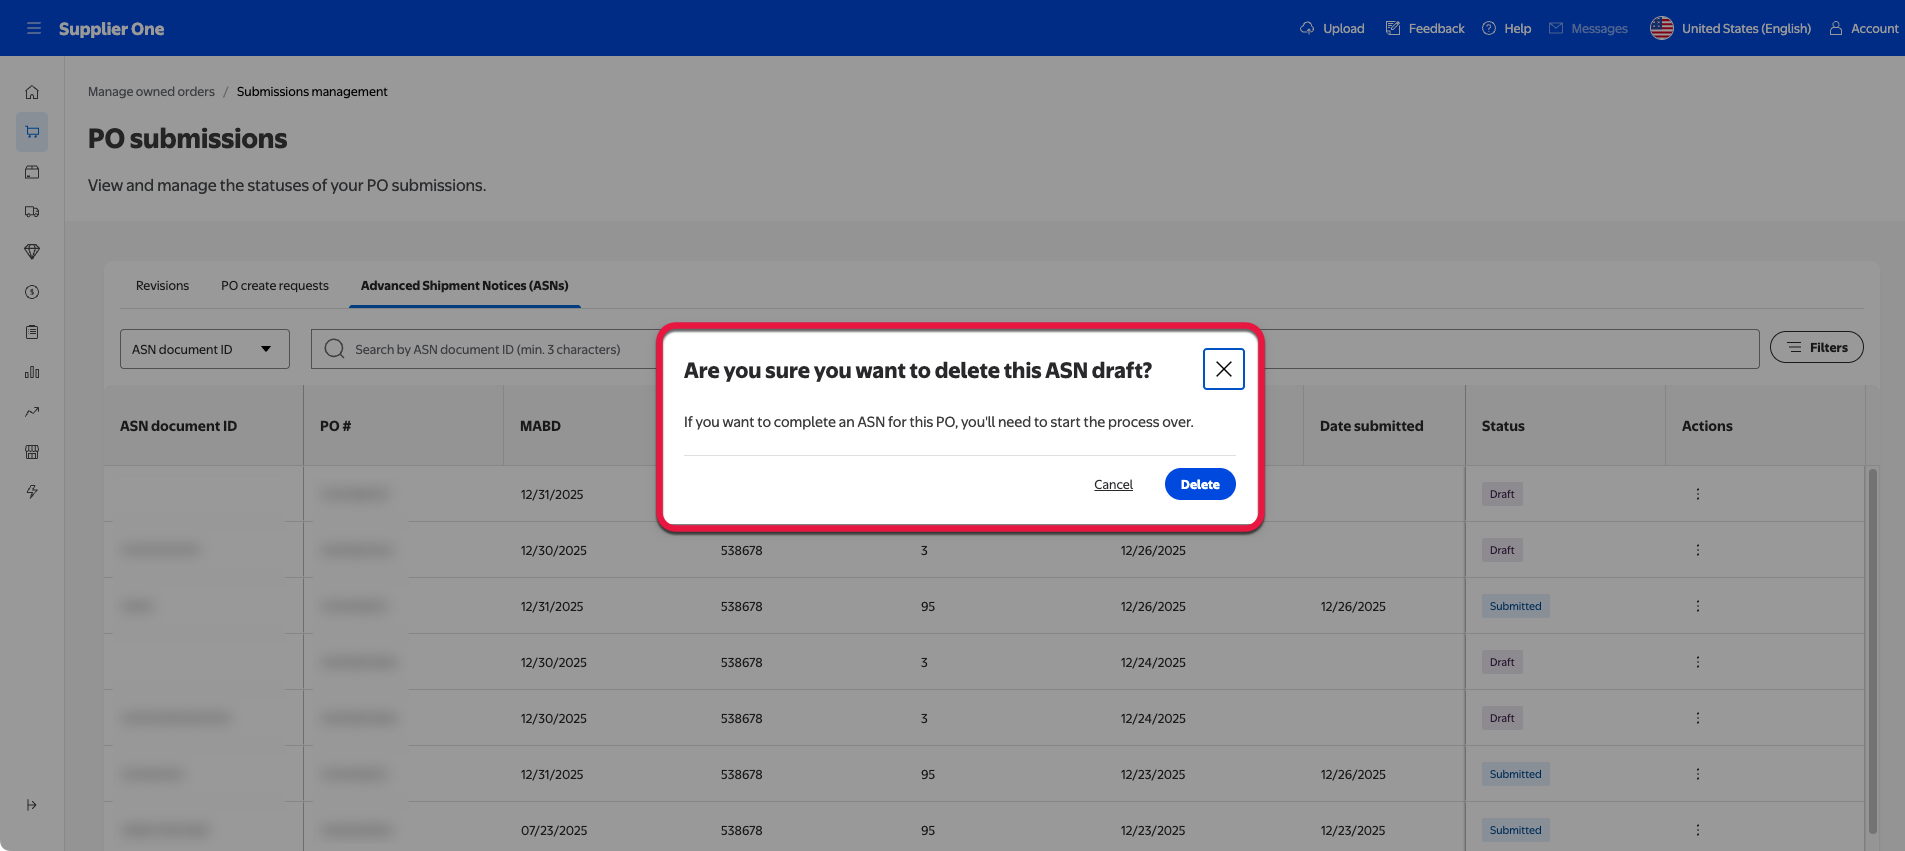
Delete button
Selecting Delete (trash can icon) allows you to delete the ASN draft in its current state. A message will appear asking you if you’re sure you’d like to delete this ASN draft.
If you want to complete an ASN for this PO, you'll need to start the process over.
Submitted ASNs
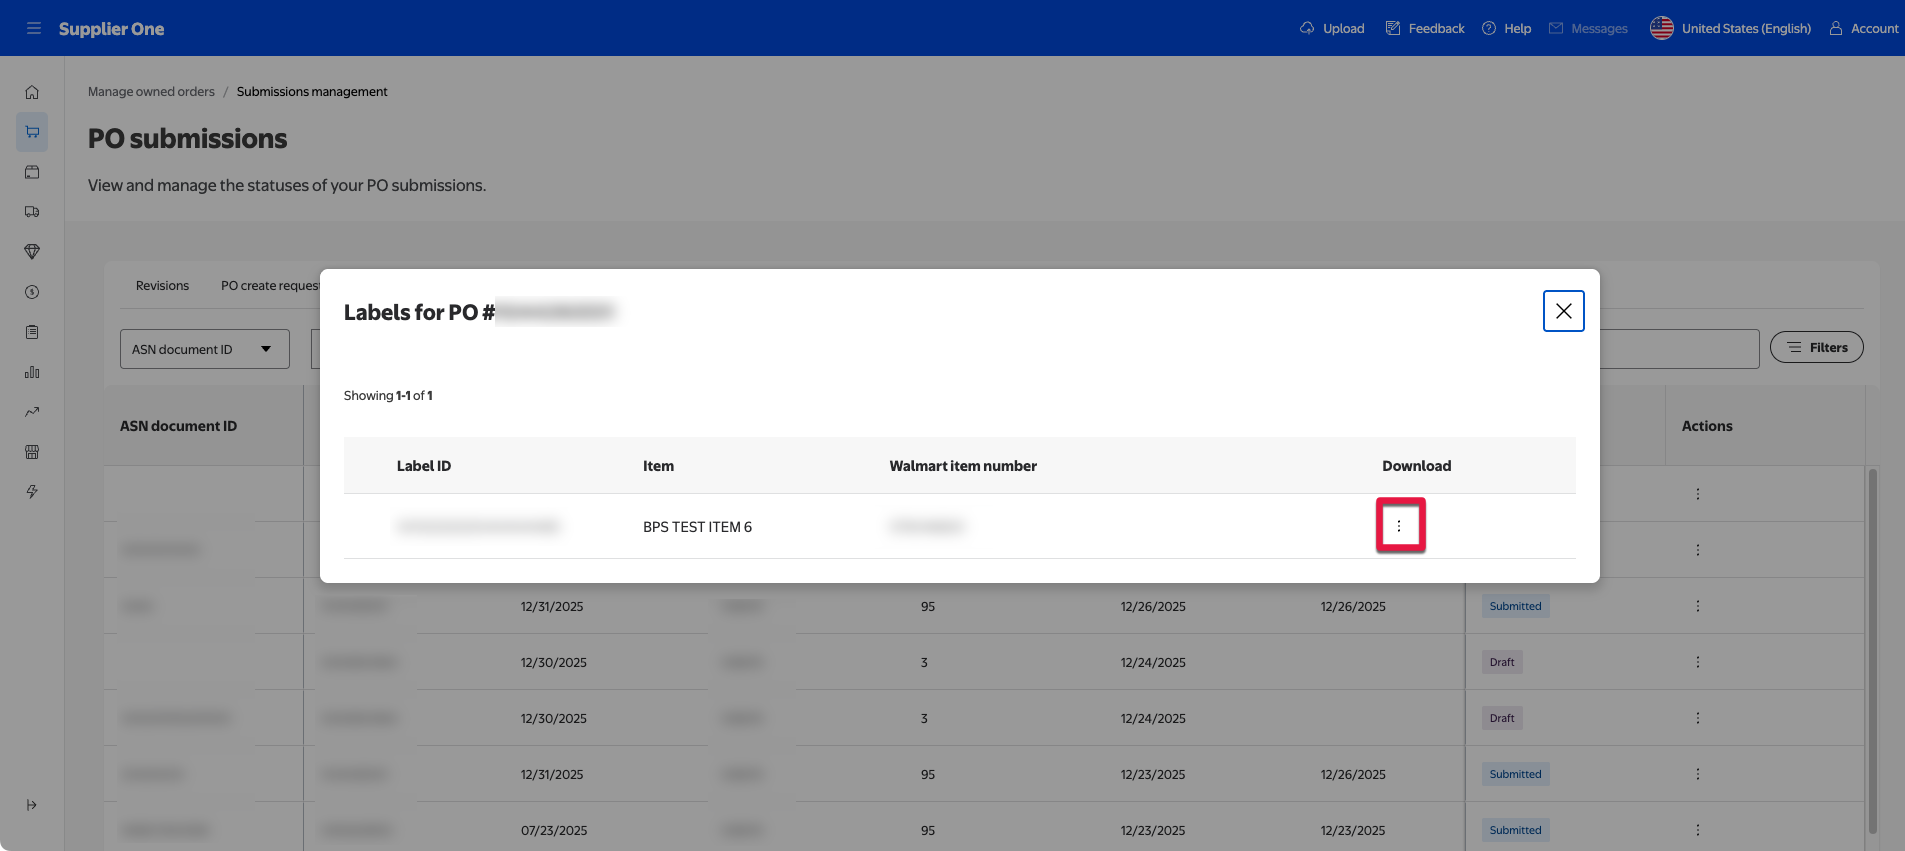
Download labels button
Selecting Download labels (cloud icon) will download the ASN as it is in its current state. A popup will appear highlighting the ASN’s information.
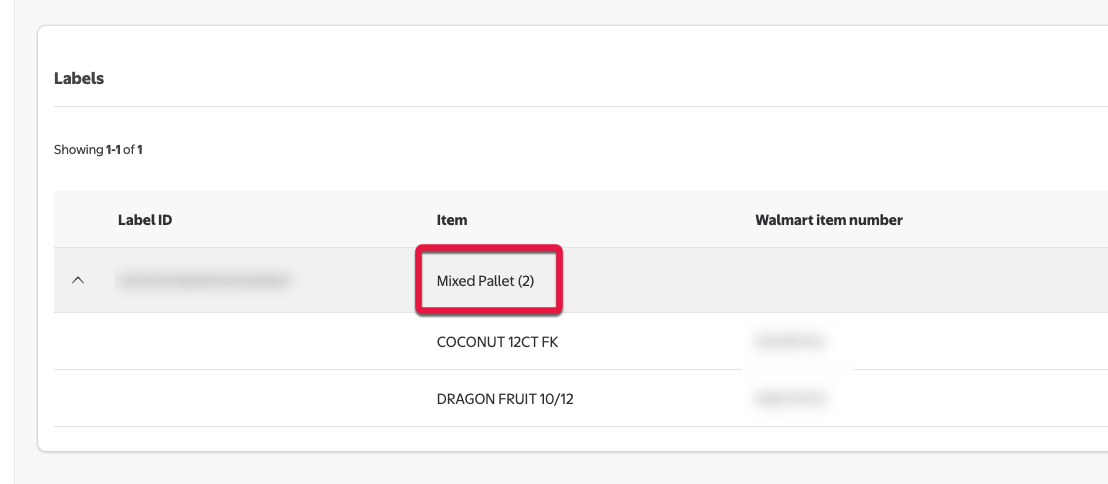
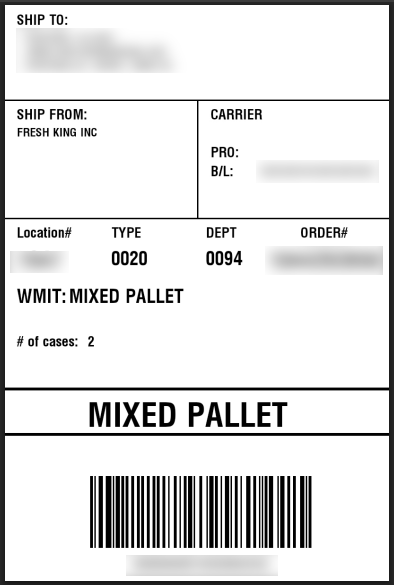
If the pallet has more than one item to be shipped on it, the item label will appear as Mixed Pallet. Select the dropdown icon (⌄) next to Label ID to see all the items in this ASN.
Here is an example of a downloaded label showing a mixed pallet with more than one ASN item.
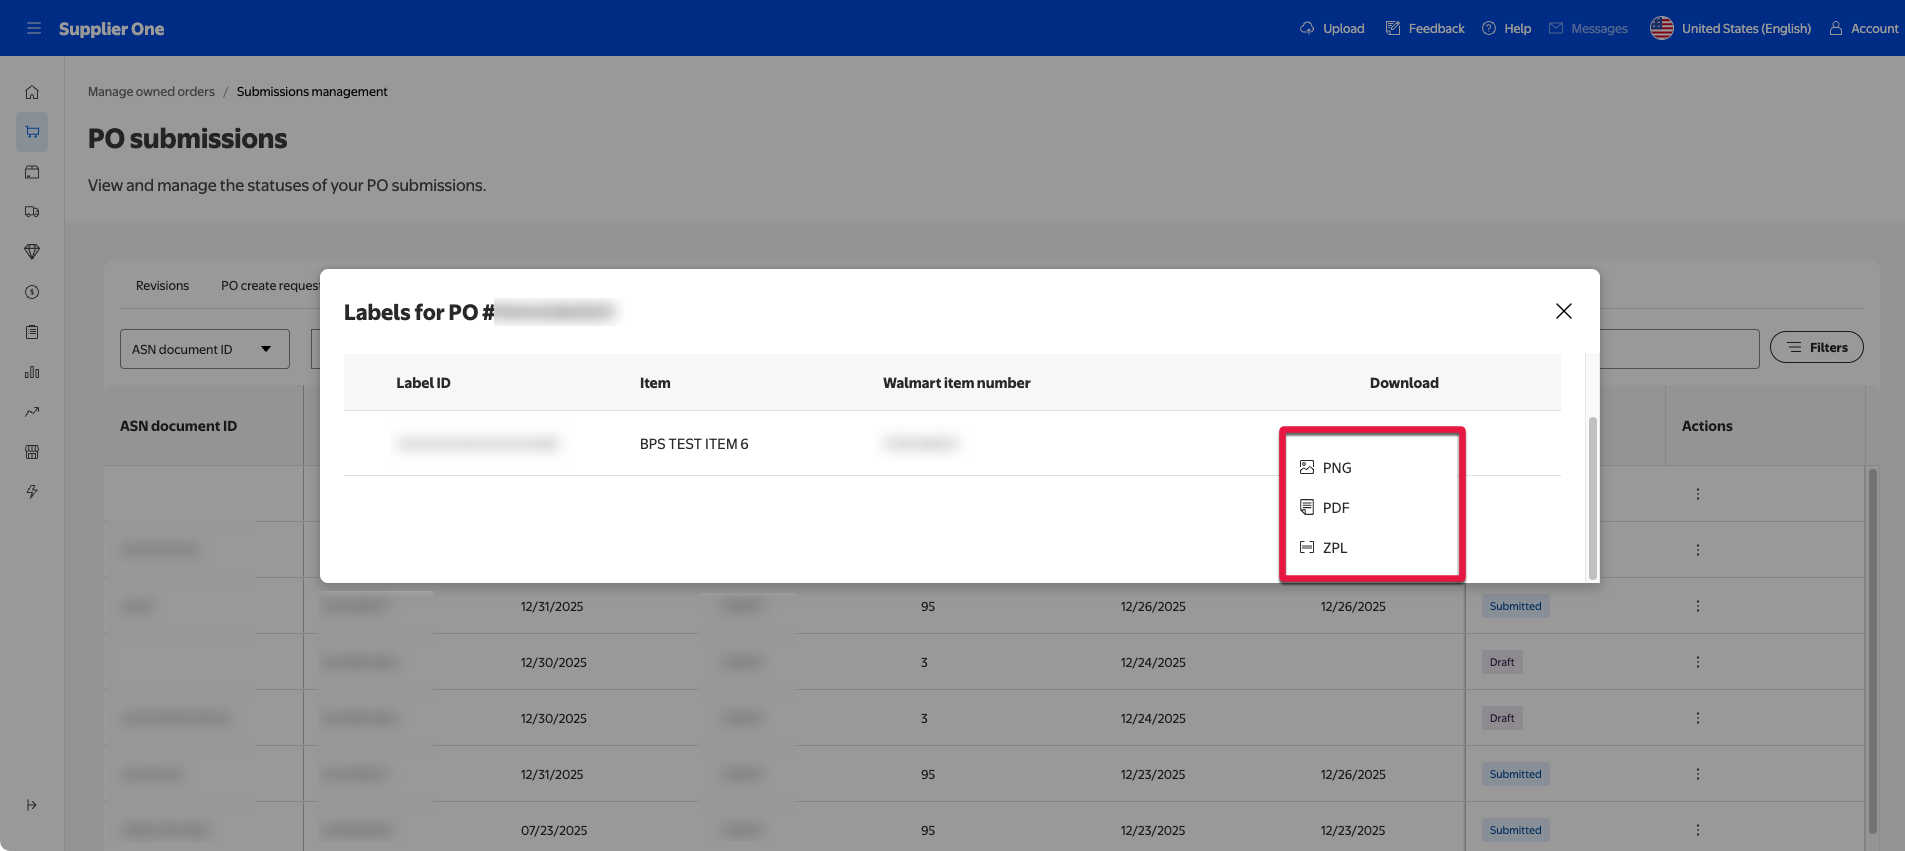
Select the three dots under the Download column to bring up a menu with the file format options (PNG, PDF, ZPL) available to download of this ASN.
For more information on the file format options, go to the ASN labels page section of this guide.

 * = Only appears if selecting General merchandise under ASN type.
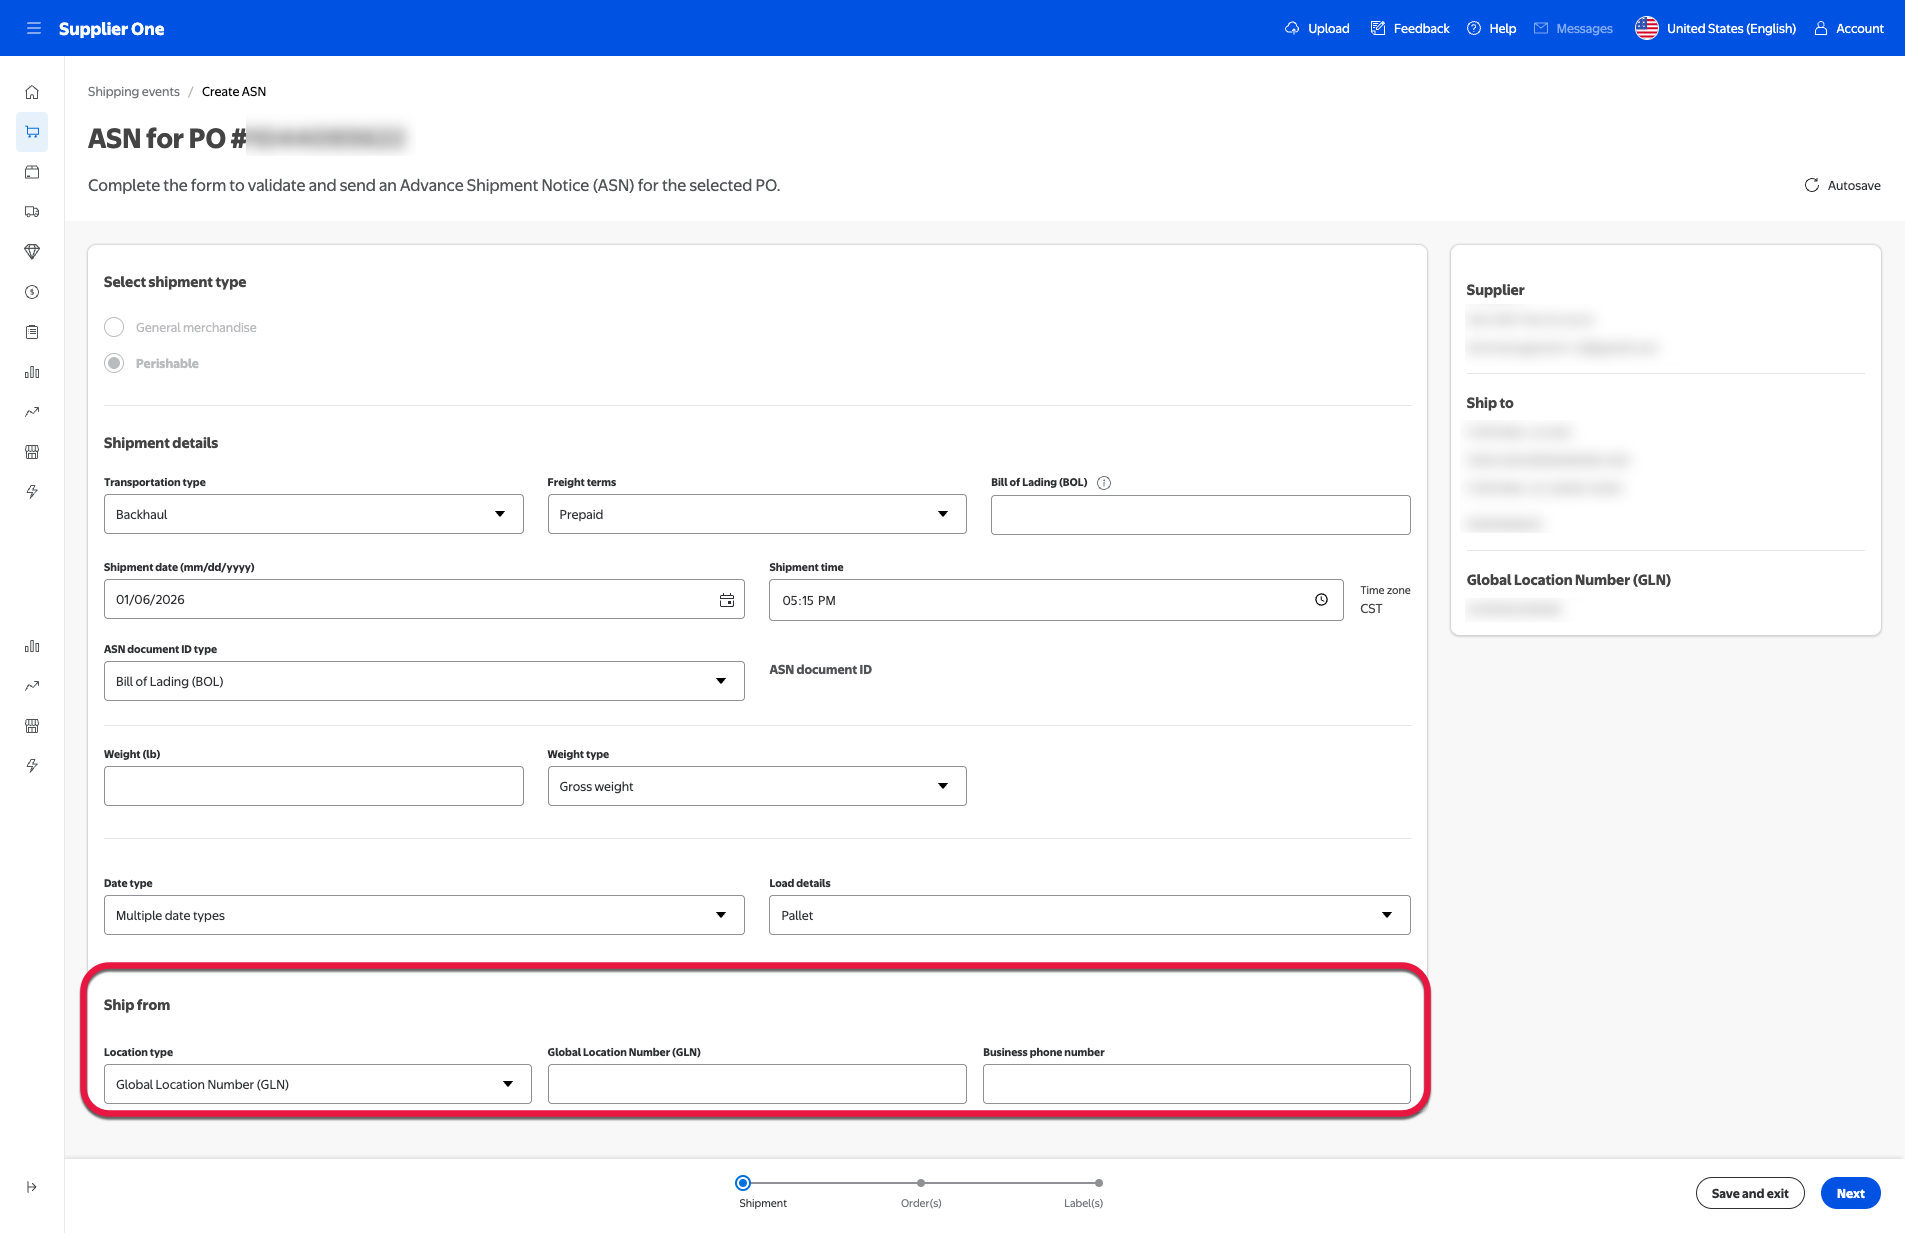
 You can select Save and exit to save your edits in the submission process. You can only access and edit draft ASNs while on the PO submissions page.
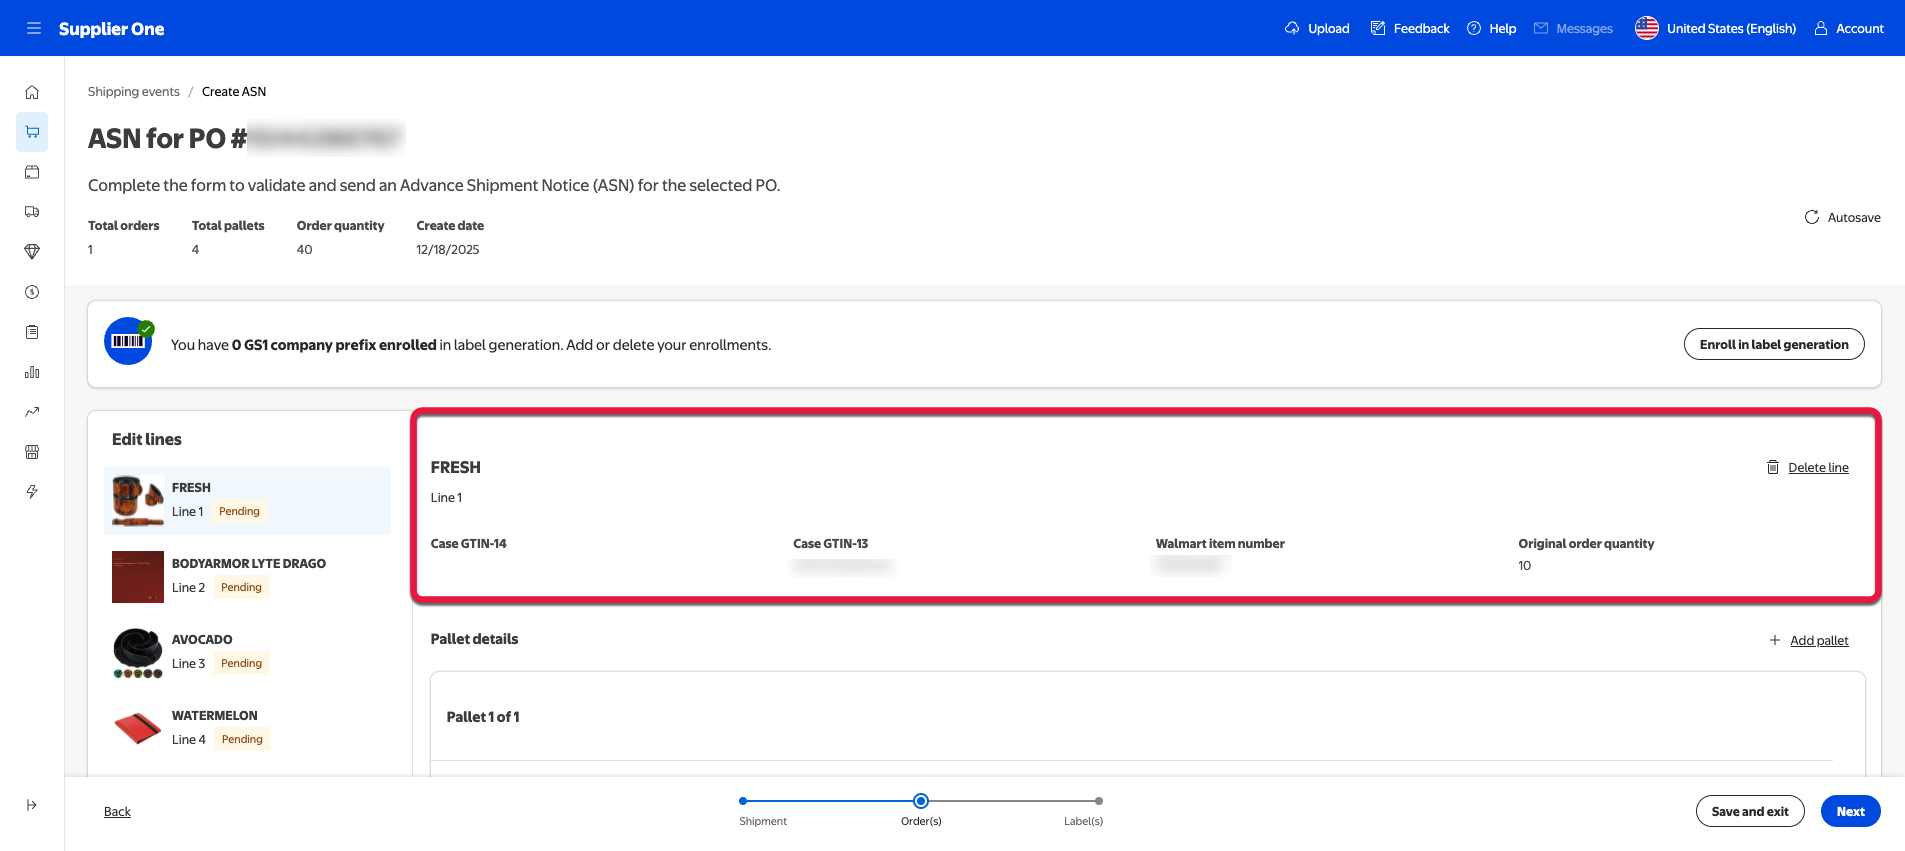


 If the ASN has multiple labels, you can bulk download the labels by selecting the box next to Label ID, then pressing Download to open a dropdown menu of the possible format types.