Order Management - Owned
Click Orders in the left navigation menu to view and manage all of your orders.
- PO management: order management page for Owned and/or DSV orders
- PO submission: view orders in revision and PO create requests

Owned and/or DSV
If you have both Owned and DSV orders, you will see two tabs. Click the Owned tab to view data for all Owned orders linked to your account.

If you only have Owned orders, you will not see these tabs. The page automatically defaults to all Owned orders linked to your account.
Owned Orders
View your order summary and statuses in one place, and drill down further into the PO details. Supplier One provides visibility to both domestic POs and import POs (if you are a direct import supplier). You can also acknowledge import POs from the Owned orders view.
Search by Purchase Order or Item Number
- Select what you want to search by (Purchase Order or Item Number) from the drop-down menu.
- Copy and paste up to 99 Purchase Order (PO) Numbers or Item Numbers in the search field and press enter on your computer.

Order Type
If you are a domestic and direct import supplier, select the Order type (Domestic PO or Import PO) that you want to view Owned orders for.

Order Status
You'll see Open orders by default. Click Order status to view Shipping, Receiving, Closed, or Cancelled orders.

You can narrow down the list of Open orders to those Past Due.
For Domestic POs: Click the filter.

For Import POs: Click the Past due filter or Acknowledgement expiring in 3 days (CDT/CST time zone) filter for pending POs.

Supplier IDs
You can view Owned orders for all 6-digit agreement numbers and 9-digit agreement numbers. Search by Supplier ID or select specific numbers from the drop-down arrows.

More Filters
Click More filters to browse for a range of POs.

For Domestic POs: Select filters for Category, Sub Category, Fine Line, Destination Node, Must Arrive By Date (start/end dates), PO Create (start/end dates), Channel Method, Event Code, Buyer ID, Create User ID, Rec Node., Stores, Supply Chain Status and/or Traits. Then, click the Apply button.

For Import POs: Select filters for Category, Sub Category, Fine Line, Loading Port, Origin Country, Must Arrive at Port (MAAP) Start/End Date, PO Create Start/End Date, PO Types, Channel Method, In Storage Date, In Store Date, Event Code, Buyer ID, Rec. Node, Stores, Supply Chain Status, Traits and/or Vendor Ship Date . Then, click the Apply button.


Customize Columns
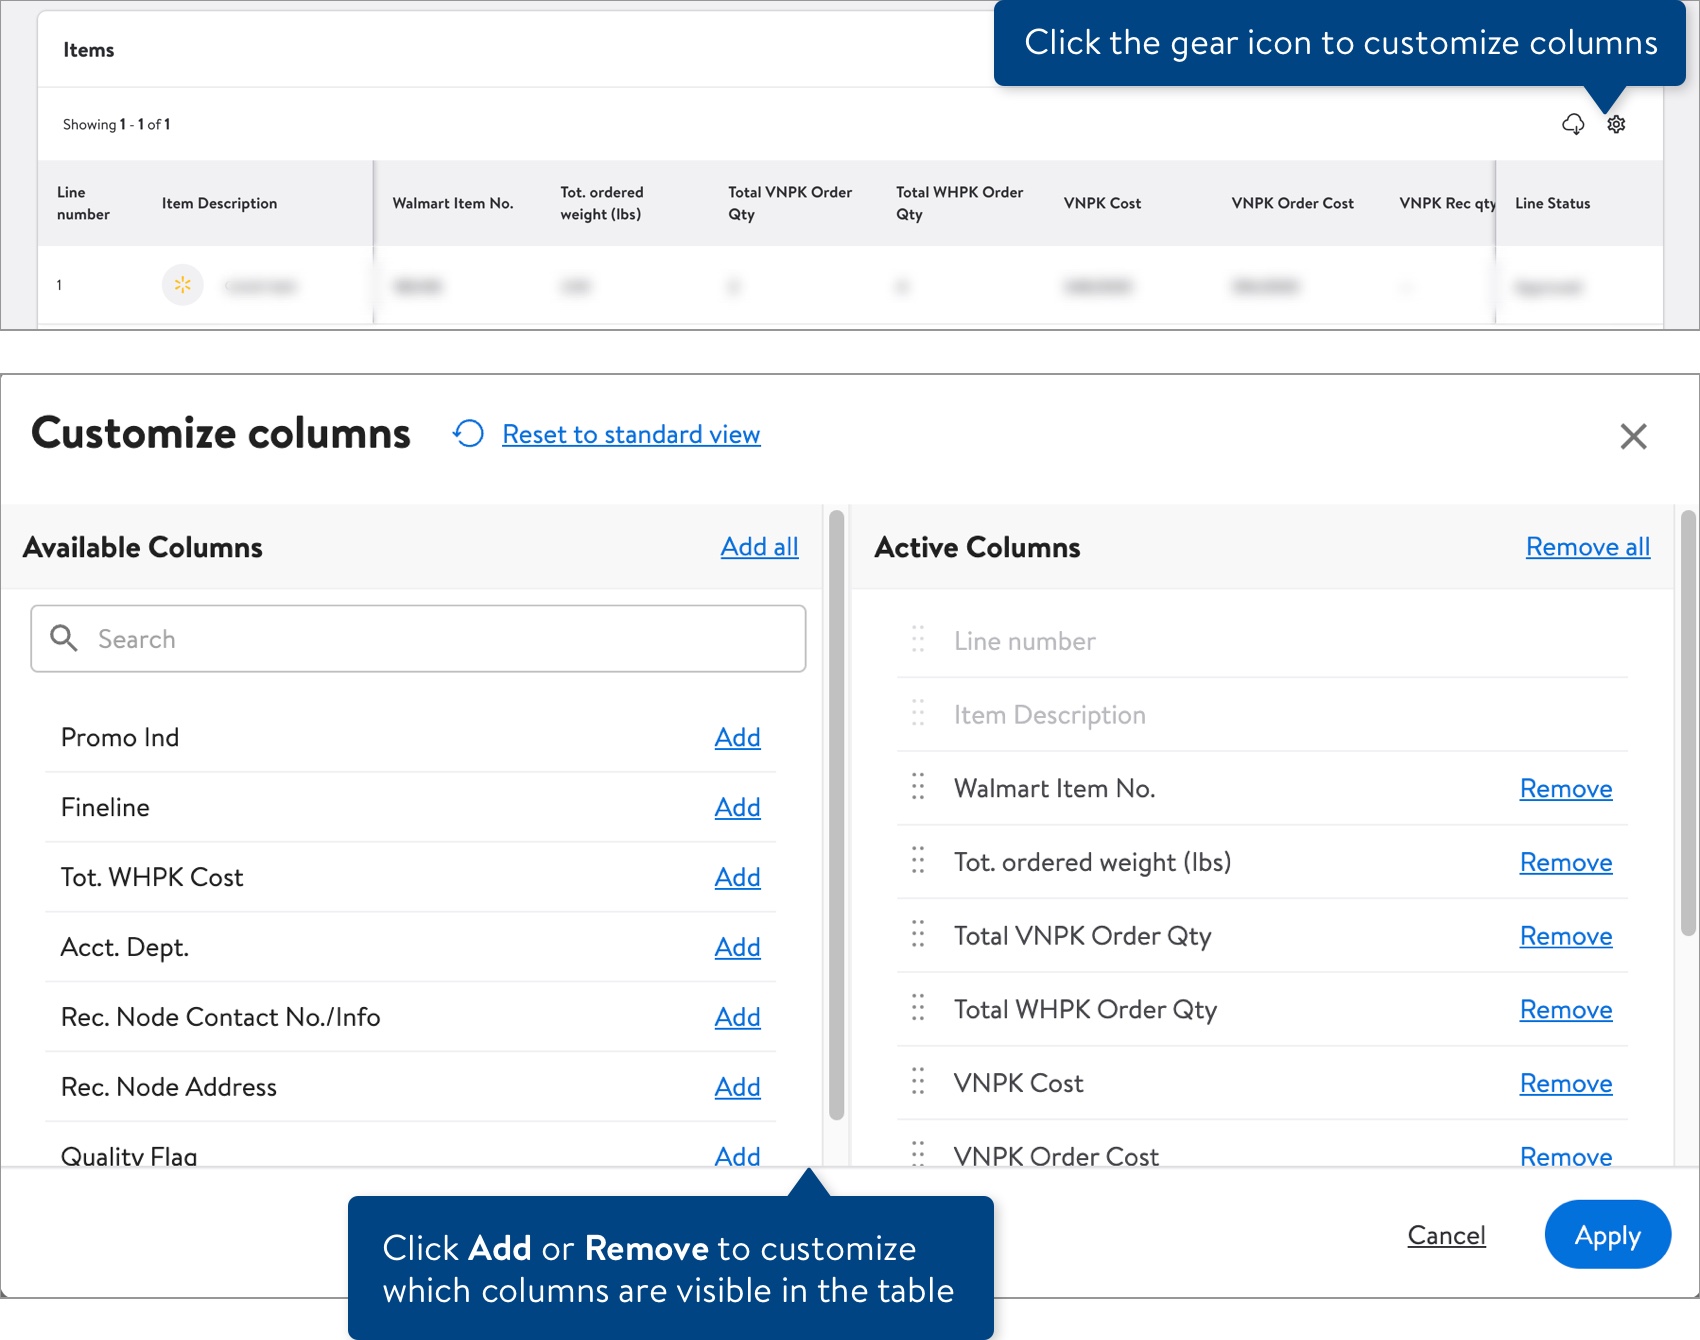
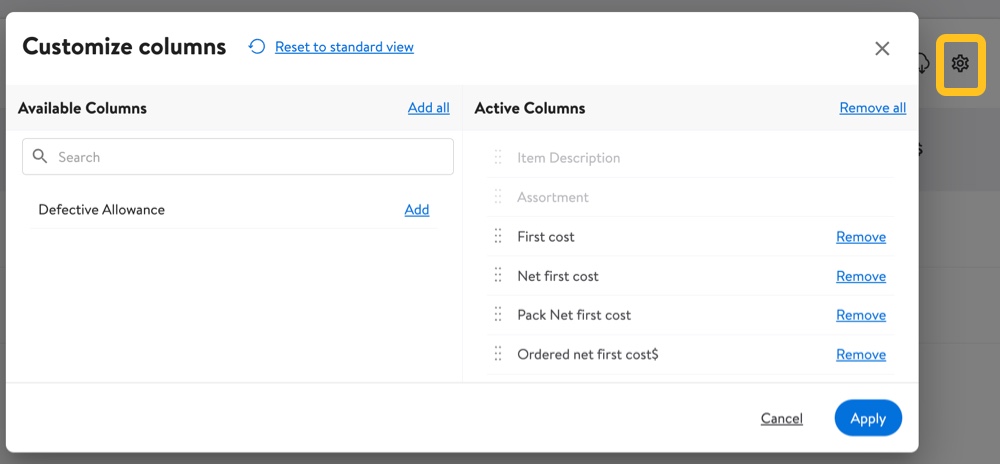
Click the gear icon to select the attributes you want to view in the table and the order in which they appear.

Click Add to move an attribute to the Active Columns (i.e., visible in the table), and click Remove to move an attribute to the Available Columns (i.e., not visible in the table). Click the Apply button to save your changes.

- To show all available attributes, click Add all.
- To build your table from scratch, click Remove all. Then, add each attribute you want to see.
To select the order in which the attributes appear, click the dots to the left of the attribute name and drag your mouse up or down. Drop the attribute in the order you prefer. Click the Apply button to save your changes.

You can also drag and drop columns directly in the table to reorder them.

Sort Columns
Click the column header to sort the data in the table.

The sort functionality is currently available for these columns:
- 9-digit agreement number
- Freight
- Event code
- Create date
- Total VNPK order qty
Download
For import and domestic POs: Click the cloud icon above the table to download Header level data, Line level data, or Distribution Data for Open, Receiving, Closed, or Cancelled orders, then select Download.

The image below shows some examples of what a file could include.

Acknowledge Import POs
- You can acknowledge import POs one at a time or select multiple import POs to acknowledge them in bulk.
- For an individual import PO, click the dots under the Actions column and select Acknowledge.

- For multiple import POs, click the check boxes to select the POs. Click Acknowledge.

- For an individual import PO, click the dots under the Actions column and select Acknowledge.
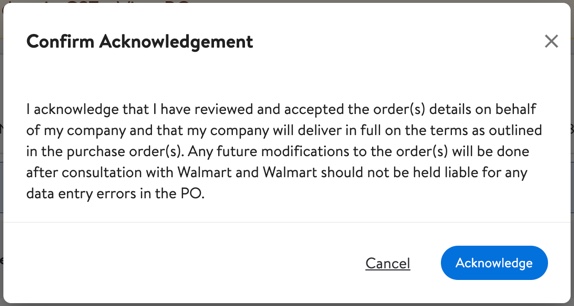
- Click Acknowledge to confirm your action.
Import PO and Cost Revision
You can select to revise cost and/or revise PO(s) by selecting the row(s) of POs you want to make changes to.

Revise Cost: Click Revise Cost to provide the updated cost in the New Value column then click Submit.

Revise PO: Click Revise to choose revision type (PO Cancellation, In storage date, Event code, Supplier ship date, In store date). Click Next to continue with the revision.

Domestic PO Details
Click the Domestic PO number in the table to view more details.

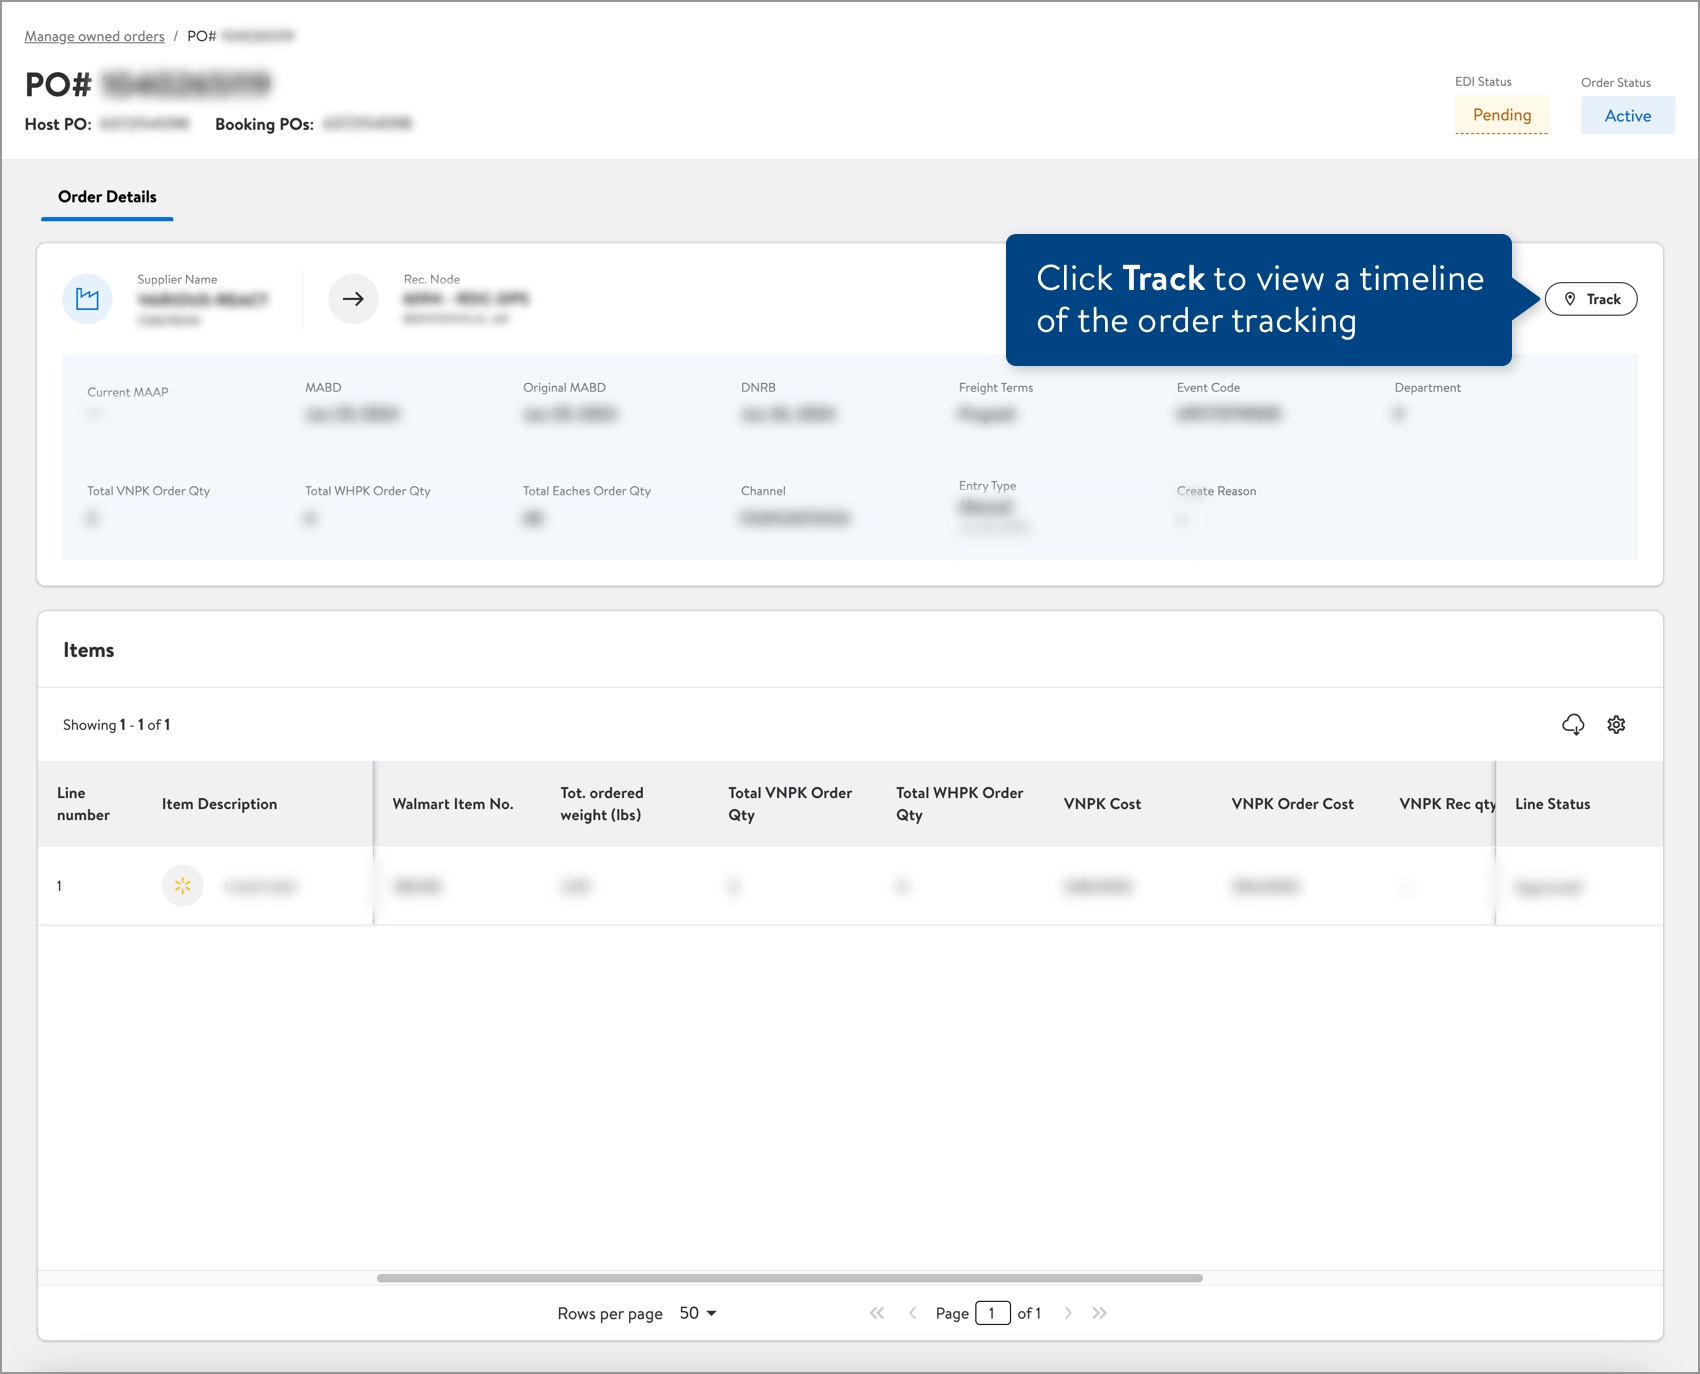
You will see a summary of the order details: Supplier Name, Receiving Node, Order Status, Current MAAP, MABD, Original MABD, DNRB, Freight Terms, Event Code, Department, Total VNPK Order Qty, Total WHPK Order Qty, Total Eaches Order Qty, Channel, Entry Type, and Create Reason. Click Track to view a timeline of the order tracking with an event log and revisions (if any).
Below the summary is a table of all items within the PO. Click the gear icon to customize columns and select the order in which the columns appear (you can also drag and drop the columns directly in the table).
To sort the data in the table, click the column header. The sort functionality is currently available for these columns:
- Line number
- Total VNPK Order Qty
- Total WHPK Order Qty
Click the cloud icon and select Download Line or Download Distribution to download the PO details.

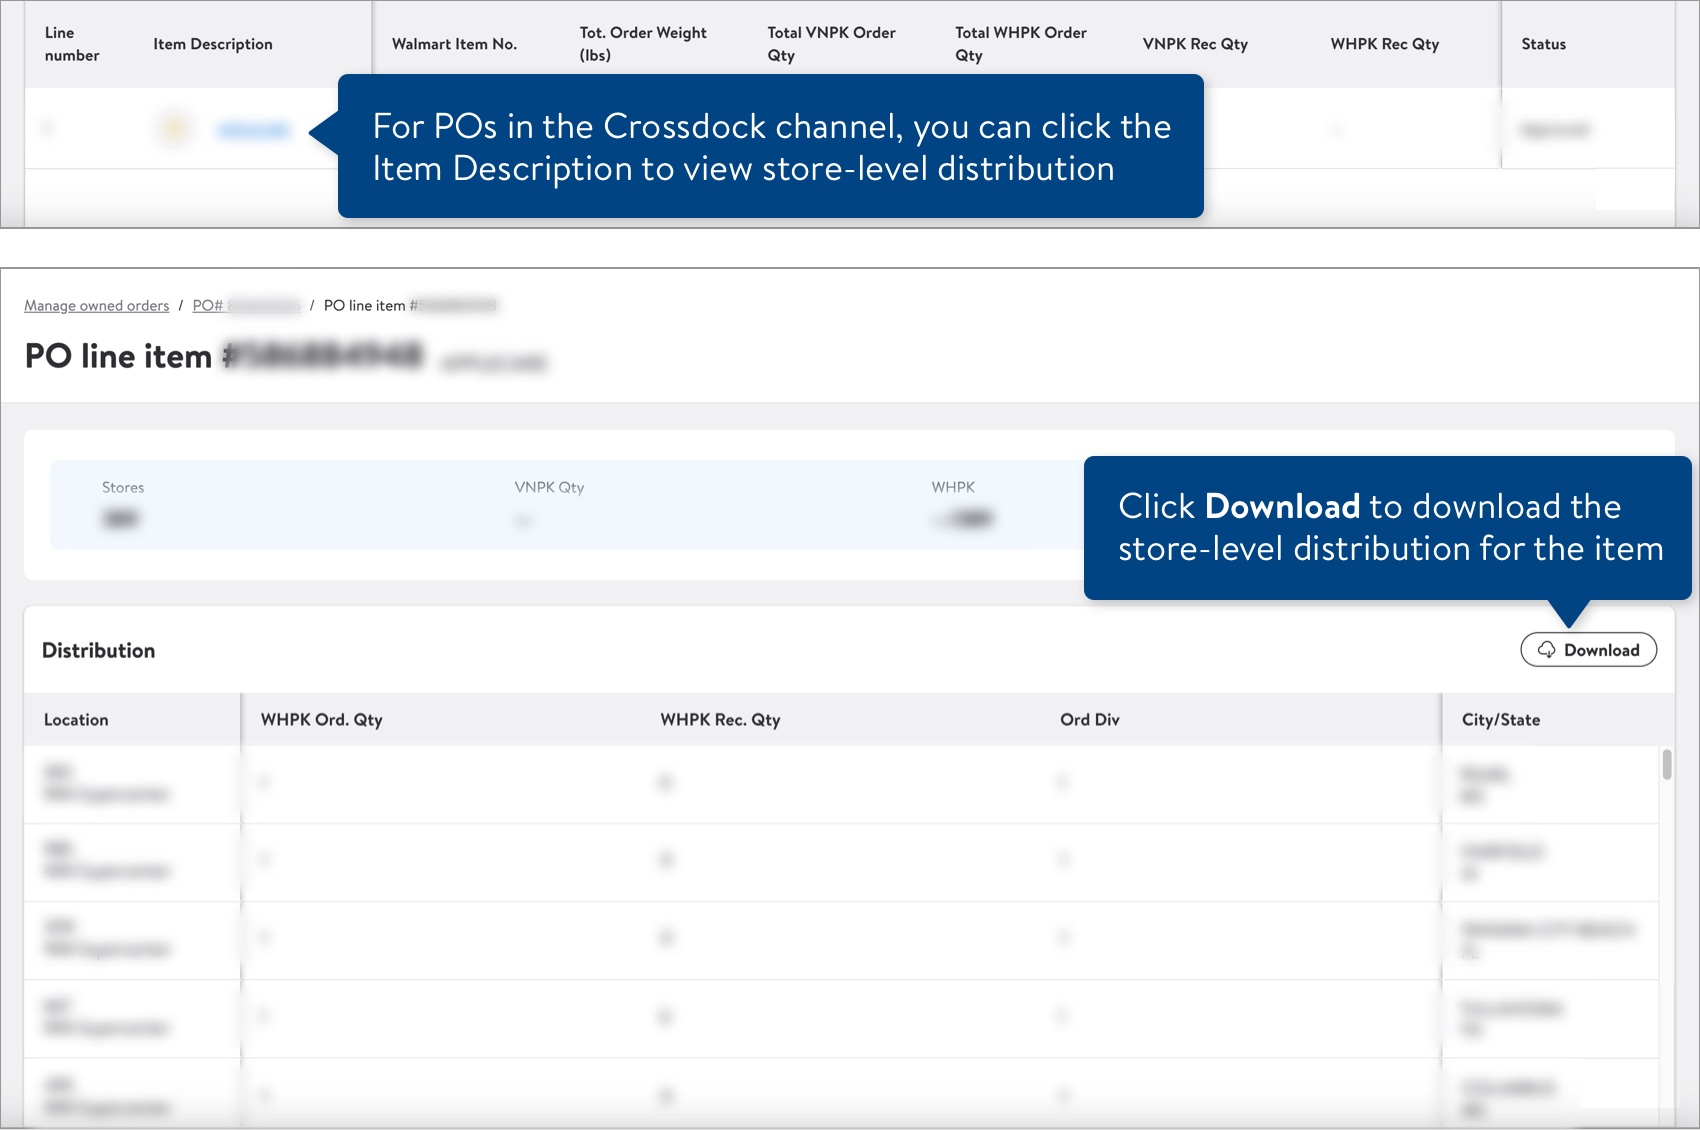
For POs in the Crossdock channel, you can drill down further. Click the Item Description in the table to view and download the store-level distribution.
Import PO Details
Click the import PO number in the table to view more details. You can also click Acknowledge from the details page.

You will see a tab with the order details (Current MAAP, Freight Terms, Department, Department Description, Total VNPK Order Qty, PO Line WHPK Ordered Qty, Total Eaches Order Qty, Channel, Import Factory ID, Pack Factory, Division, Purchase Company, PO Type, Factory Name, Season Code, Season Description, Quote ID (MPA), Vendor #, Rec. Node Contact, Total Net First Cost, WMT Week, Managing Buyer, Ordering Buyer, Vendor Ship Date, PO Create Date, In Store Date, Credit Office, Creation Office, Event Code, Payment Method, and Class) and a table of all items within the PO.
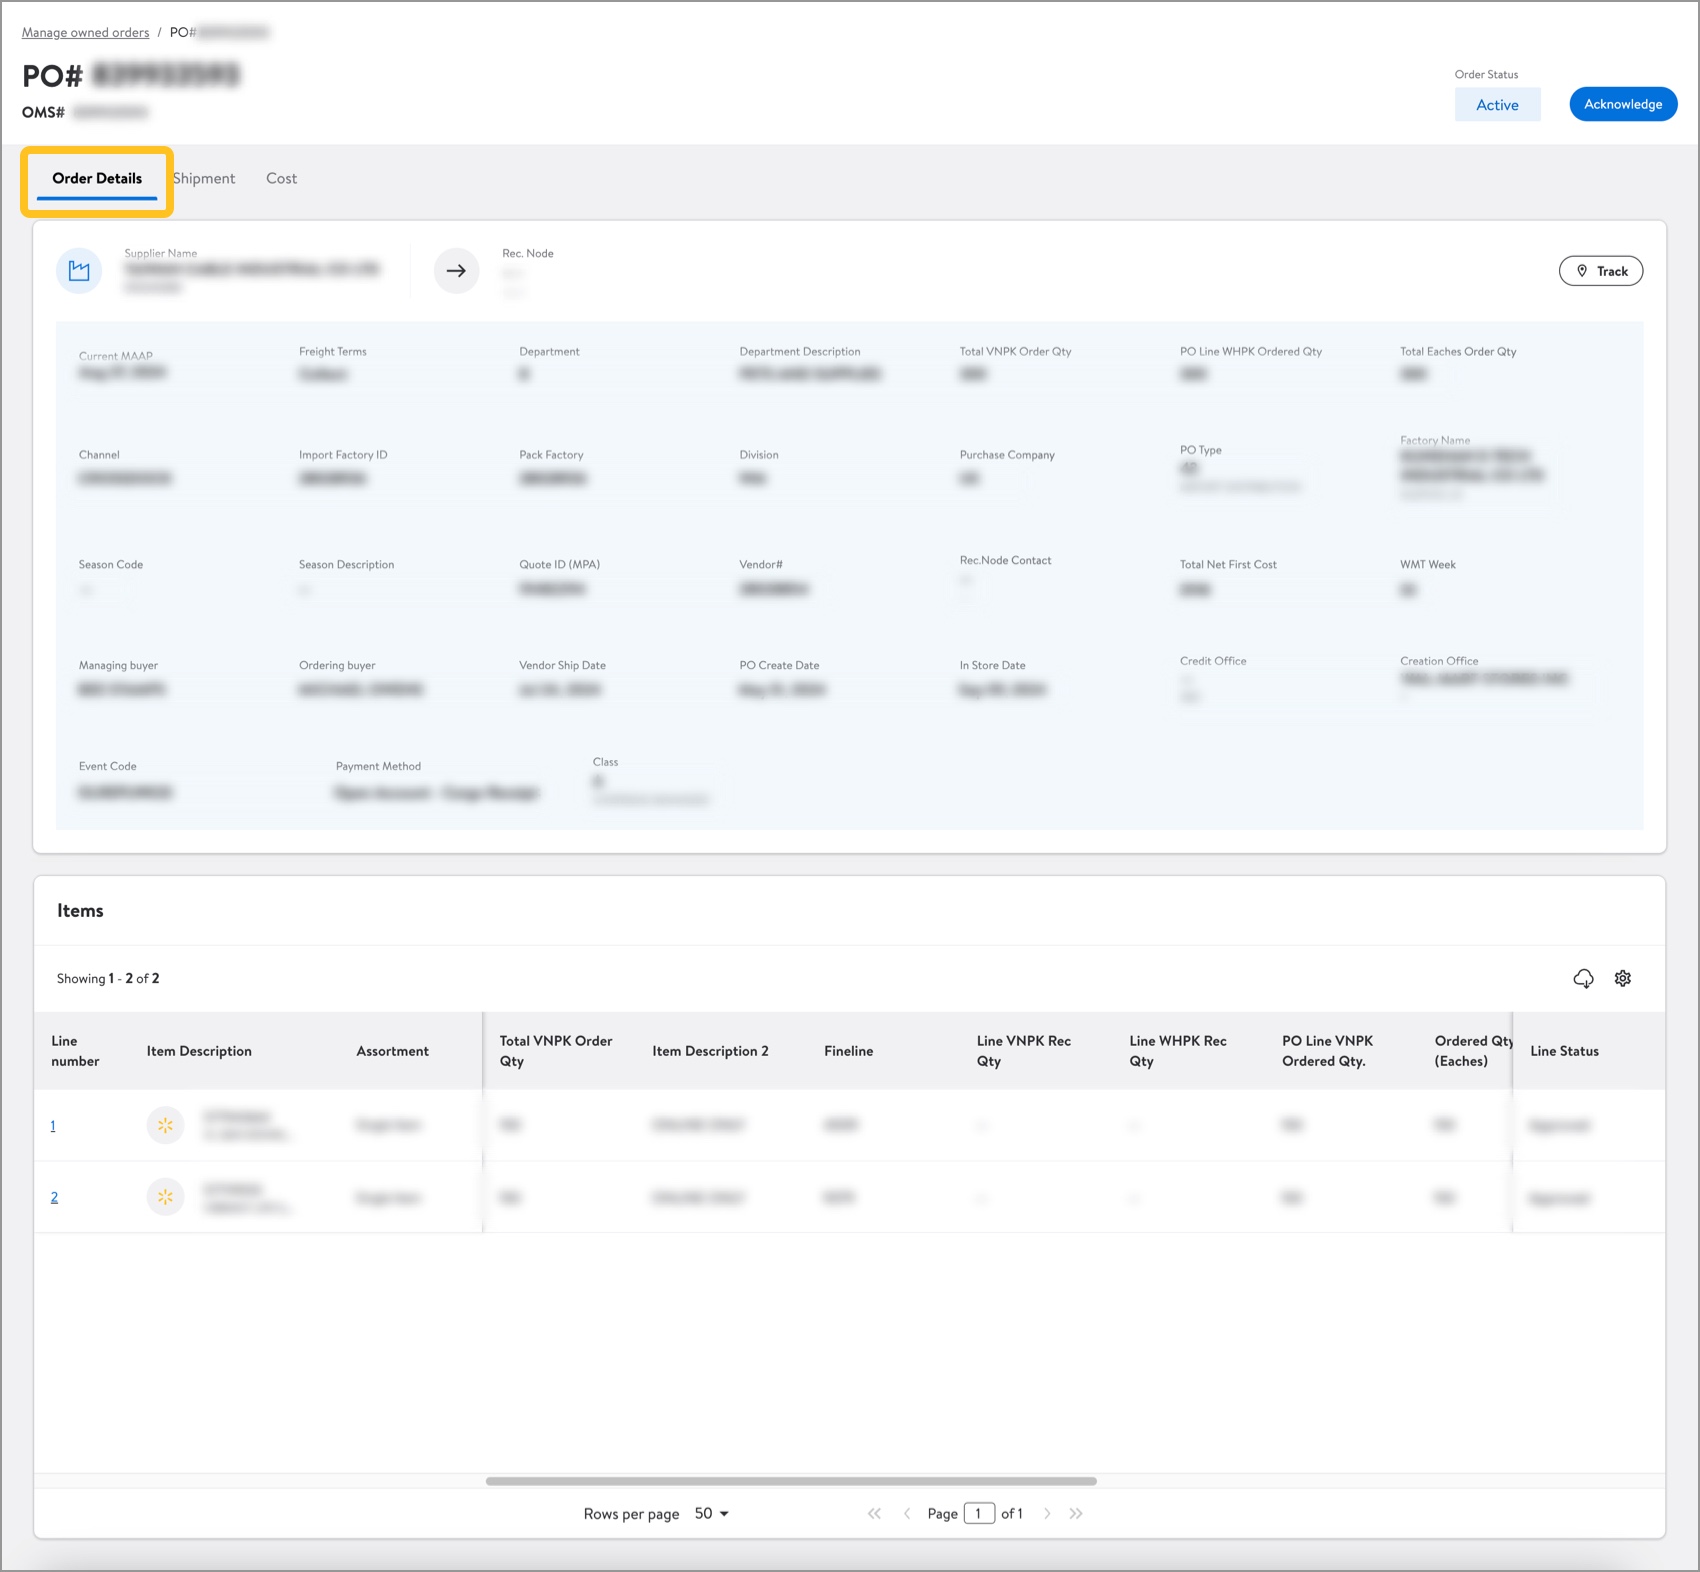
Click the Shipment tab to view shipment details for the order.

Click the Cost tab to view the Pack First cost, Pack Net First Cost, Ordered Net First Cost $, Defective allowance, Total Net First Cost $, and Total Retail $.


Track an Import PO
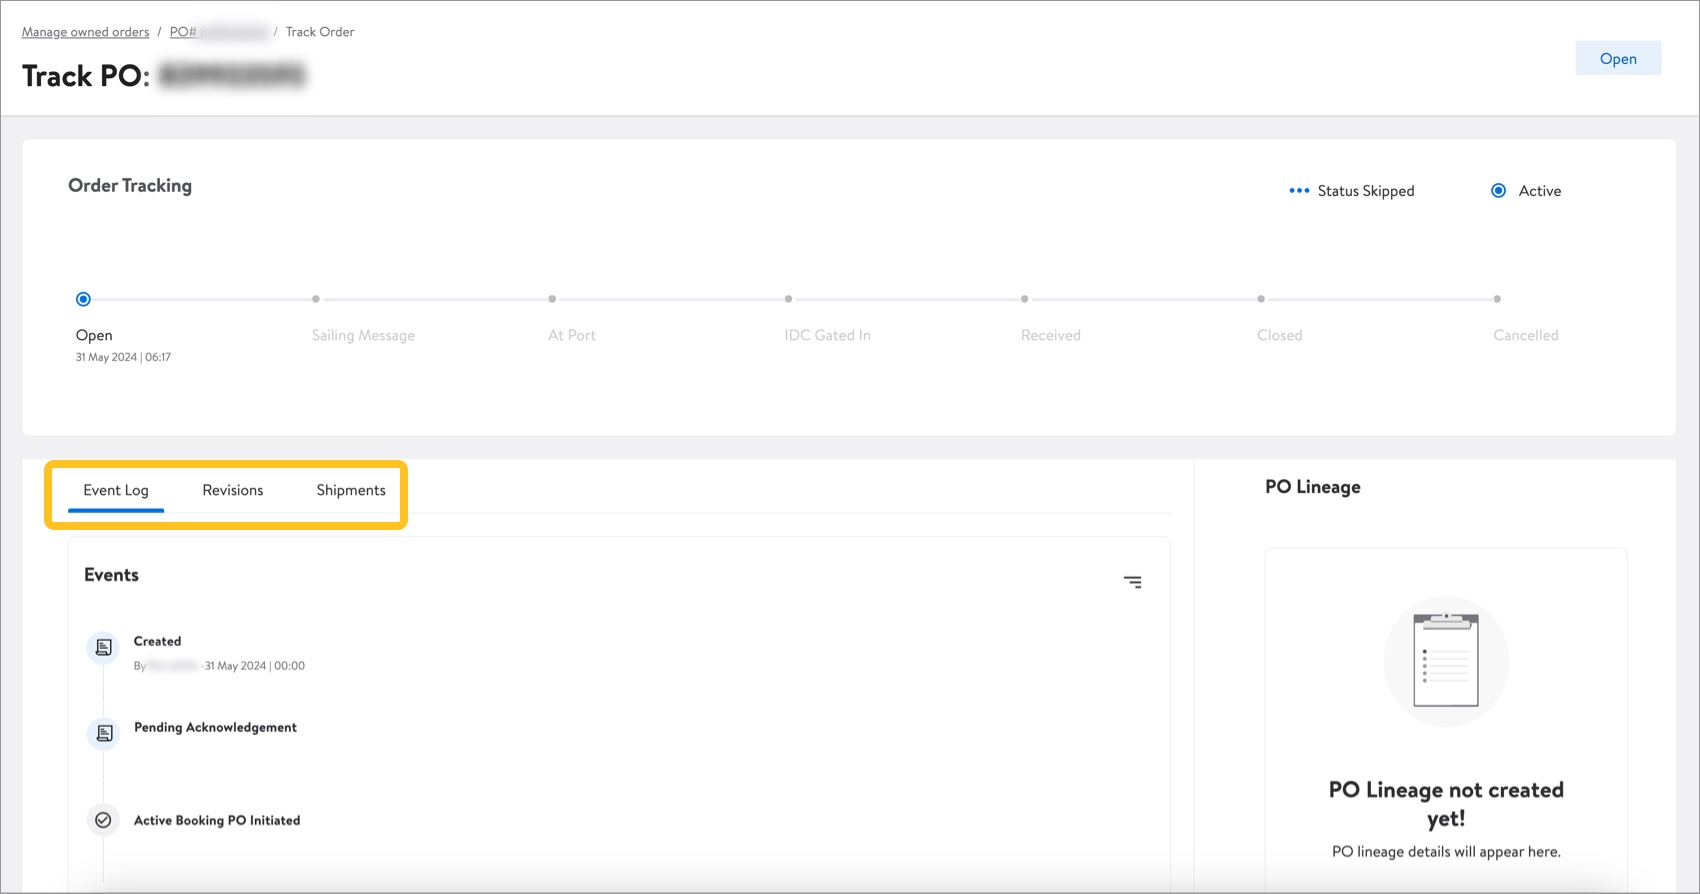
Click the dots under the Actions column and select Track.

View a timeline of the order tracking. You can also click one of the tabs to view the Event Log, Revisions, or Shipments.
Additional Actions for Import POs
Click the dots under the Actions column and select an option:
- Revise in Import PO Revision (IPOR)

- Download in Import PO Delivery (IPOD)

Have Questions or Need Help?
If you experience any issues viewing your orders, please click "Help" in the top navigation menu and select "Manage tickets" to file a case ticket. Or, select "Chat" to get real-time help from our chat bot or click "Search articles" to search Supplier One HelpDocs.
Make sure to select the issue type Orders and Shipping.