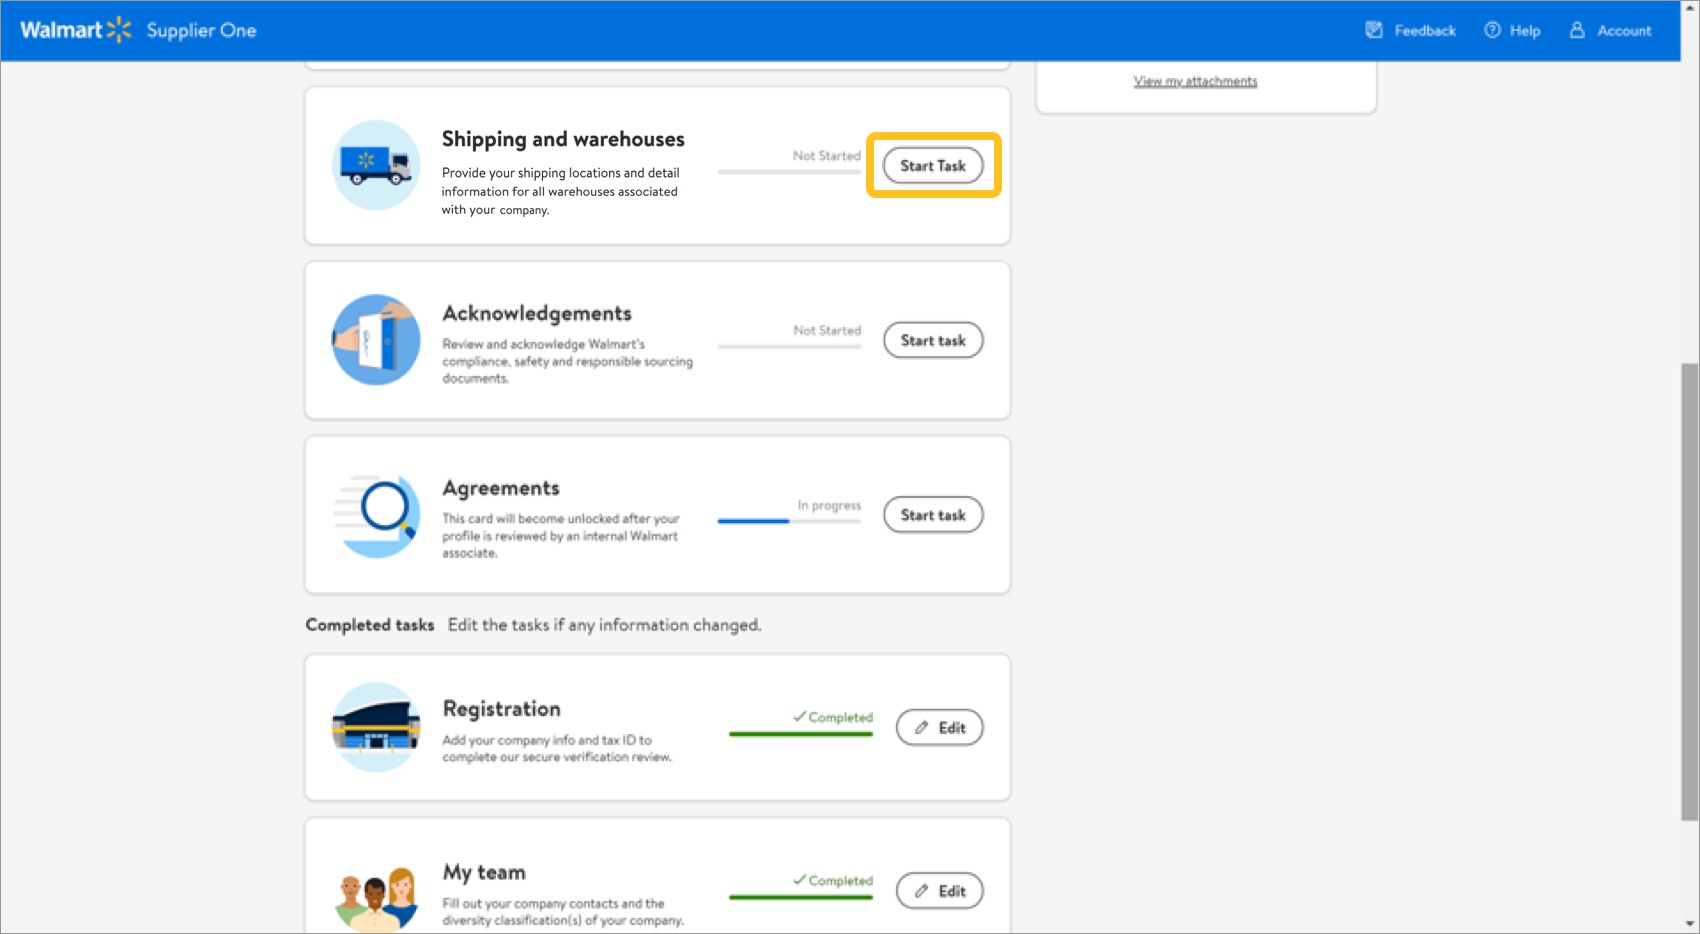
Supplier Onboarding: Shipping and Warehouses (GFR)
The Shipping and warehouses tile is enabled after you successfully complete the Registration tile. Reference the Supplier Onboarding: Registration (GFR) article for more information. You must complete all available steps in the Shipping and warehouses tile before Walmart, Inc. can send an agreement. Once you receive an agreement, you need to return to the Shipping and warehouses tile to indicate if you are a Collect or Prepaid supplier.
Pre-Supplier Agreement
Delivery and DSV Information
- From the supplier onboarding dashboard within Supplier One, click Start task on the Shipping and warehouses tile.
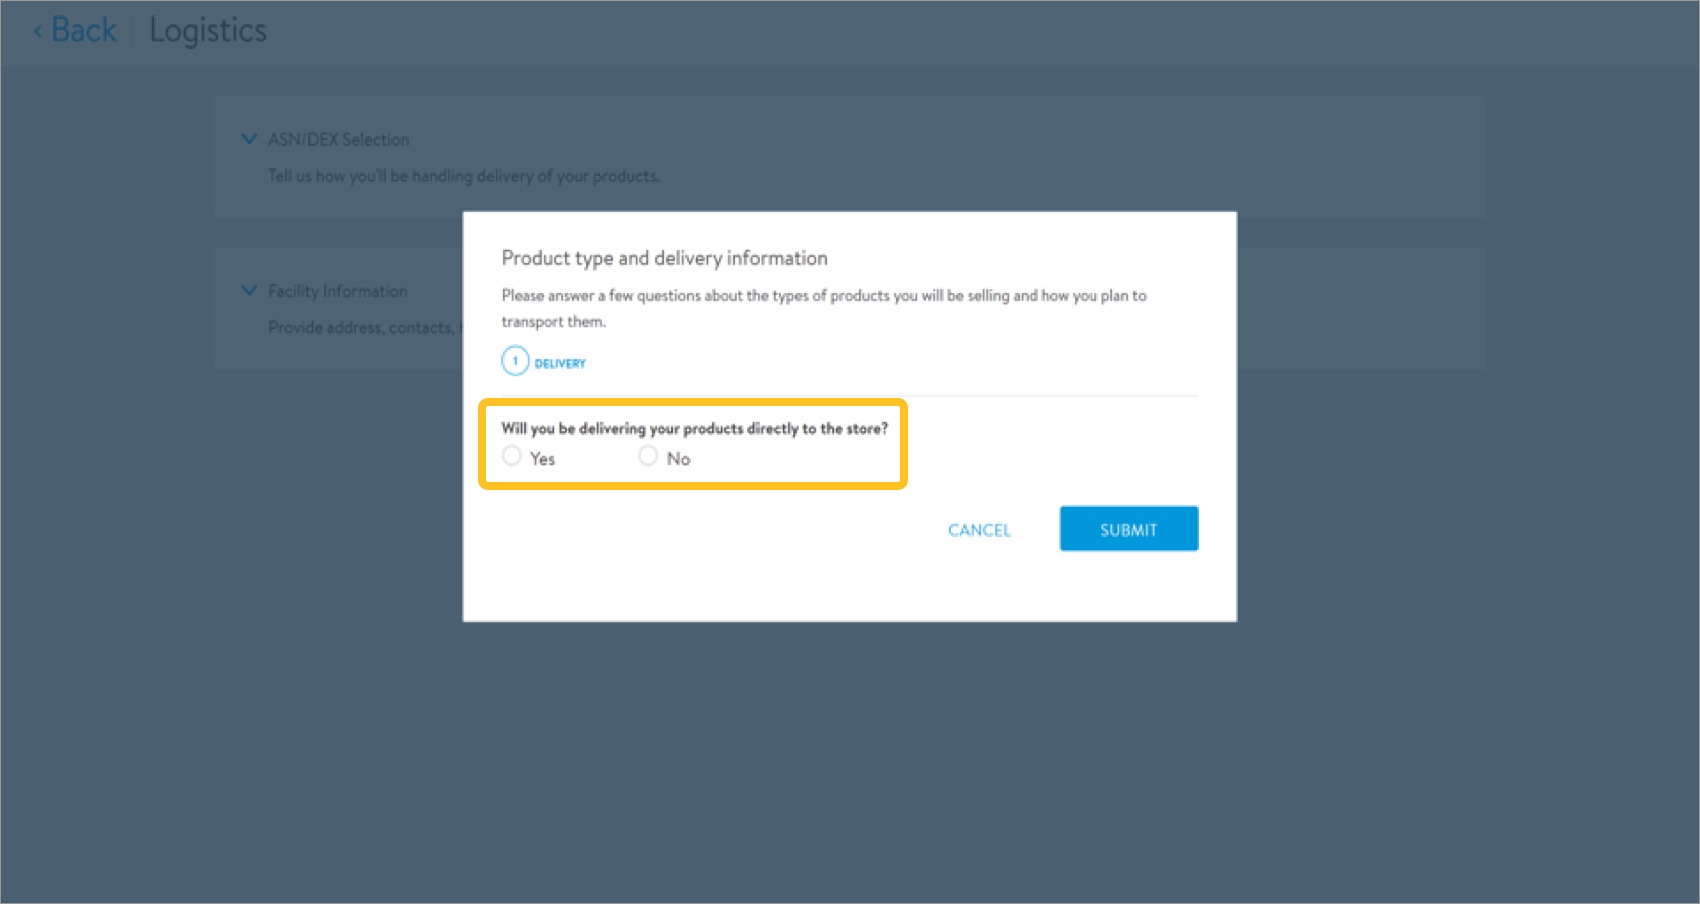
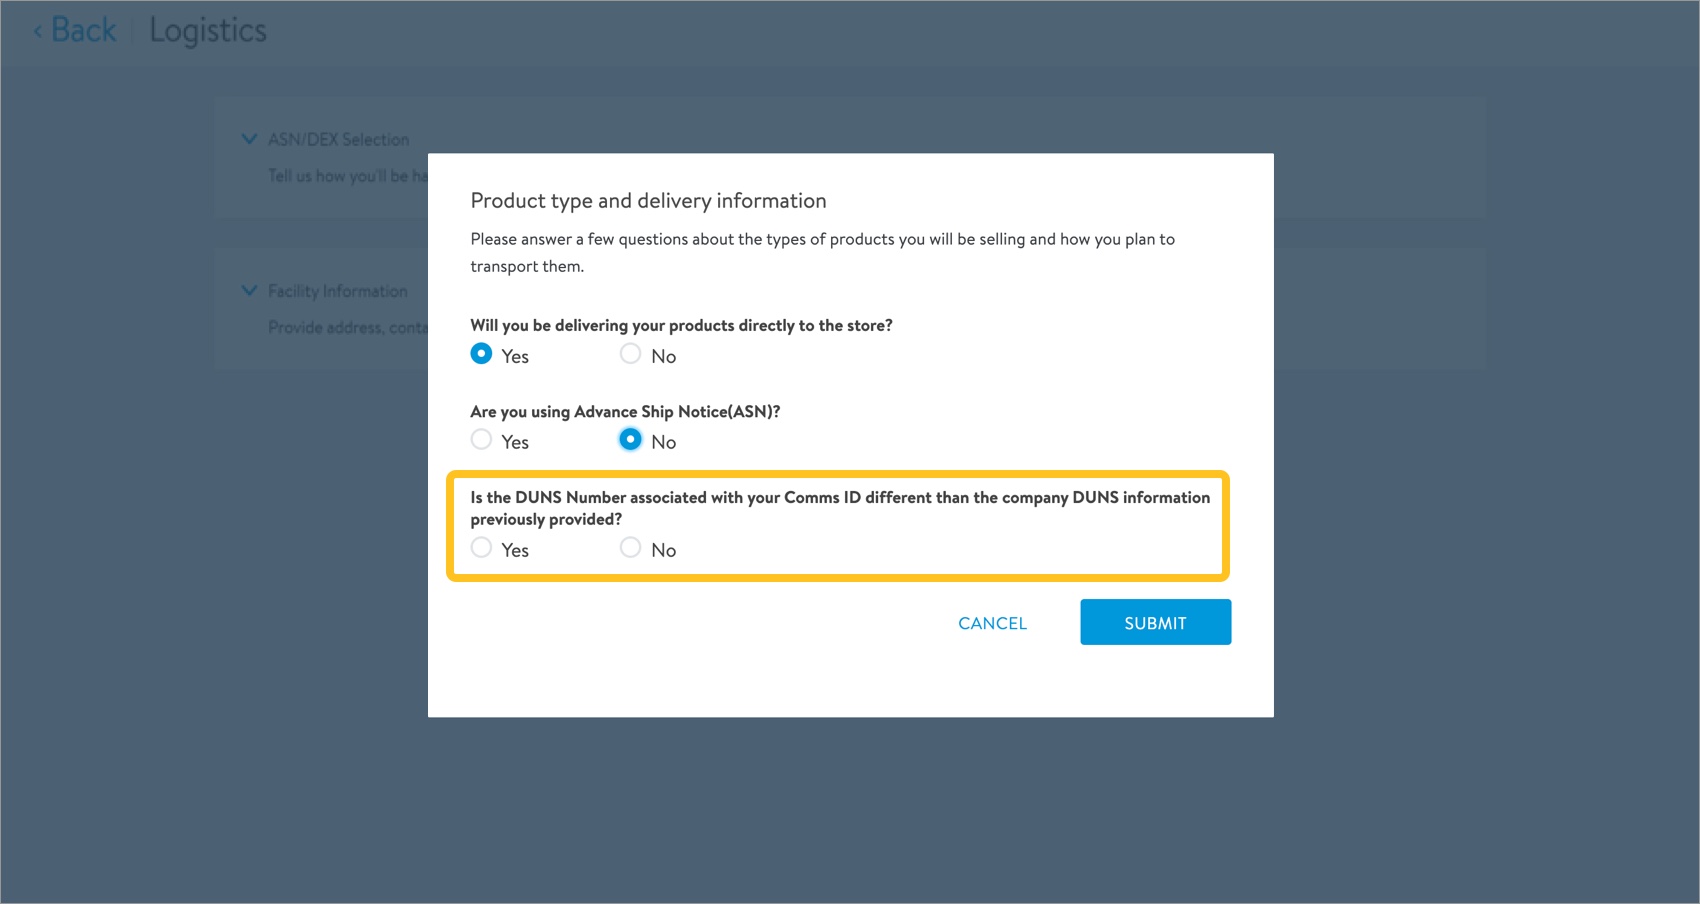
- Tell us if you will be delivering products directly to the store.Selecting No in this step marks the ASN/DEX Selection as completed later in this task.Step 3 (immediately following) is not required if you select No in this step.
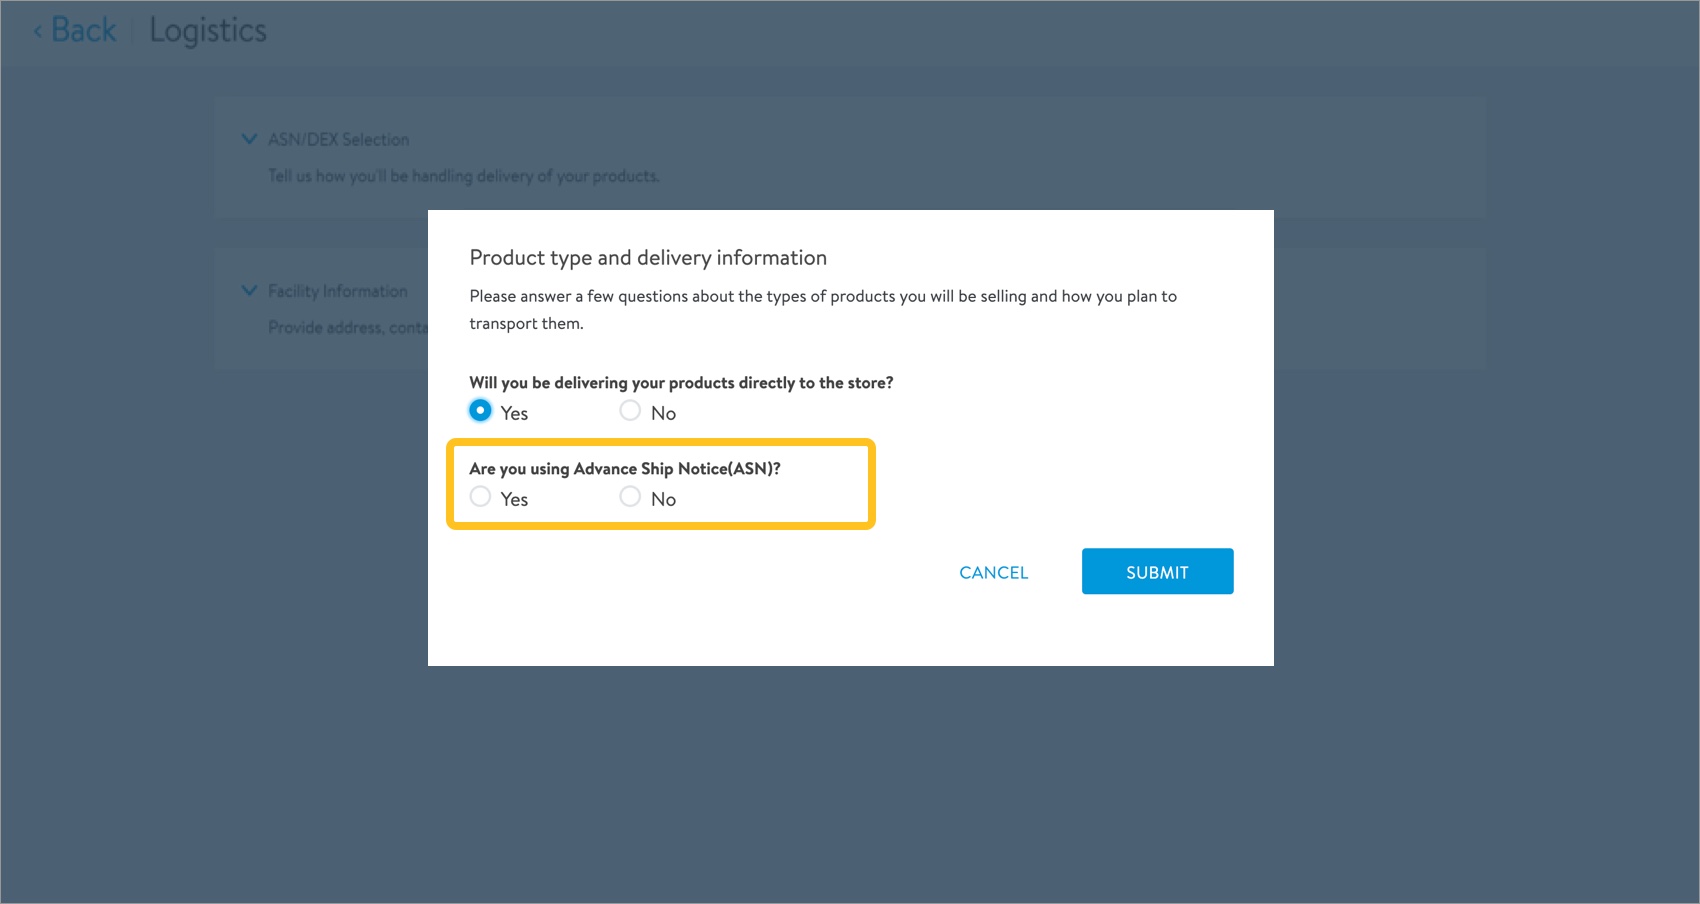
- Only required if you will be delivering products directly to the store: Tell us if you are using Advance Ship Notification (ASN). Click Next.Selecting No in this step marks the ASN/DEX Selection as completed later in this task.
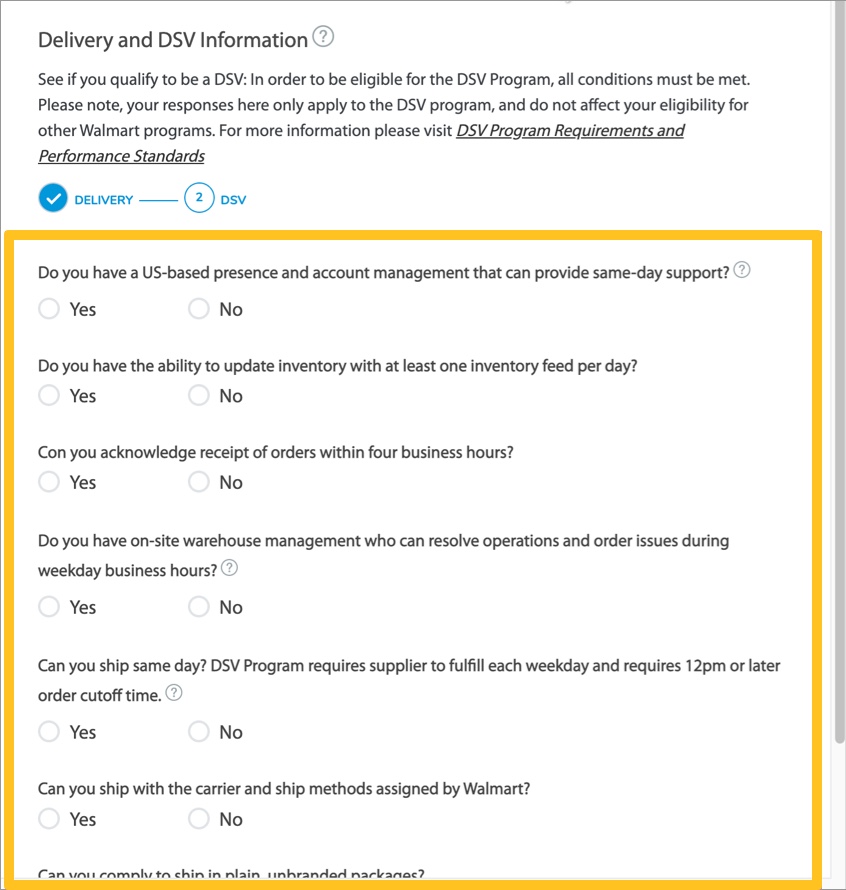
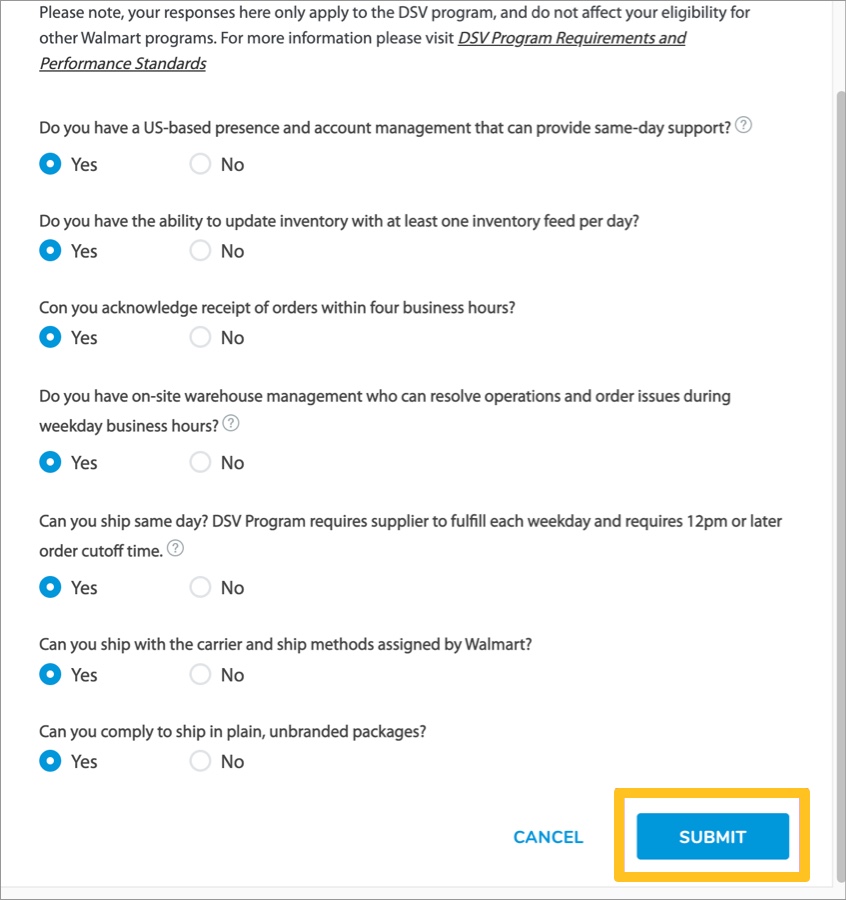
- Answer questions to see if you qualify as a Drop Ship Vendor (DSV).Find more information about DSV program requirements and performance standards here. You must select Yes to all questions to be considered for DSV eligibility.
- Click Submit. The supplier onboarding process saves your responses under the Shipping and warehouses tile.
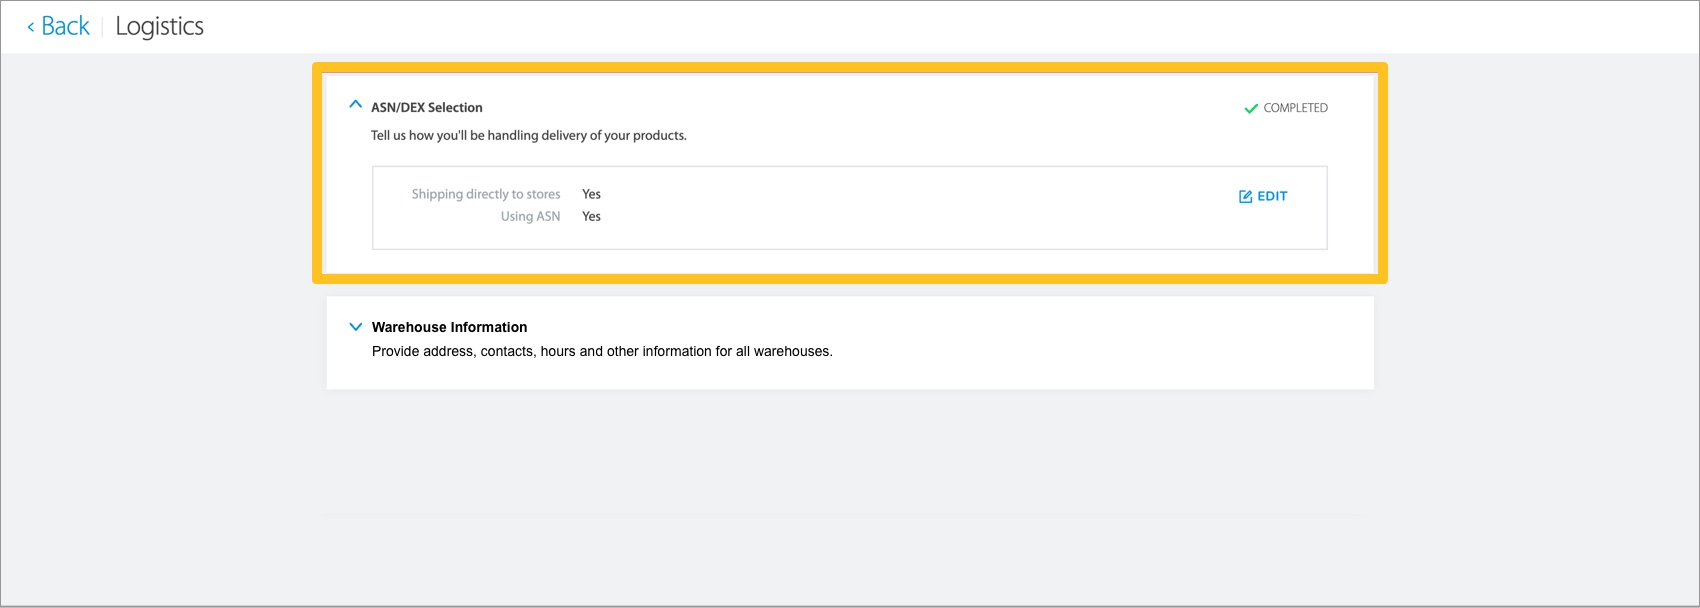
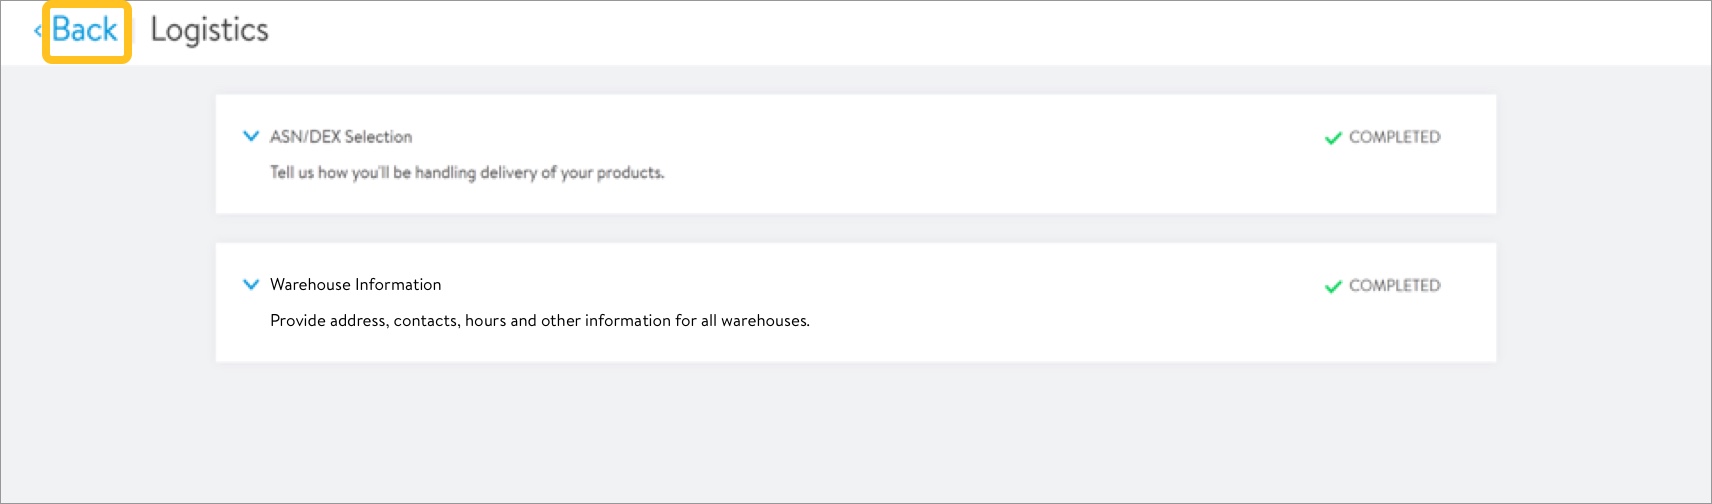
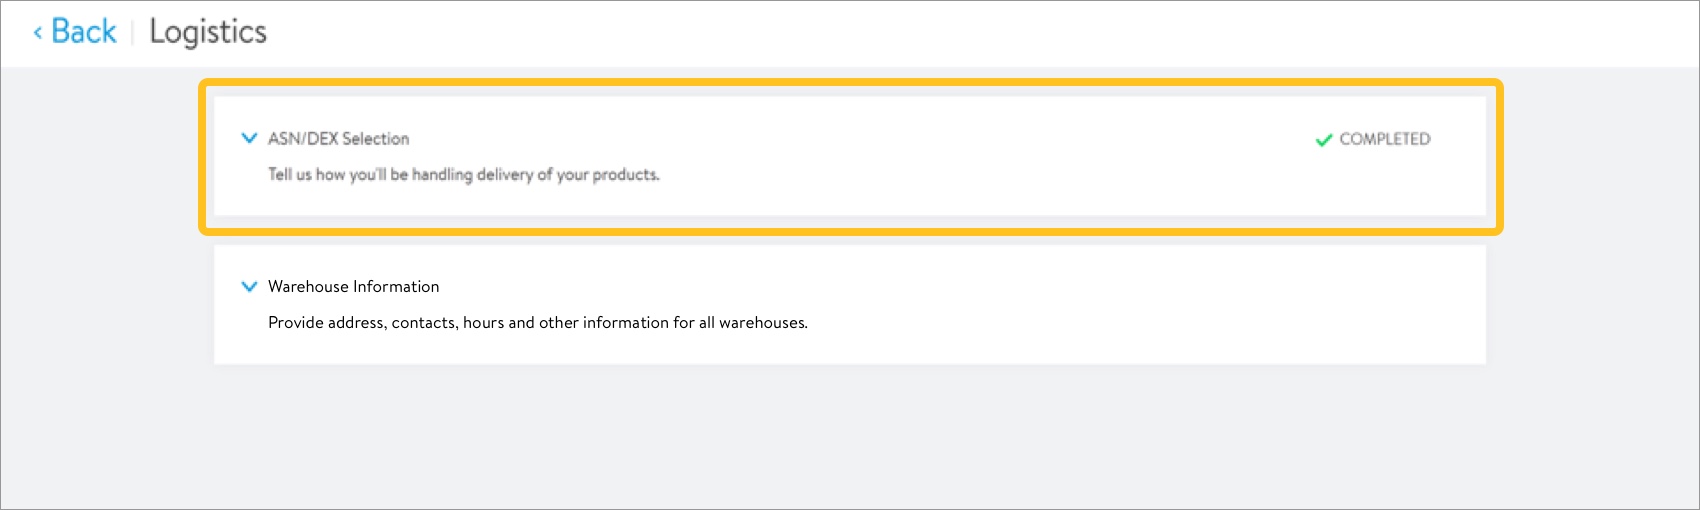
ASN/DEX Selection
- Click ASN/DEX Selection to expand the section and review the information.If you told us you will not be delivering products directly to the store, the ASN/DEX Selection is automatically marked completed.

- Review the shipping directly and ASN information. Click Edit to make changes.

- Only review this information if you are not using ASNs.
- If you are using ASNs, no action is required. The ASN/DEX Selection is marked as completed.
- If you are not using ASNs, tell us if the DUNS Number associated with your Comms ID is different than the company DUNS information previously provided.
- If you select Yes, provide a new 10-digit Comms ID and the updated DUNS Number associated with the Comms ID. Select a Contact from the drop-down menu. Click Save once all the information is entered accurately.
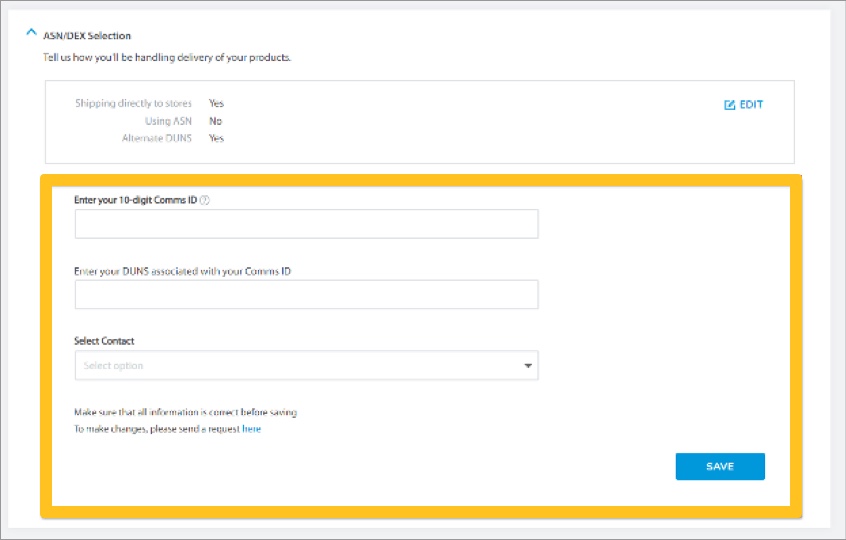 Once an alternative DUNS is set up, you cannot change it directly from this screen. You will have to submit a separate request for any changes made to the DUNS information.
 - If you select No, click Submit to move on to the DSV Profile Requirements.

- If you select Yes, provide a new 10-digit Comms ID and the updated DUNS Number associated with the Comms ID. Select a Contact from the drop-down menu. Click Save once all the information is entered accurately.
- If you are using ASNs, no action is required. The ASN/DEX Selection is marked as completed.
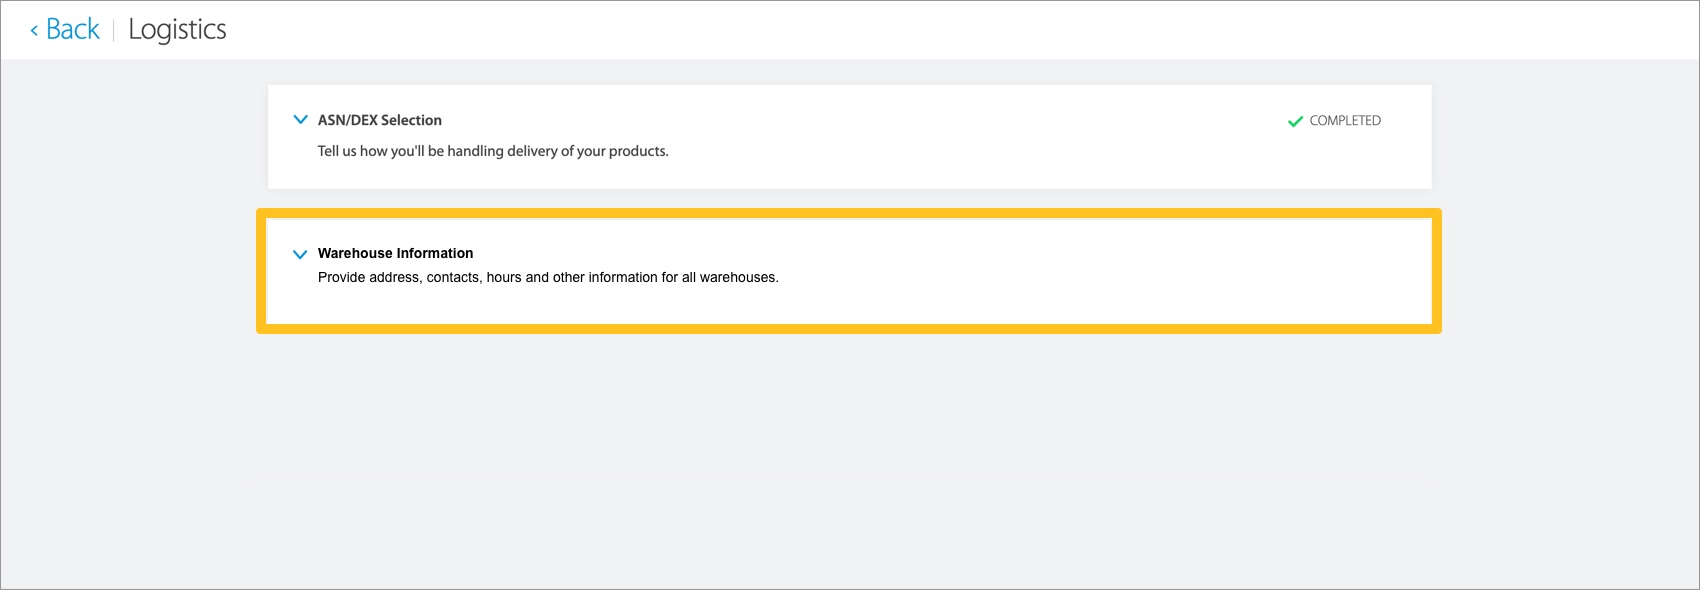
Warehouse Information
Warehouse information does not have to be provided all at once. After you provide your warehouse address, you can go back to the supplier onboarding dashboard. When you come back later to provide the remaining information, click Resume.

- Click Warehouse Information to expand the section and provide information.
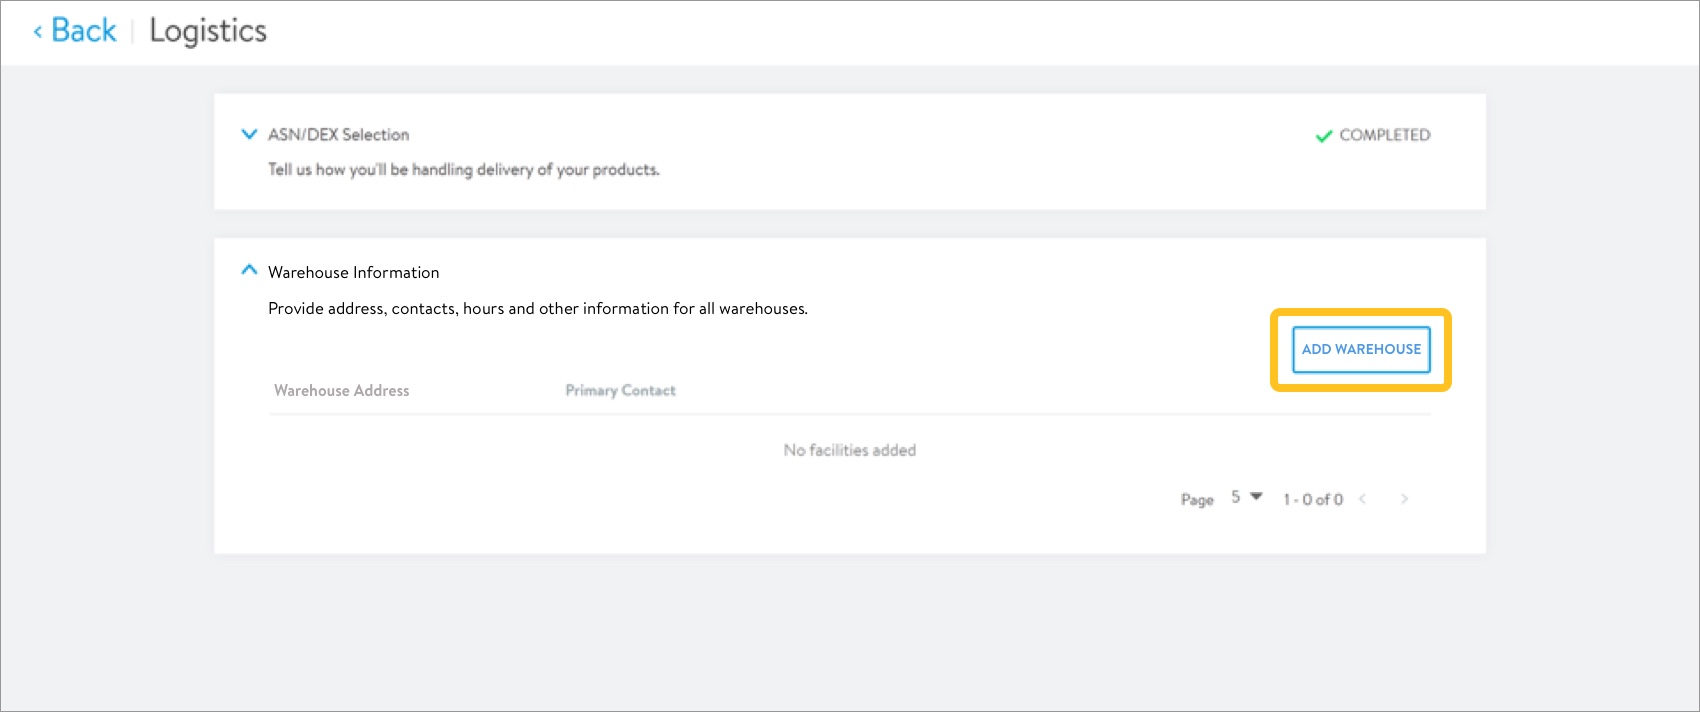
- Click Add Warehouse to provide addresses, contacts, hours, and other information for all your warehouses.
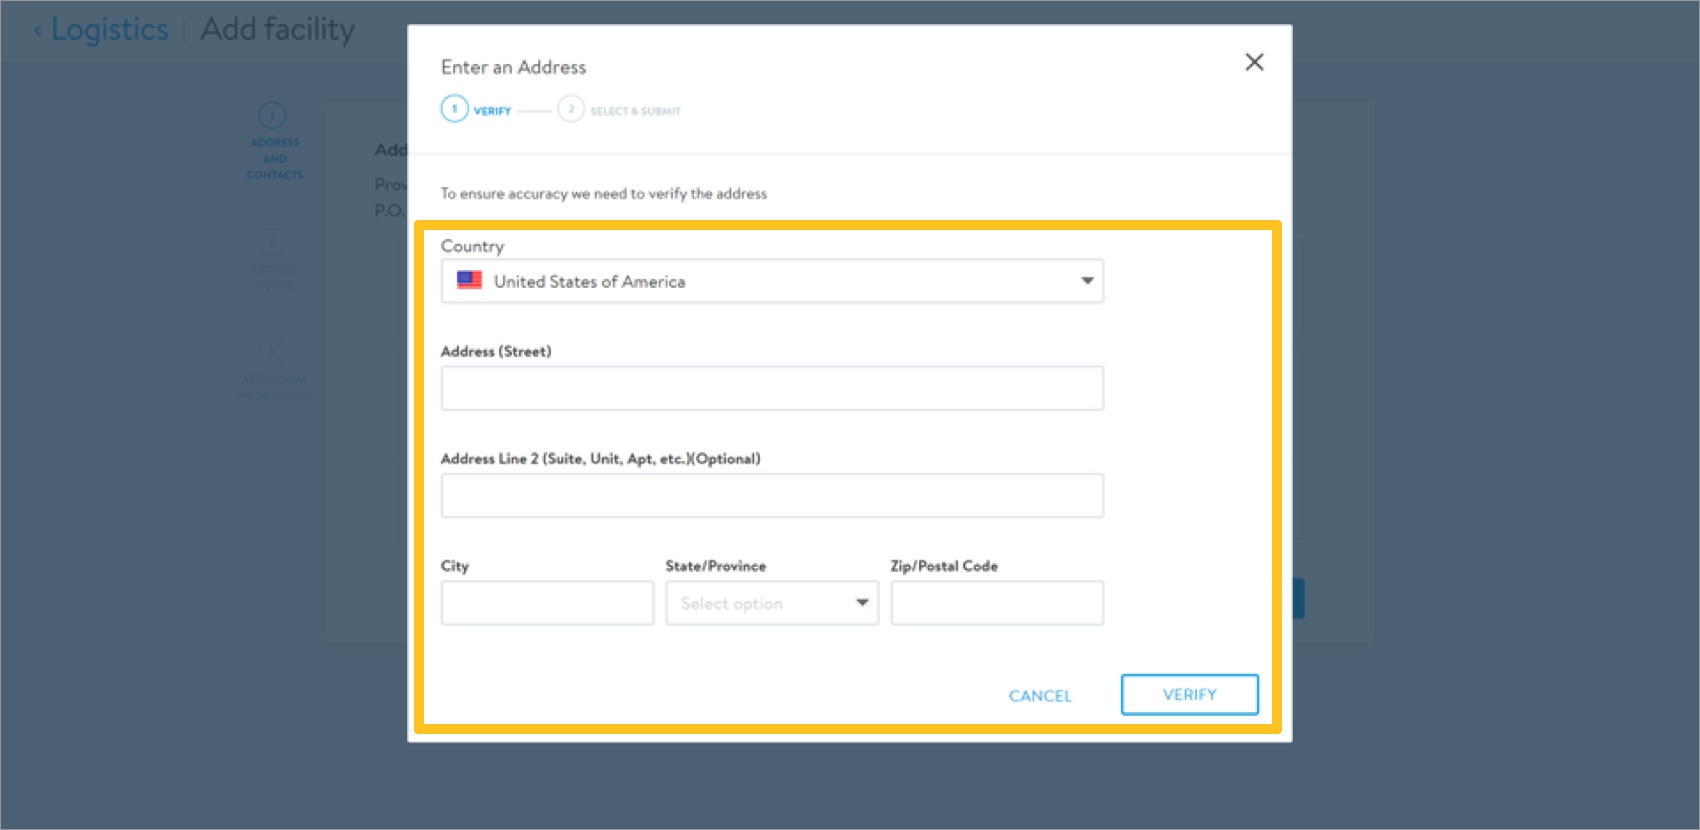
- Provide warehouse address information: Country, Street Address (line 2 if needed), City, State/Province, and ZIP/Postal Code. Click Verify.
 Once your address is verified, select an address from the list (we recommend selecting the Suggested Address) and click Submit.
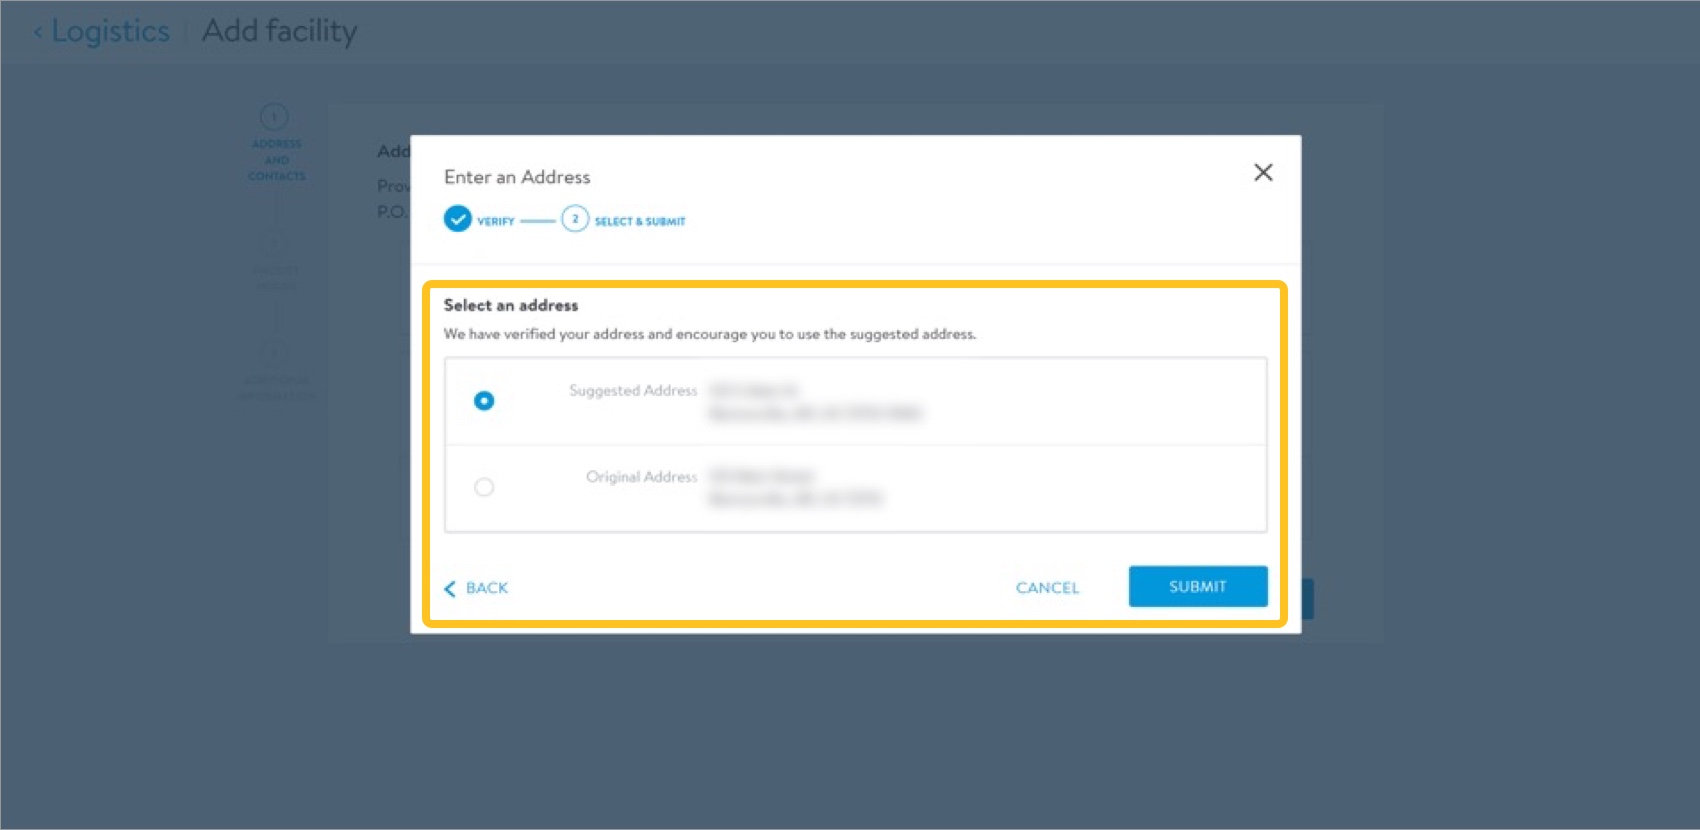
- Select the warehouse contact(s) by clicking the check box next to their name.The supplier onboarding process pulls the warehouse contact(s) in from those provided in the My Team tile. Reference the Supplier Onboarding: My Team (GFR) article for more information.
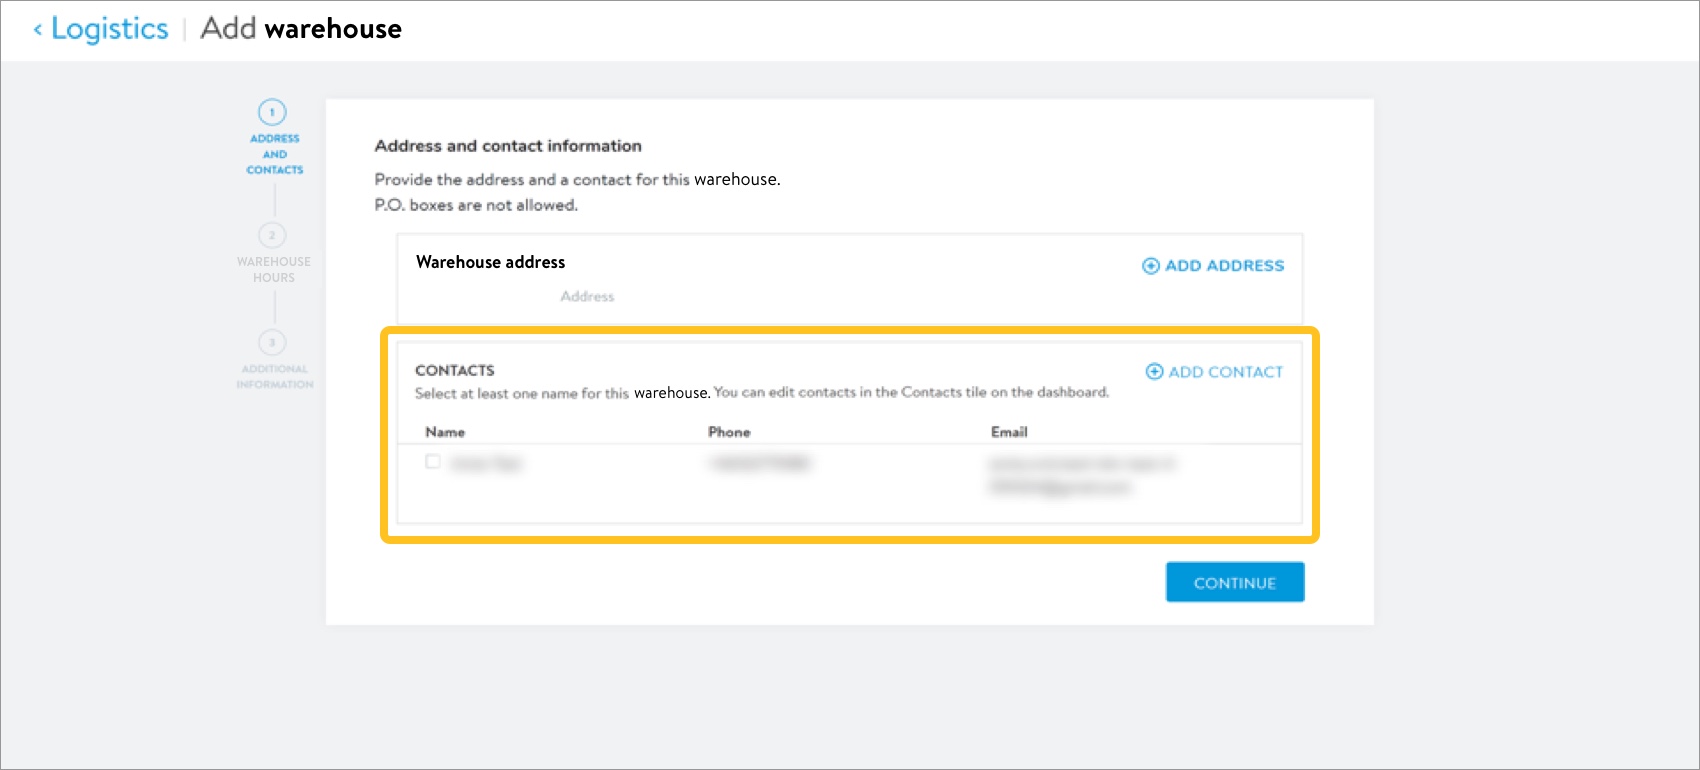
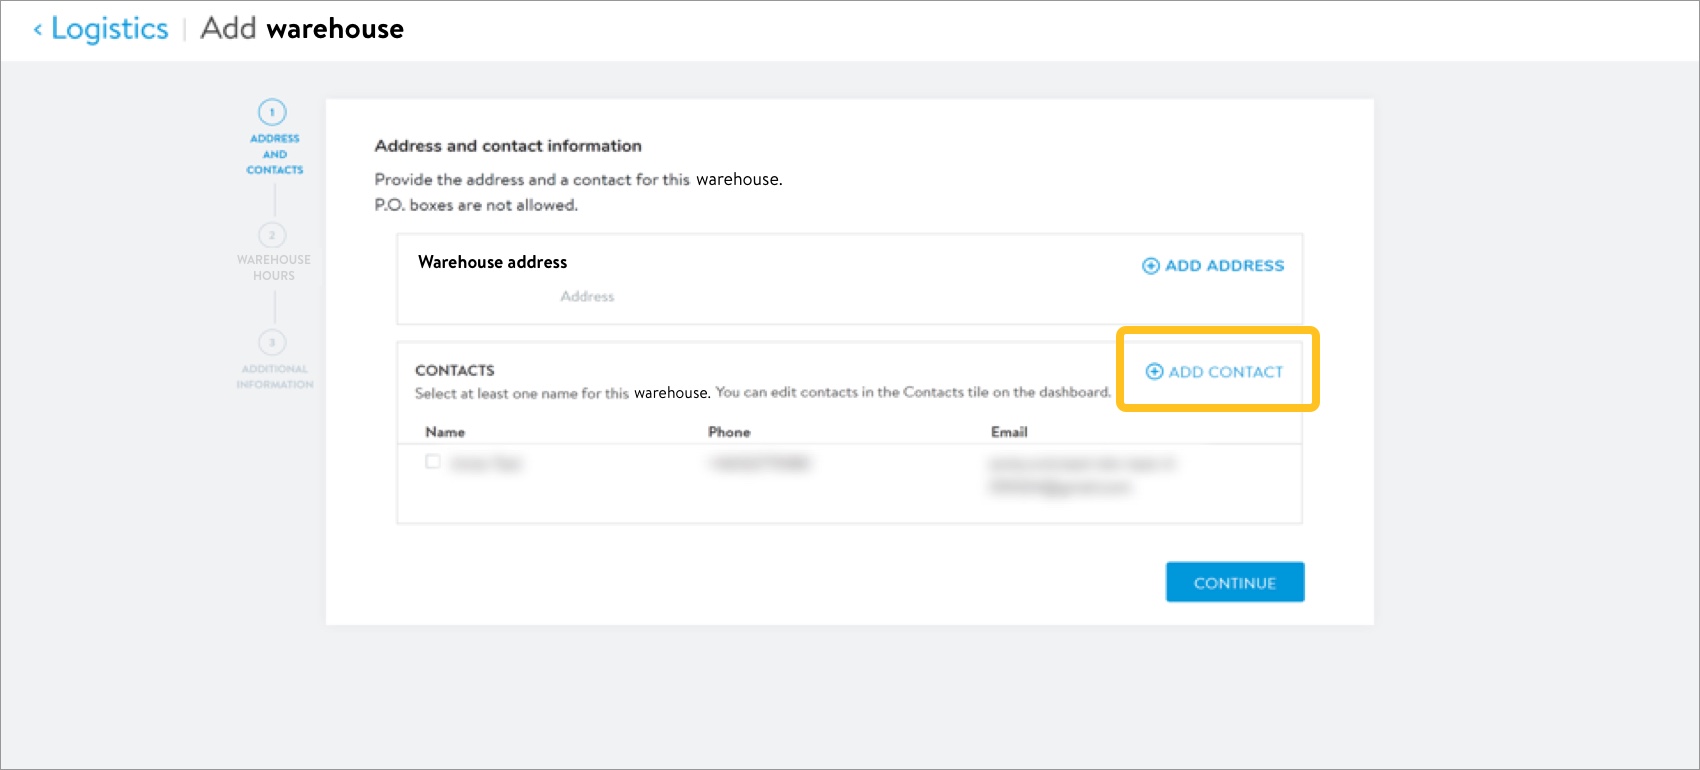
- If needed, click Add Contact to add a new warehouse contact.
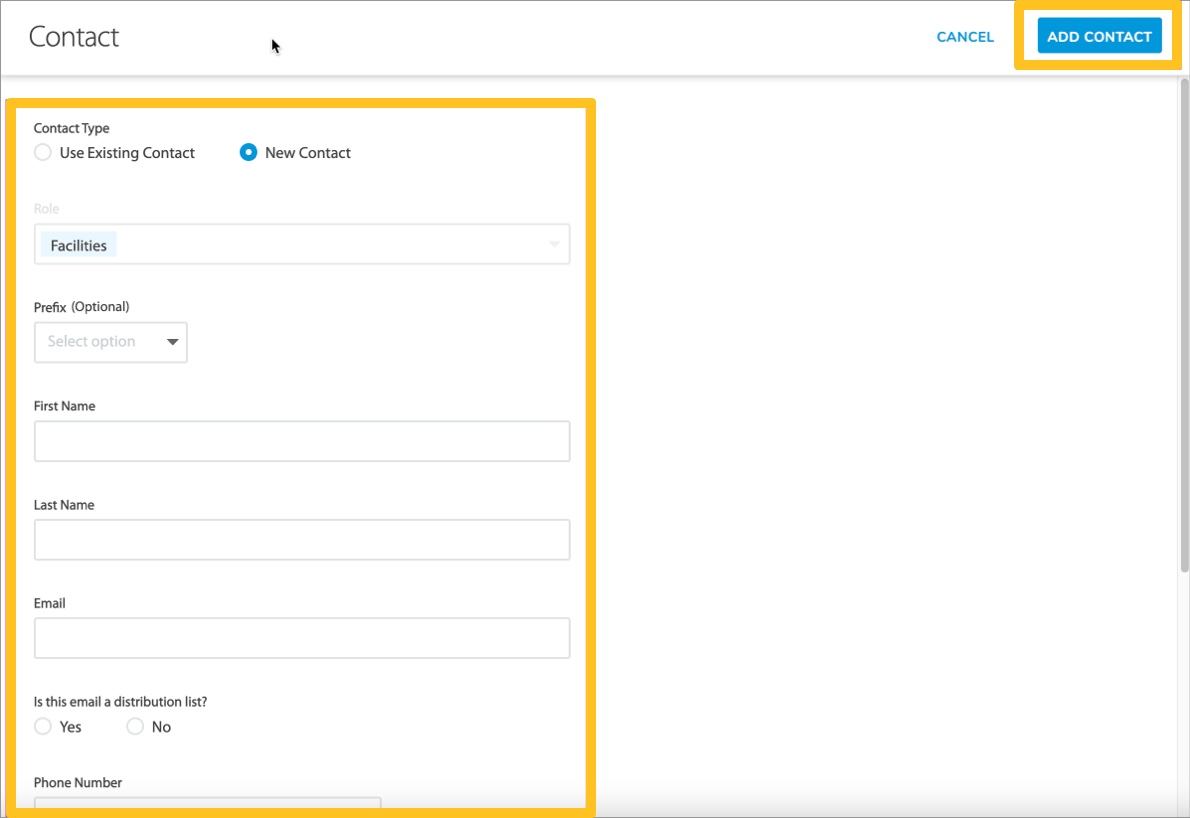
- Provide the contact's information: Role, Prefix (optional), First Name, Last Name, Email, if the email is a distribution list, and Phone Number. Click Add contact to save your changes.
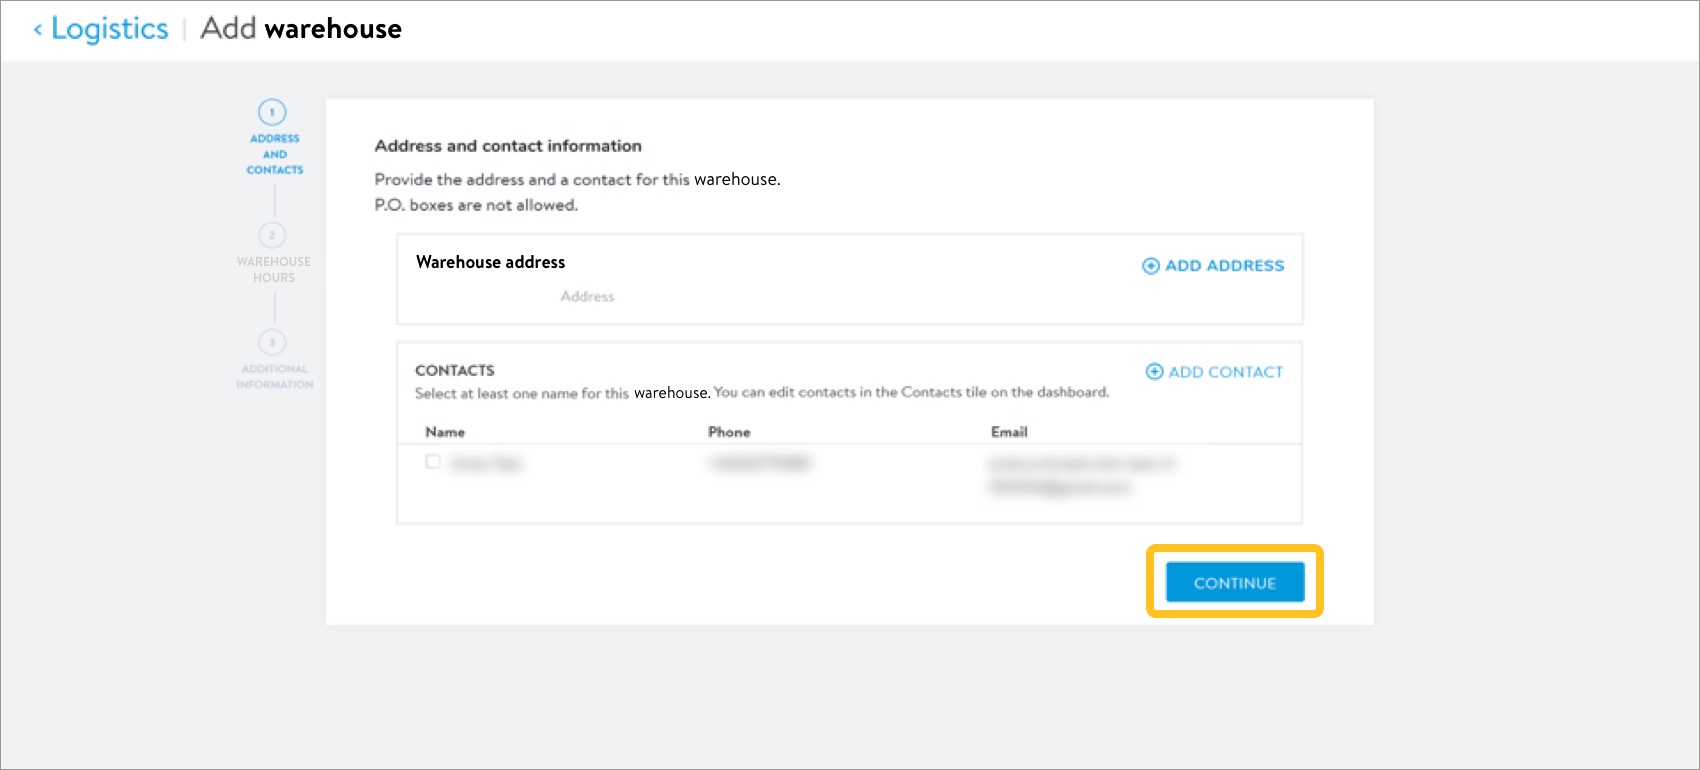
- Click Continue.
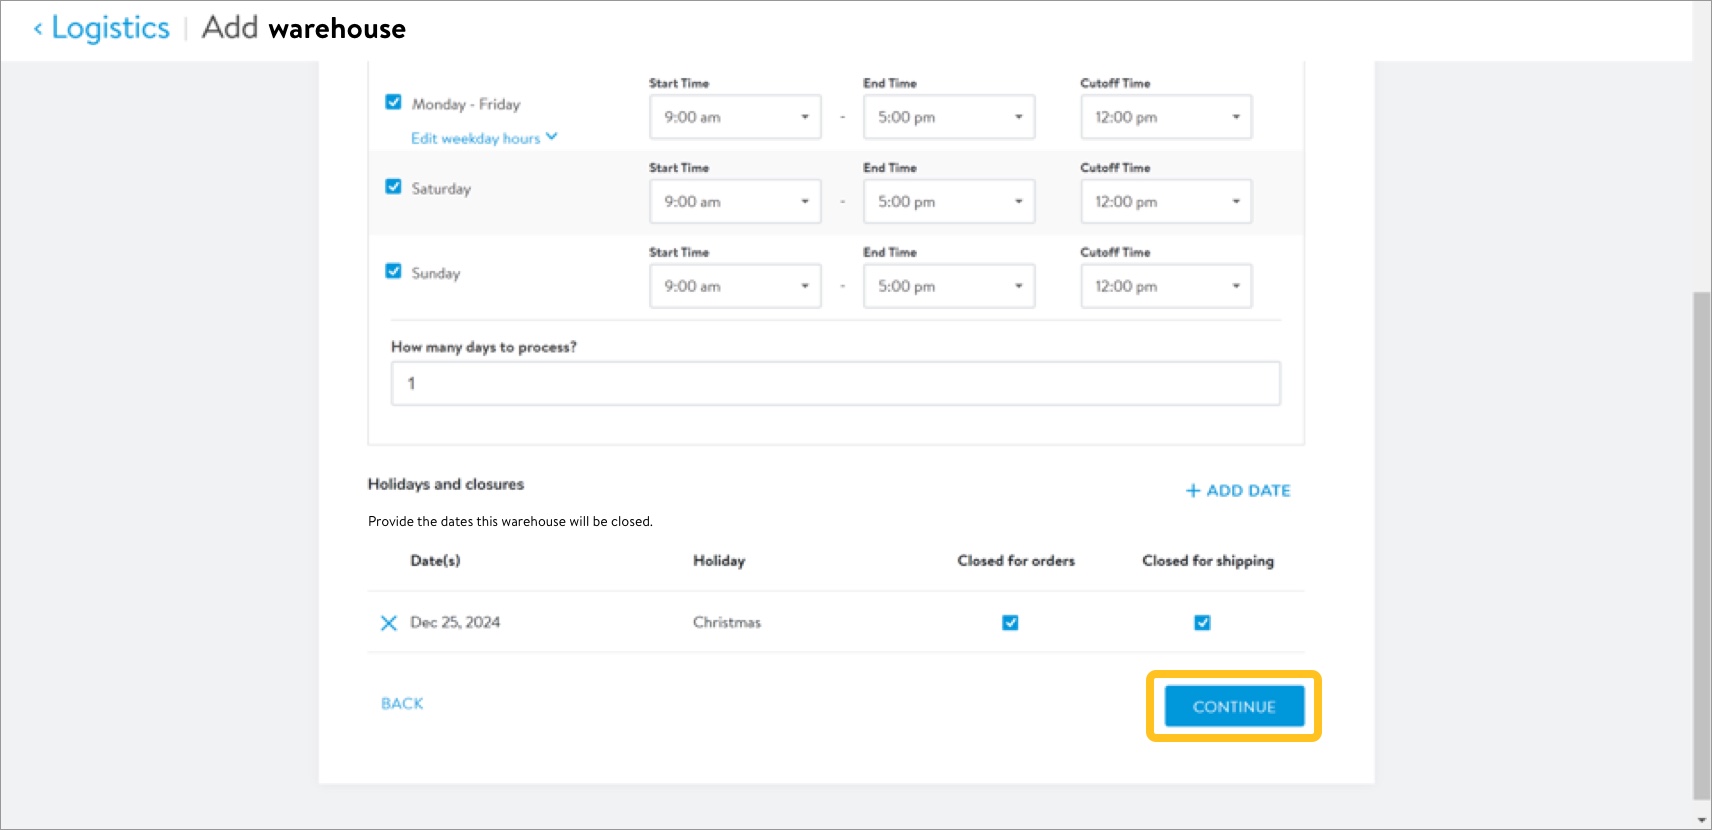
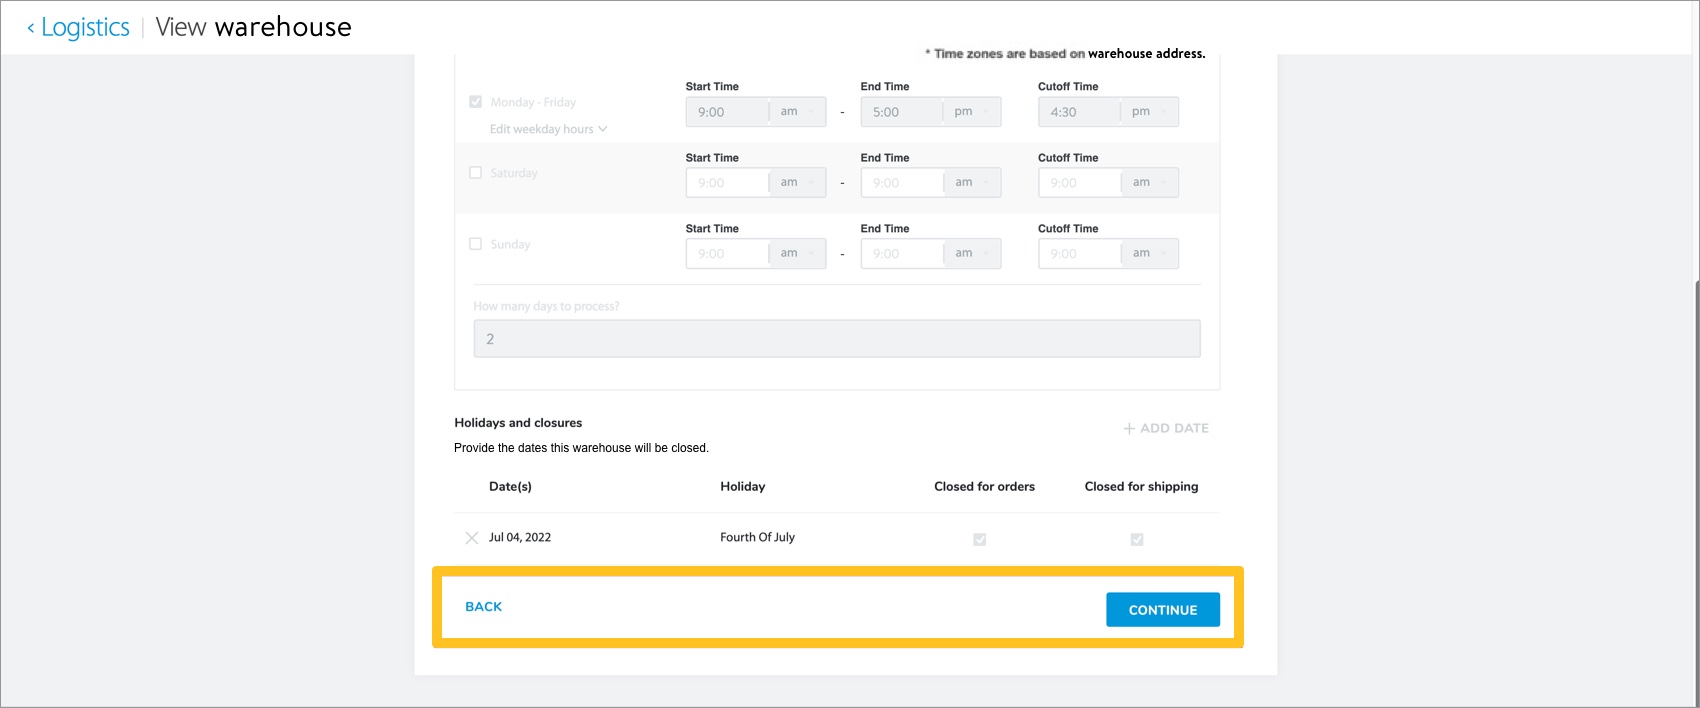
- Provide the warehouse's hours of operation for receiving orders.
- Click the check box on the left to activate the day(s). For example, do not select Saturday if your warehouse does not receive orders on Saturdays.
- Provide the Start Time and End Time for the active day(s). Time zone is based on the warehouse address.
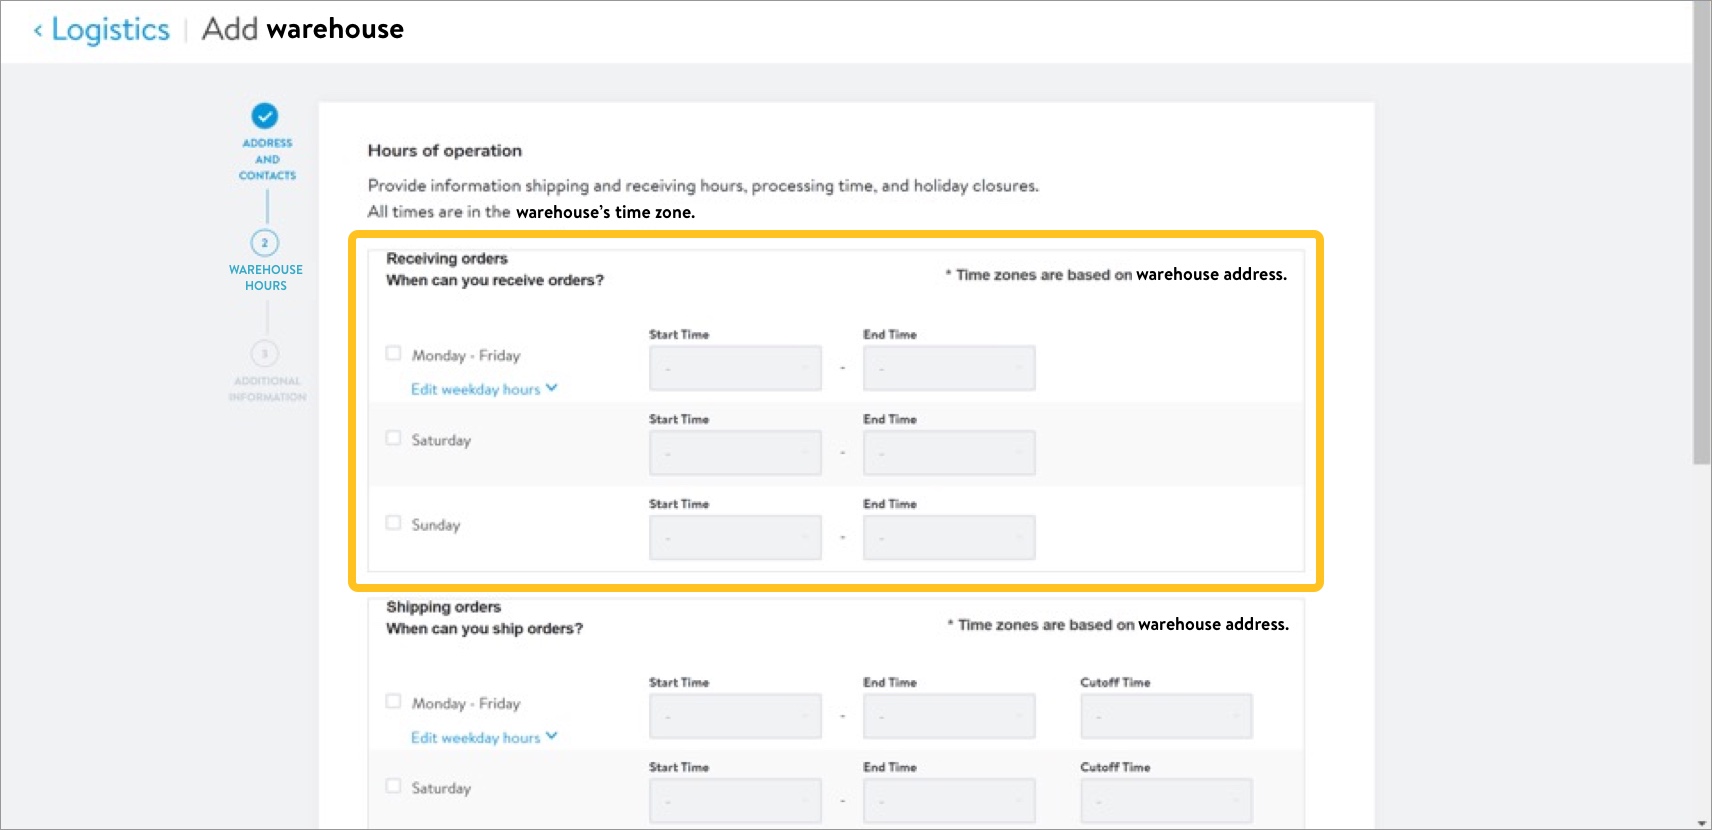
If needed, click the Edit weekday hours drop-down option to define each weekday's receiving start and end times.
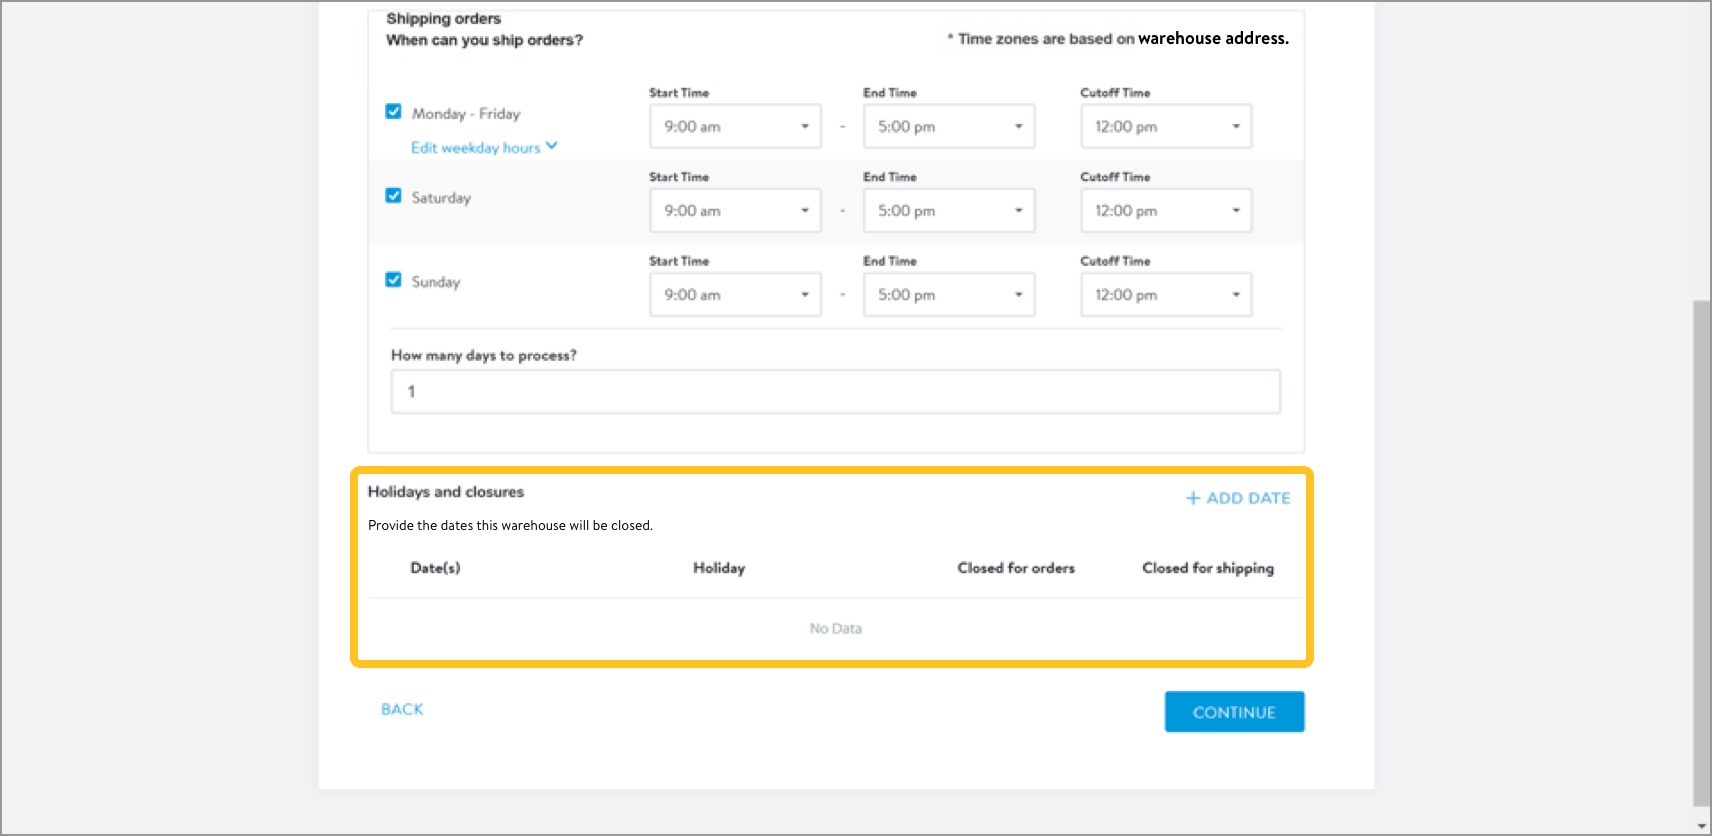
- Provide the warehouse's hours of operation for shipping orders.
- Click the check box on the left to activate the day(s). For example, do not select Saturday if your warehouse does not ship orders on Saturdays.
- Provide the Start Time and End Time for the active day(s). Time zone is based on the warehouse address.
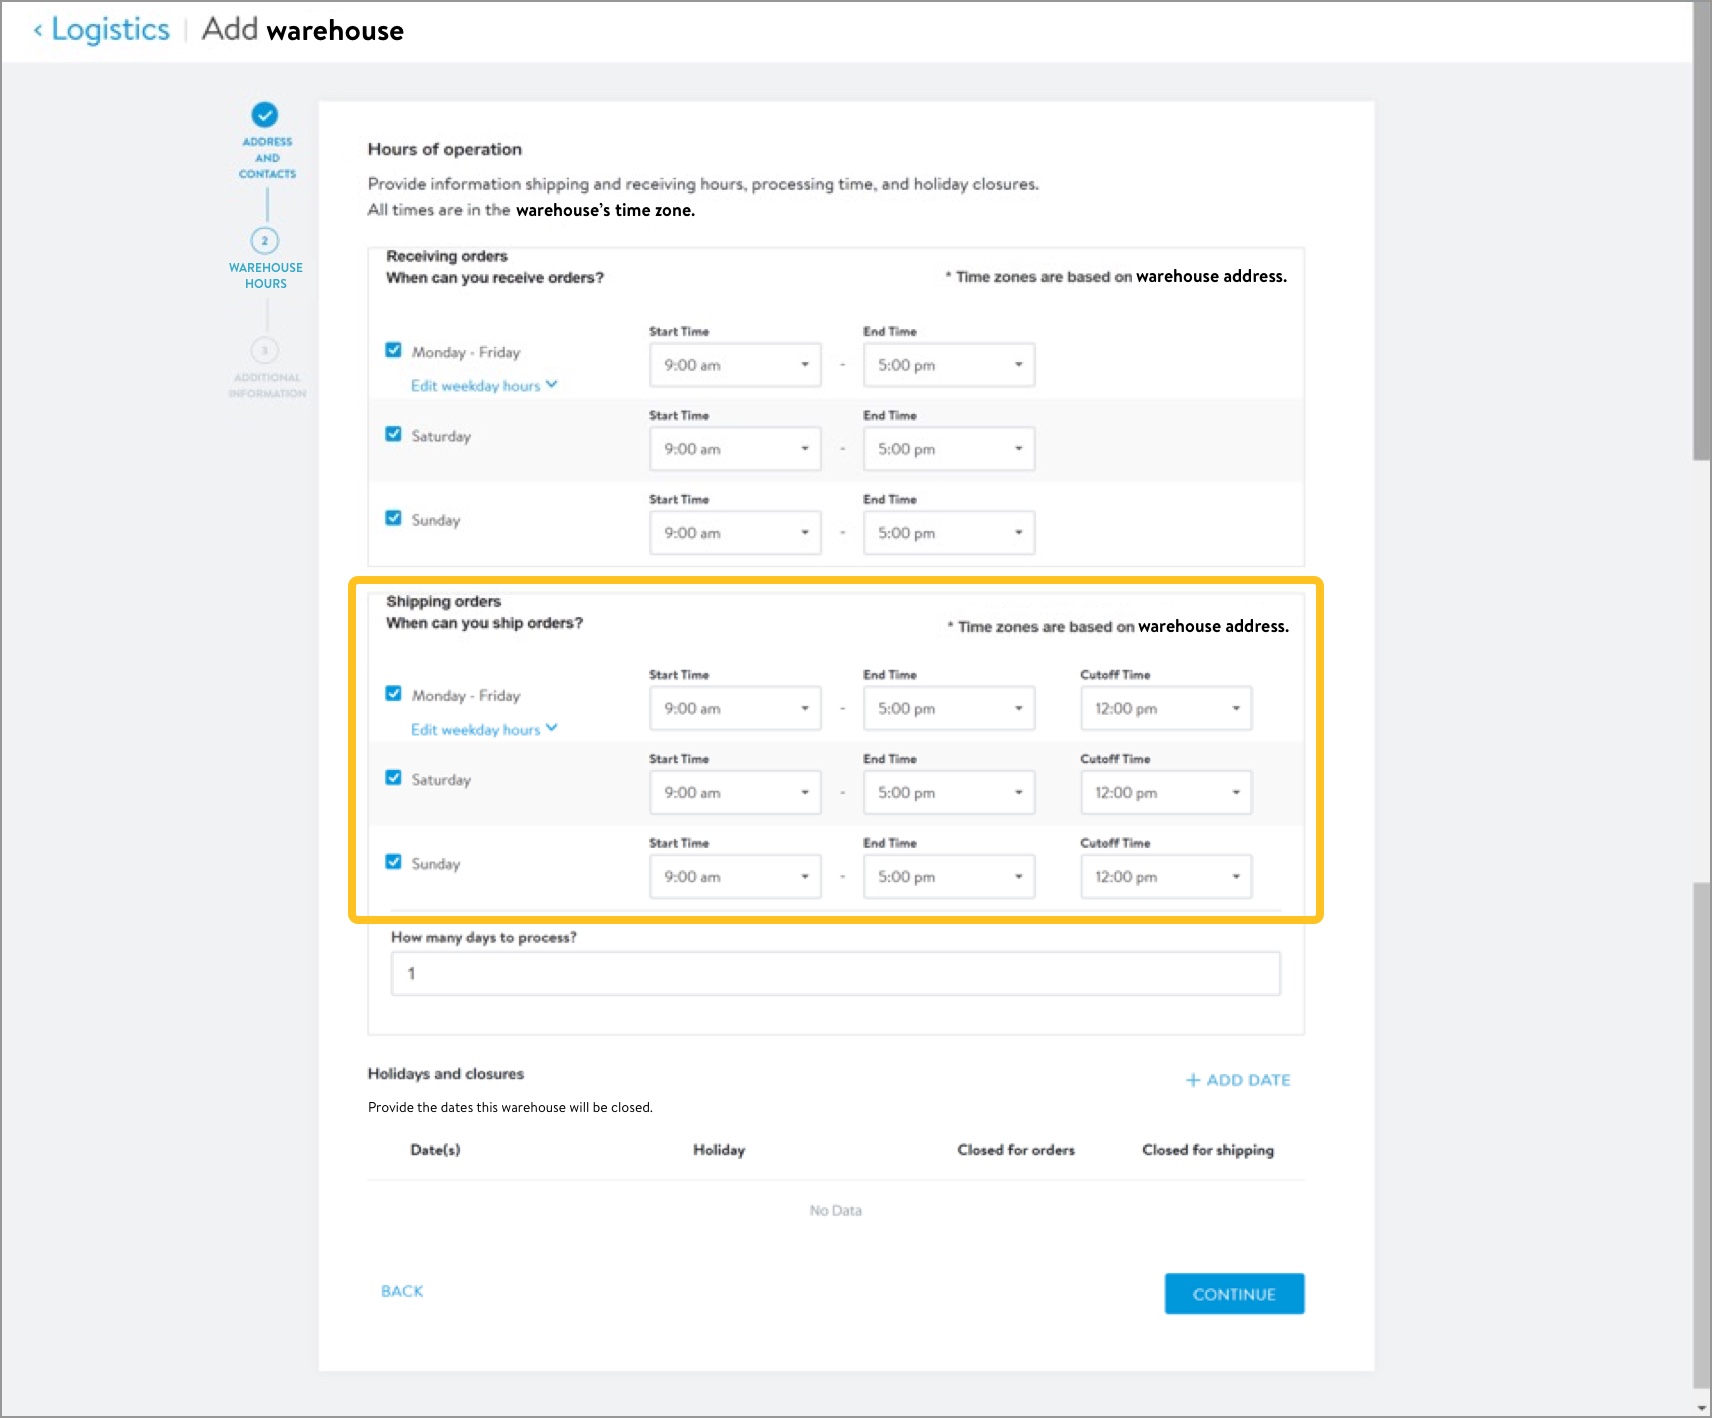
If needed, click the Edit weekday hours drop-down option to define each weekday's shipping start, end, and cutoff times.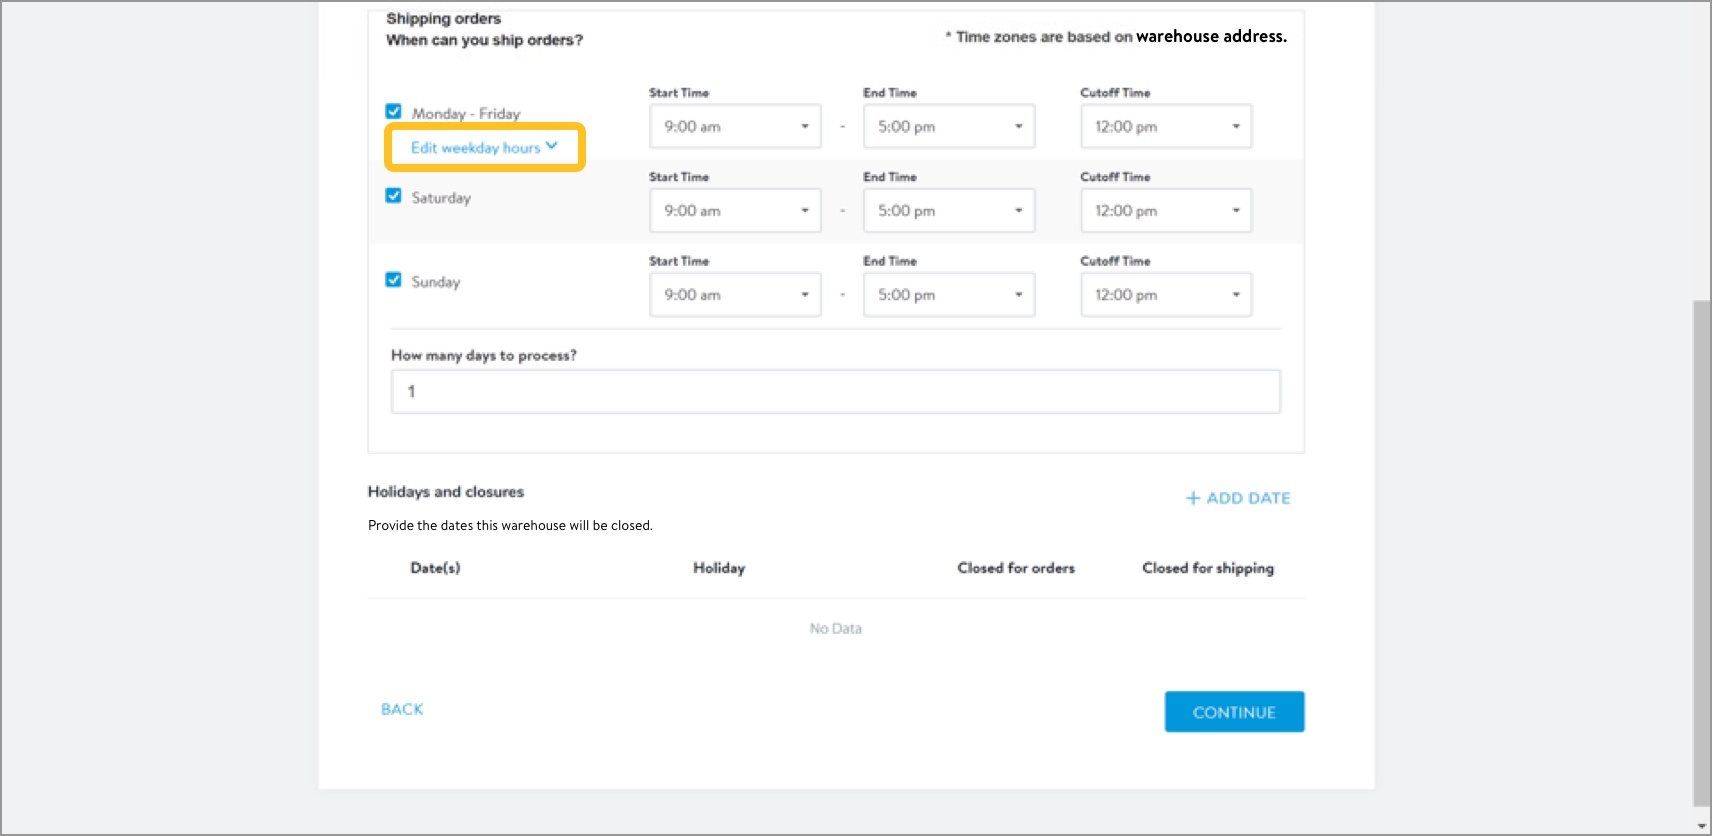
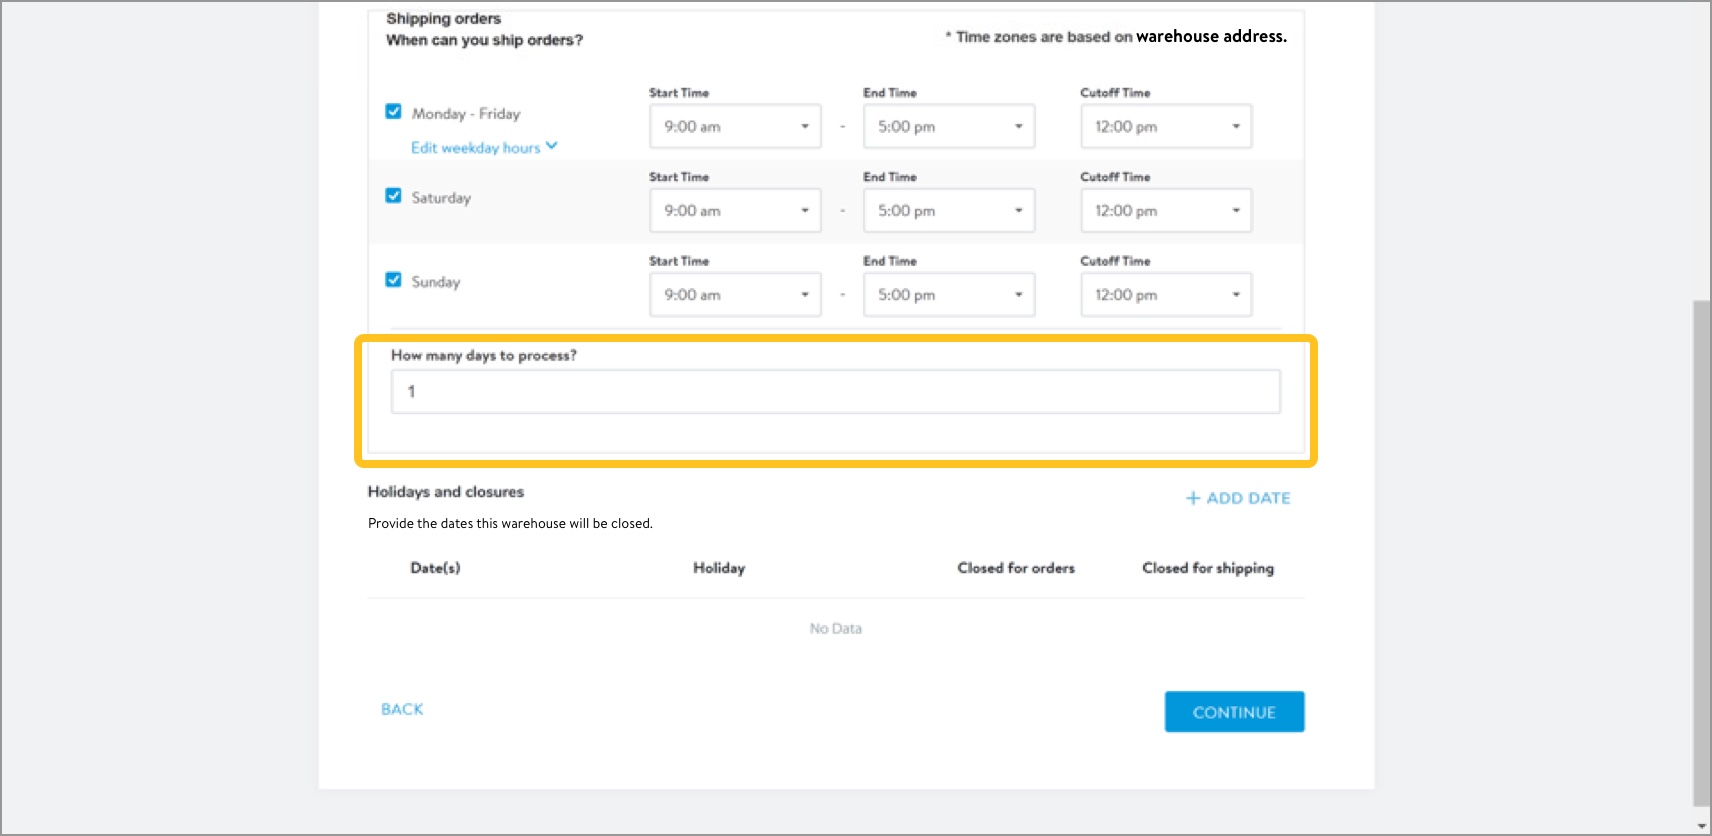
- Enter how many days your warehouse needs to process orders.
- Provide holiday and closure information. Click Add Date to add a needed holiday/closure.
- Use the calendar picker to select the appropriate date or enter date information in the Start date and End date fields.
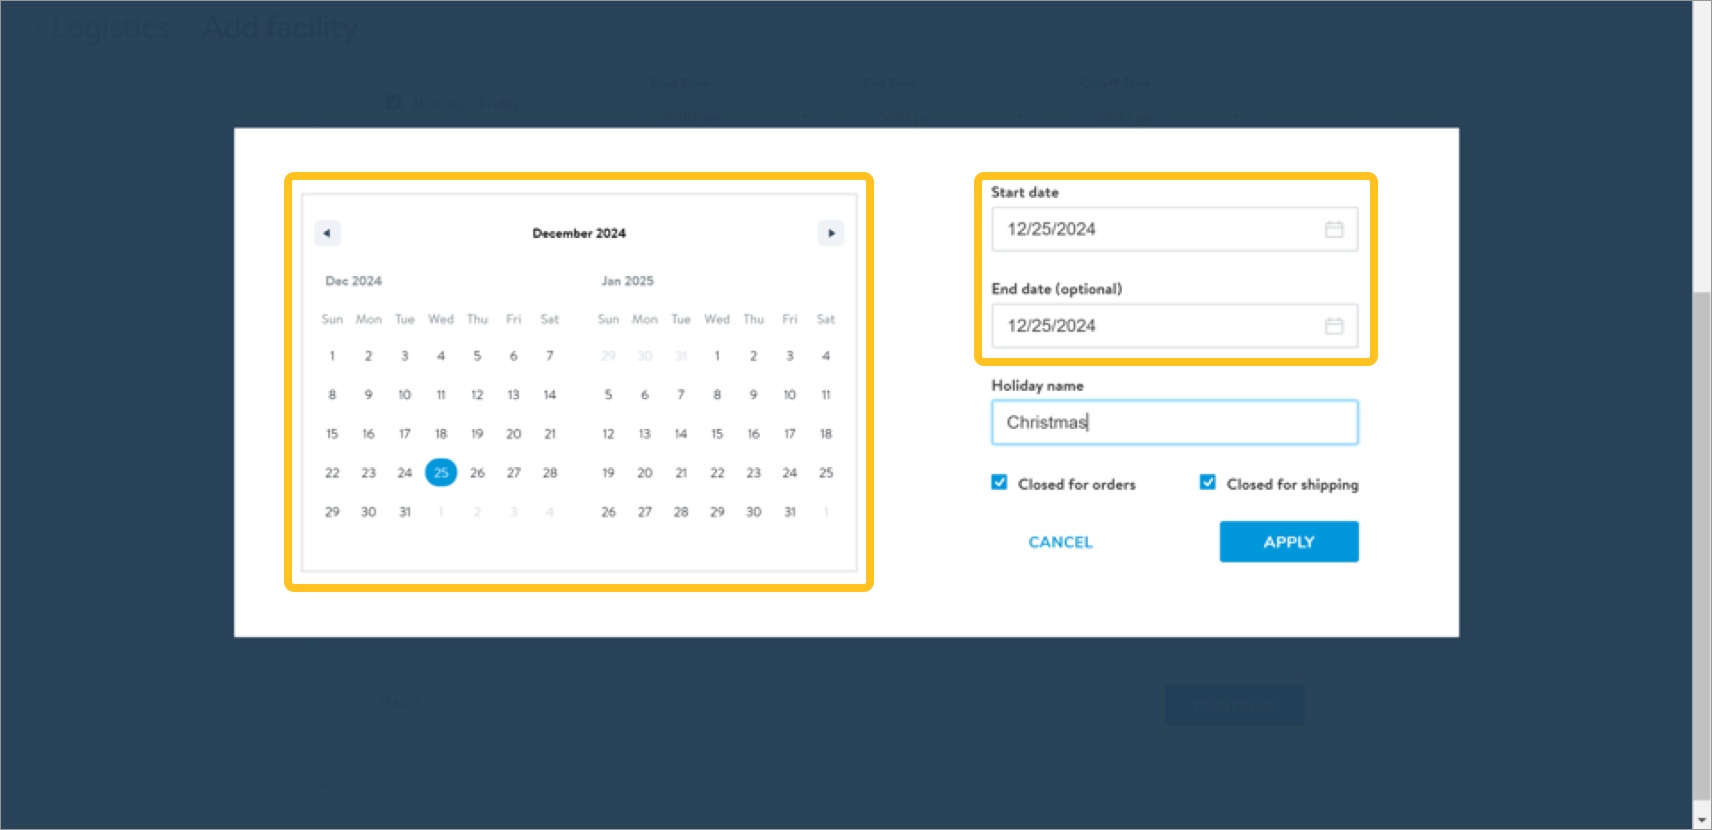
- Enter the Holiday name.

- Click the check boxes to define the holiday/closure as closed for orders and/or closed for shipping.
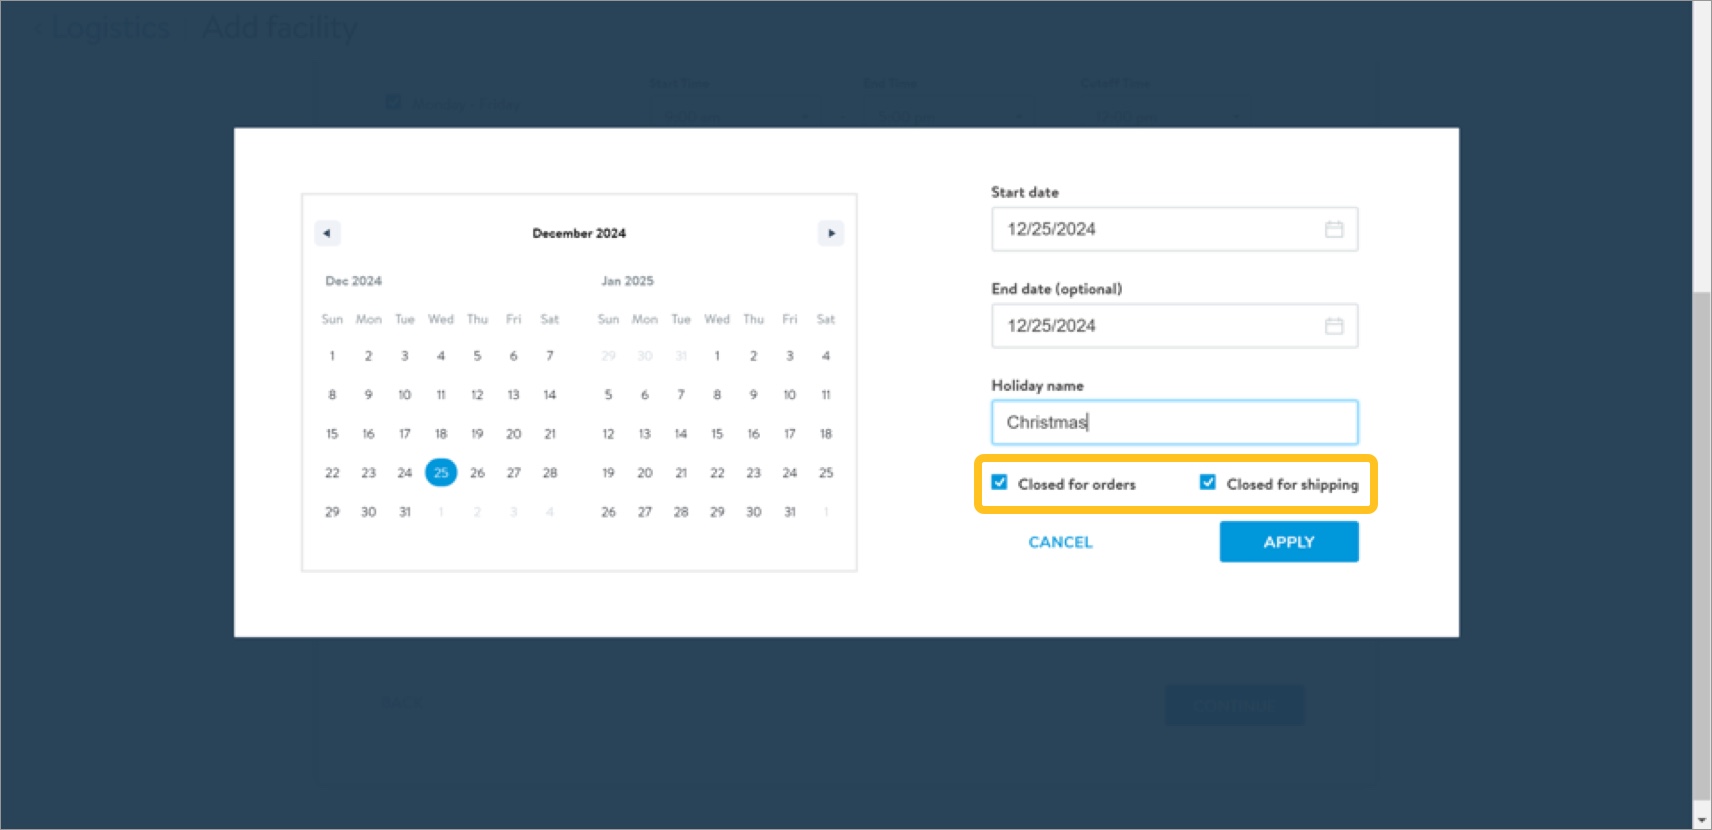
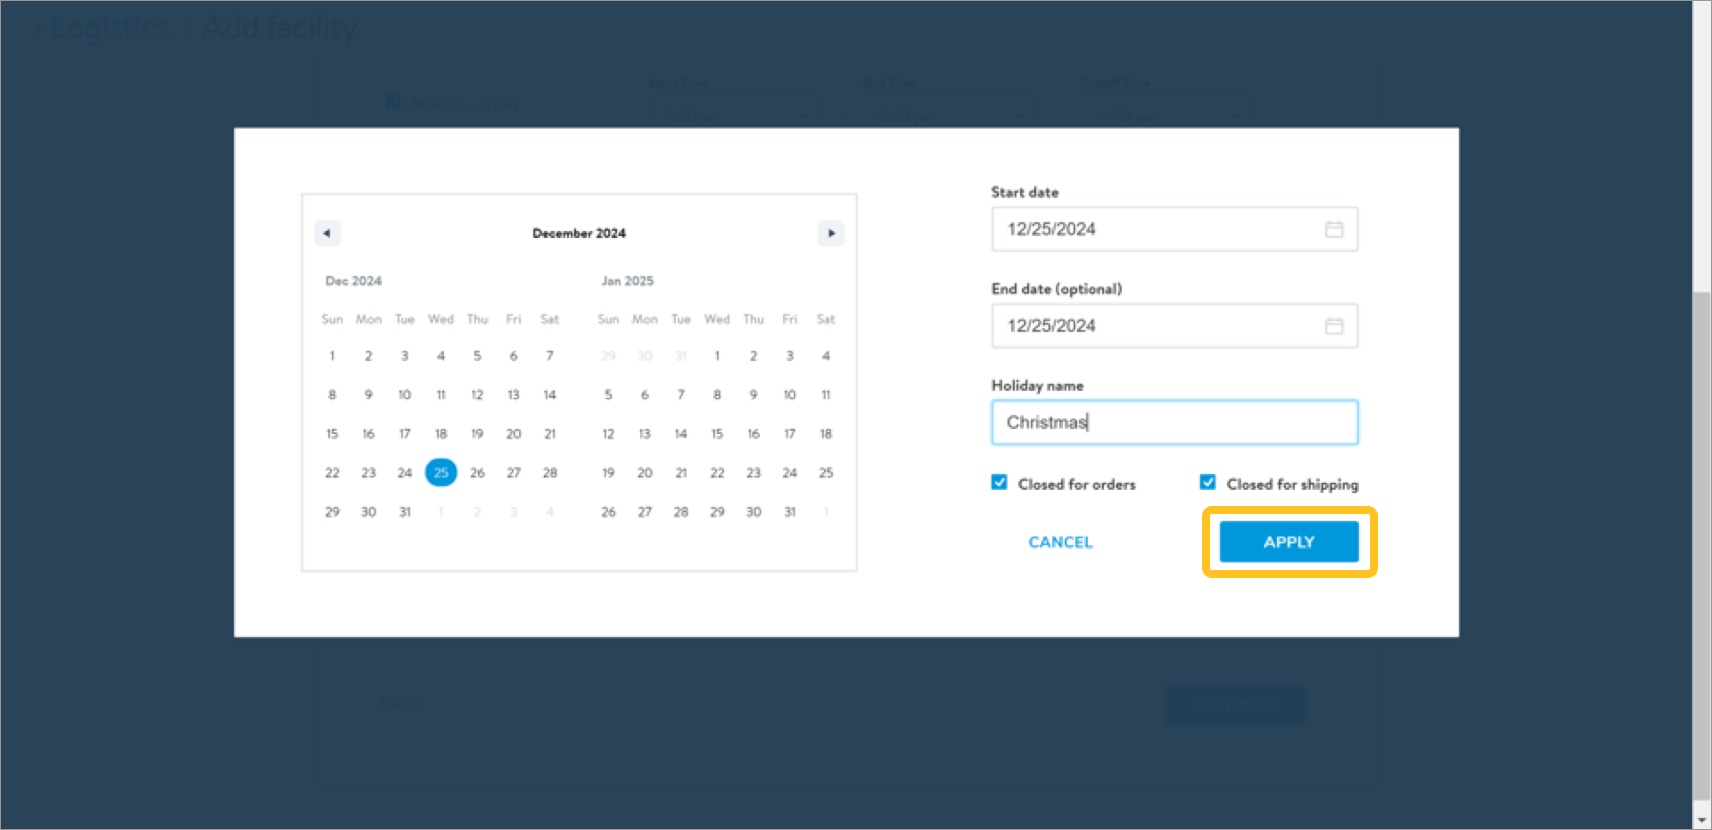
- Click Apply to assign the date as a warehouse closure.
- Repeat steps 1–15 to assign more holidays/closures.
- Click Continue.
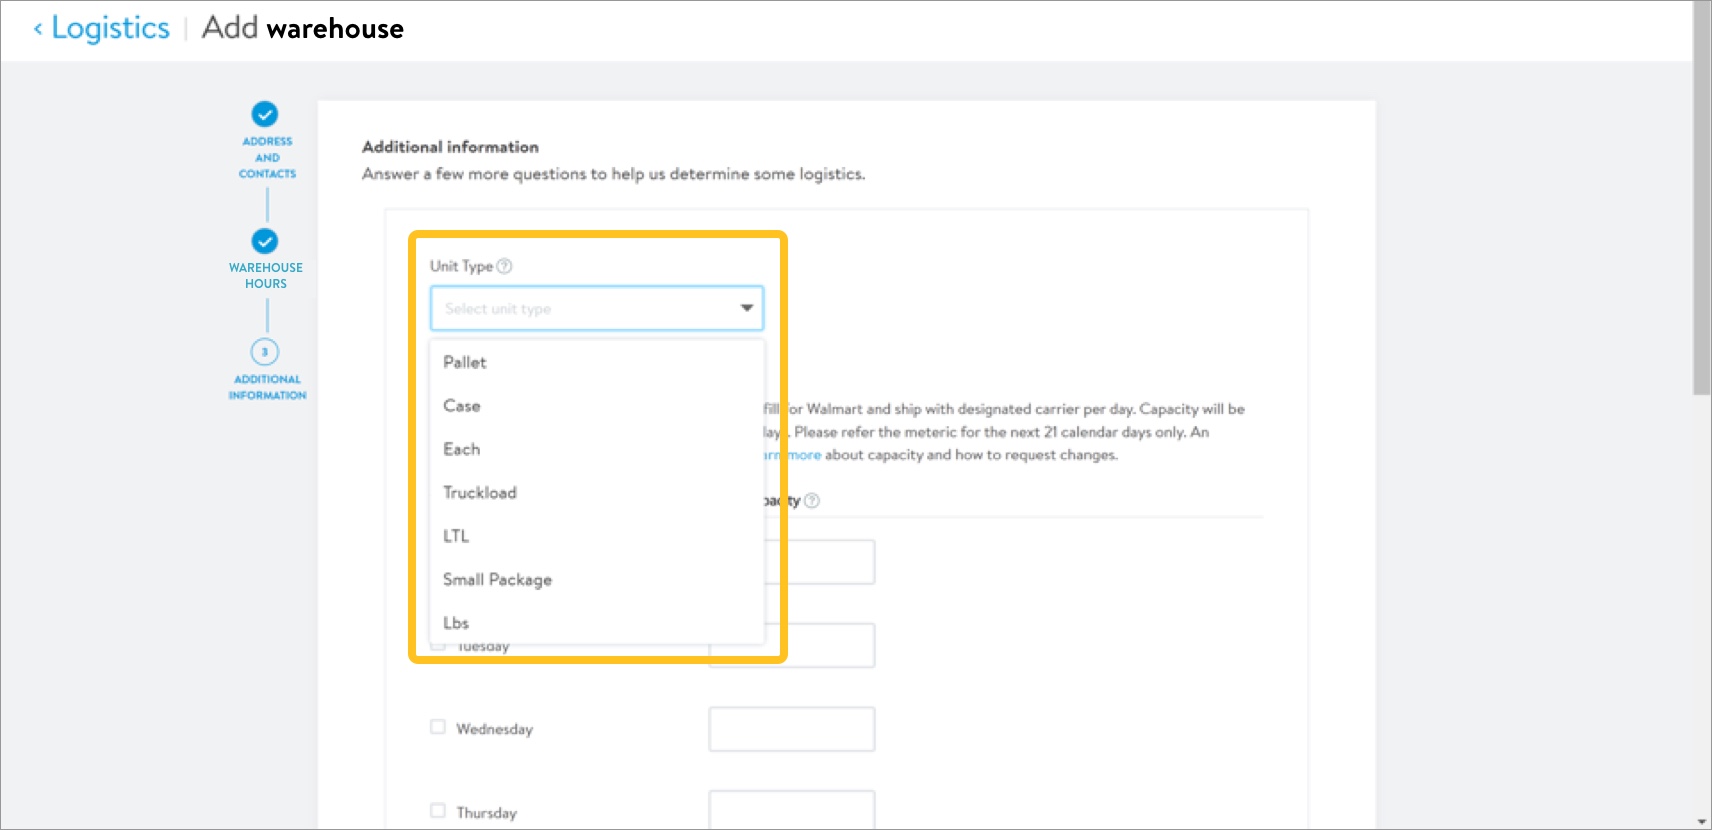
- Select the warehouse unit type from the Unit Type drop-down menu: Pallet, Case, Each, Truckload, LTL, Small Package, or Lbs.The unit type is the type of unit you can have ready to ship to Walmart every day.
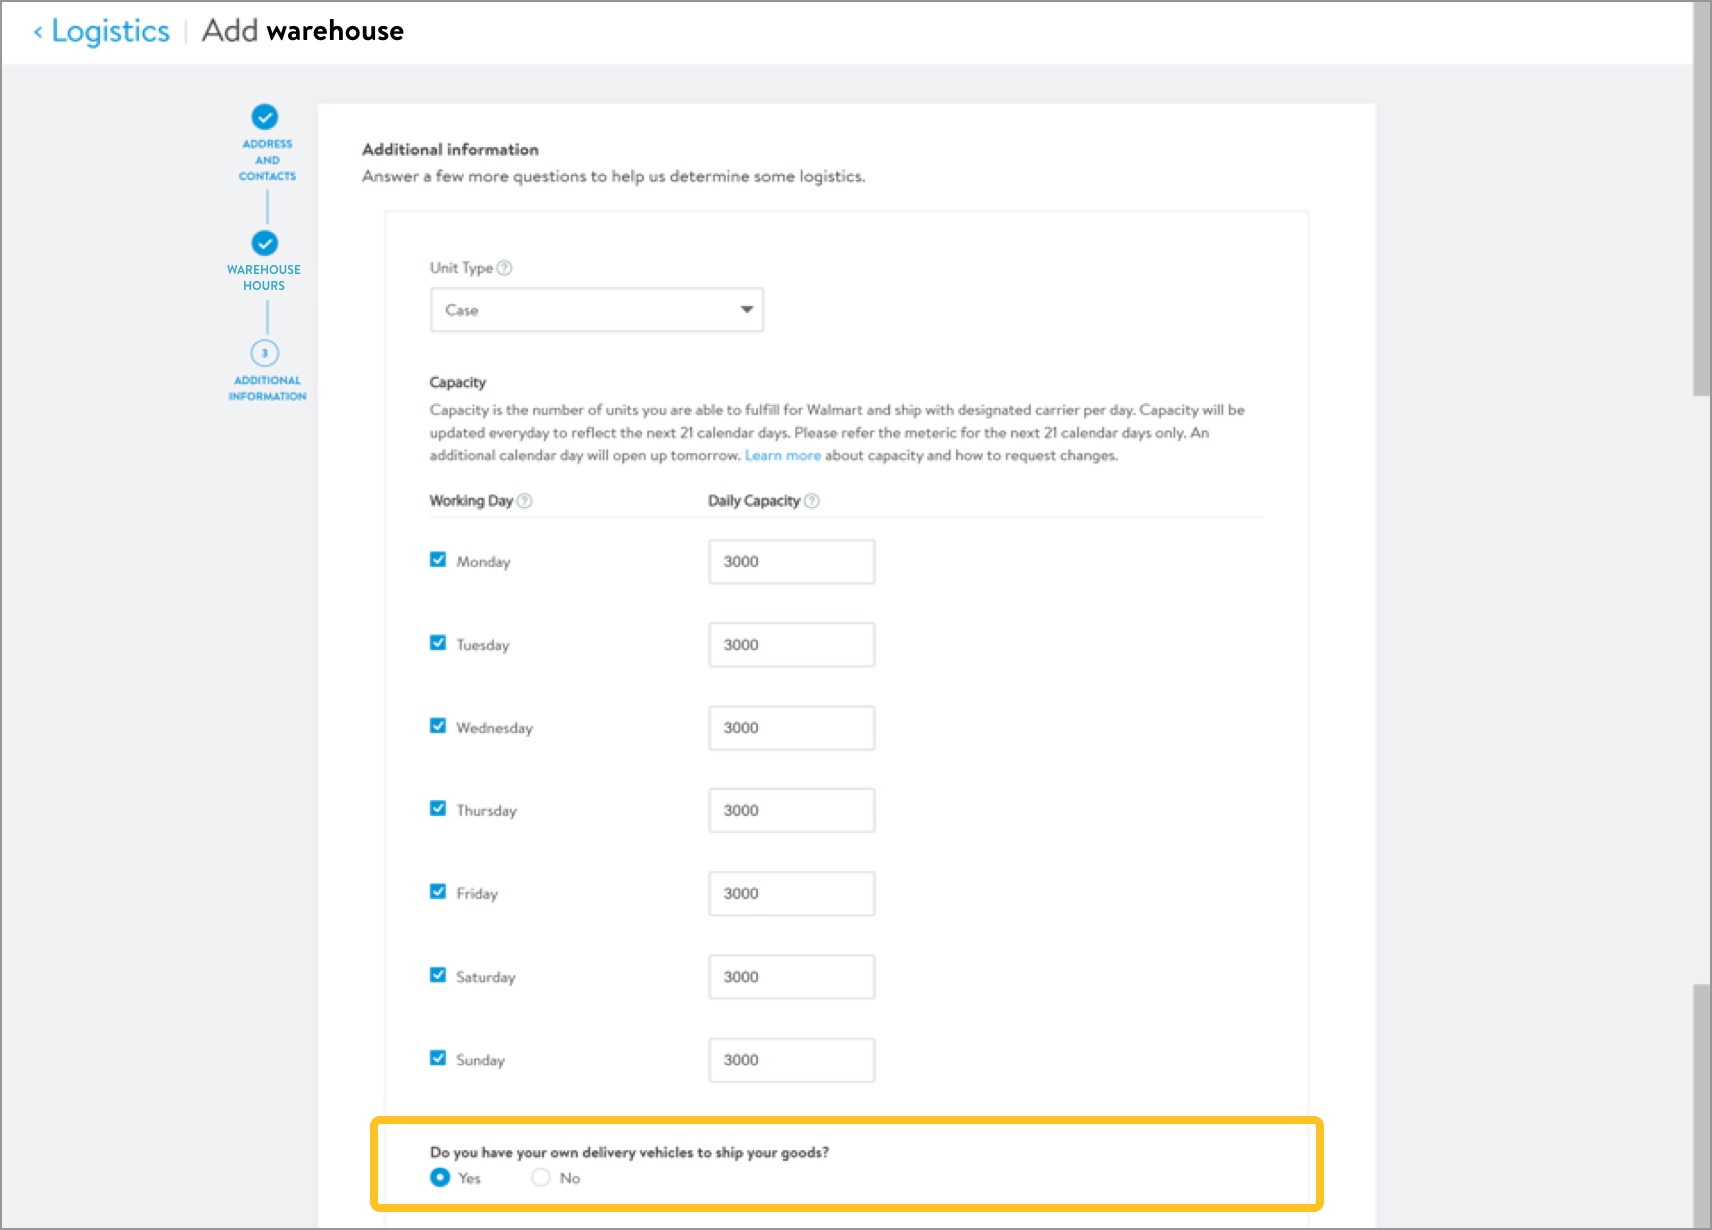
- Define the warehouse capacity.
- Select the days your warehouse is open to ship orders by clicking the check box to the left of days listed in the Working Day column.
- Enter the number of units a warehouse can process (supplier shipment and carrier pickup) on a daily basis for Walmart.com orders. Provide the information for each selected working day in the Daily Capacity column.
Capacity is the number of units you are able to fulfill for Walmart and ship with designated carrier per day. Capacity will be updated everyday to reflect the next 21 calendar days; refer the metric for the next 21 calendar days only. An additional calendar day will open up tomorrow. Click here to learn more about capacity and how to request changes.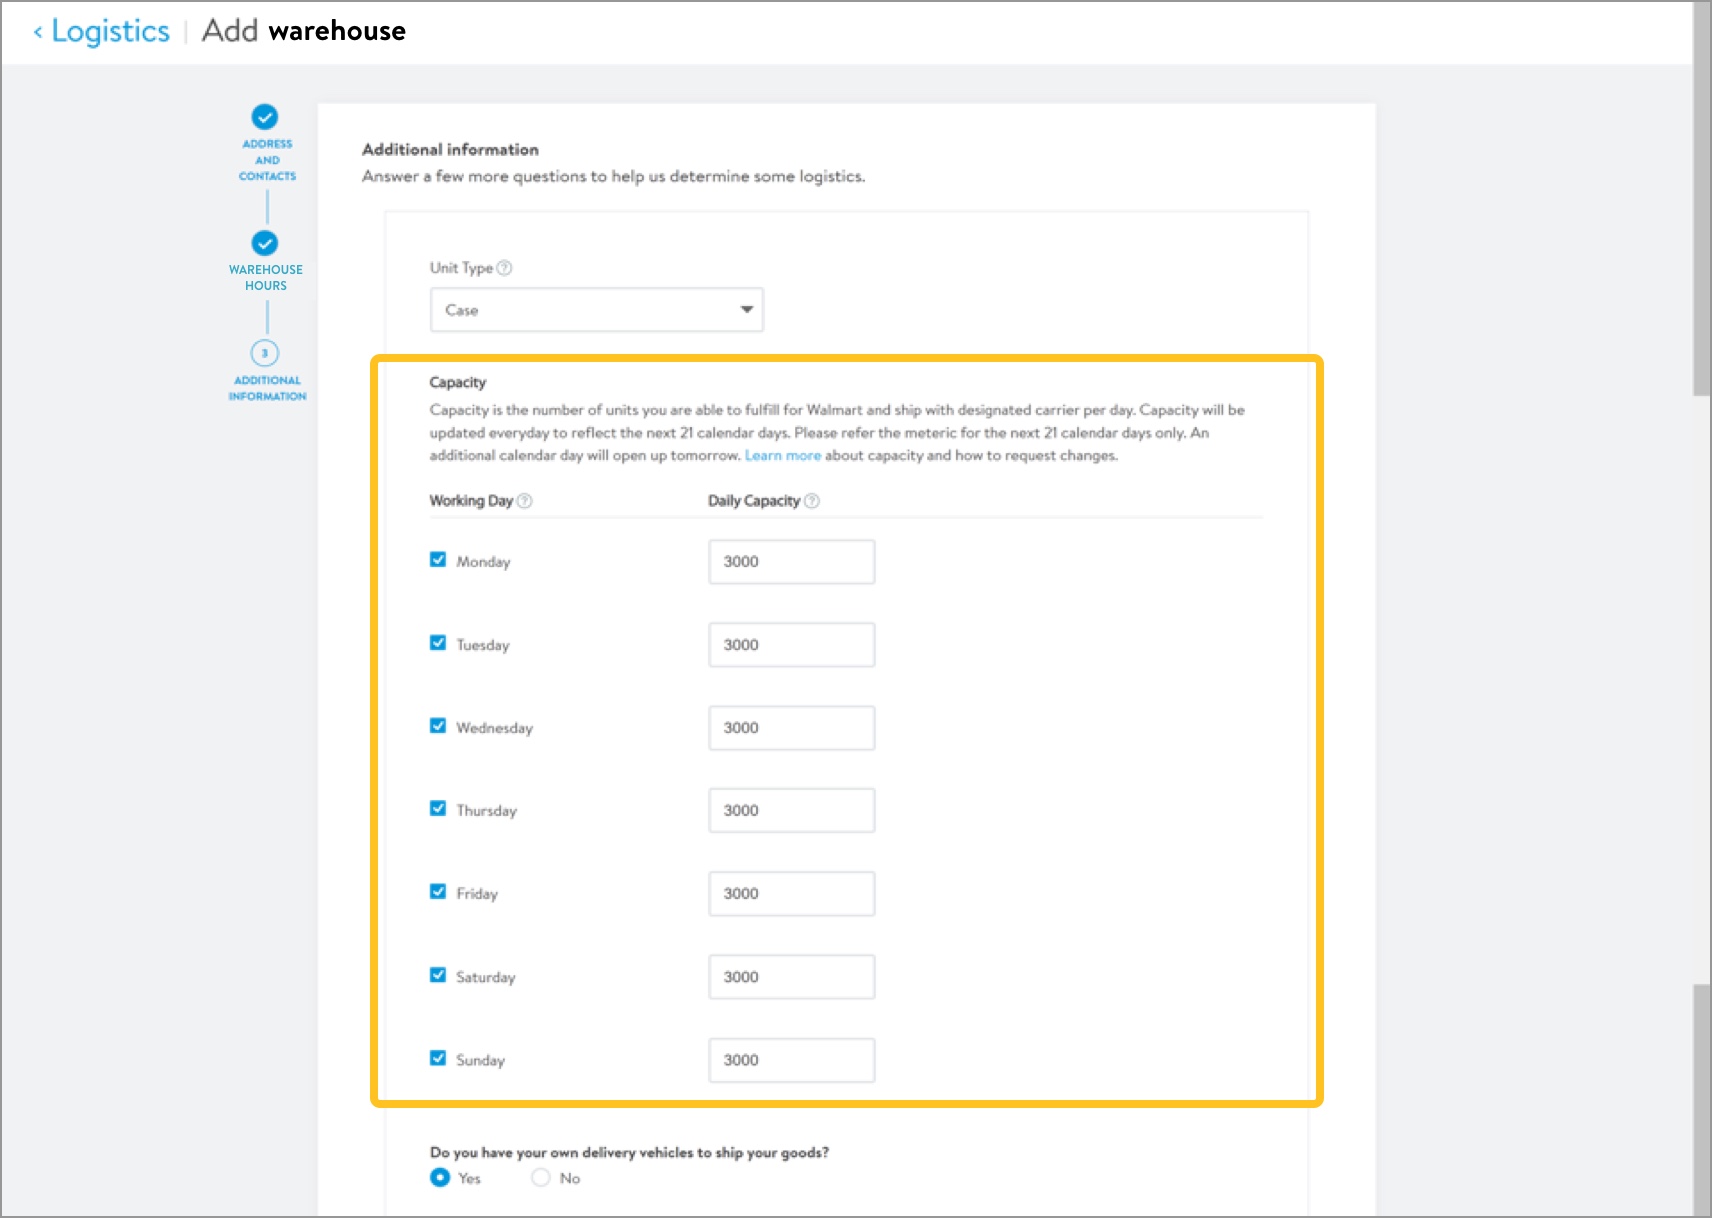
- Tell us if you have your own delivery vehicles to ship your goods.
- (Optional) Tell us what types of products (e.g., Auto & Tires, Baby & Kids, Books & Magazines, etc.) you ship from your warehouse.

- Click Submit.

- If needed, repeat steps 1–22 to add all applicable supplier-owned warehouses.
Return to Dashboard
- Click Back in the page header to return to the supplier onboarding dashboard.
Additional functionality displays in the Shipping and warehouses tile when your account is in a post-agreement status, or after accepting your Master Service Agreements (MSAs) and Business Terms Agreement (BTAs).
Post-Supplier Agreement
ASN/DEX Selection
- Click ASN/DEX Selection to expand the section and provide information.

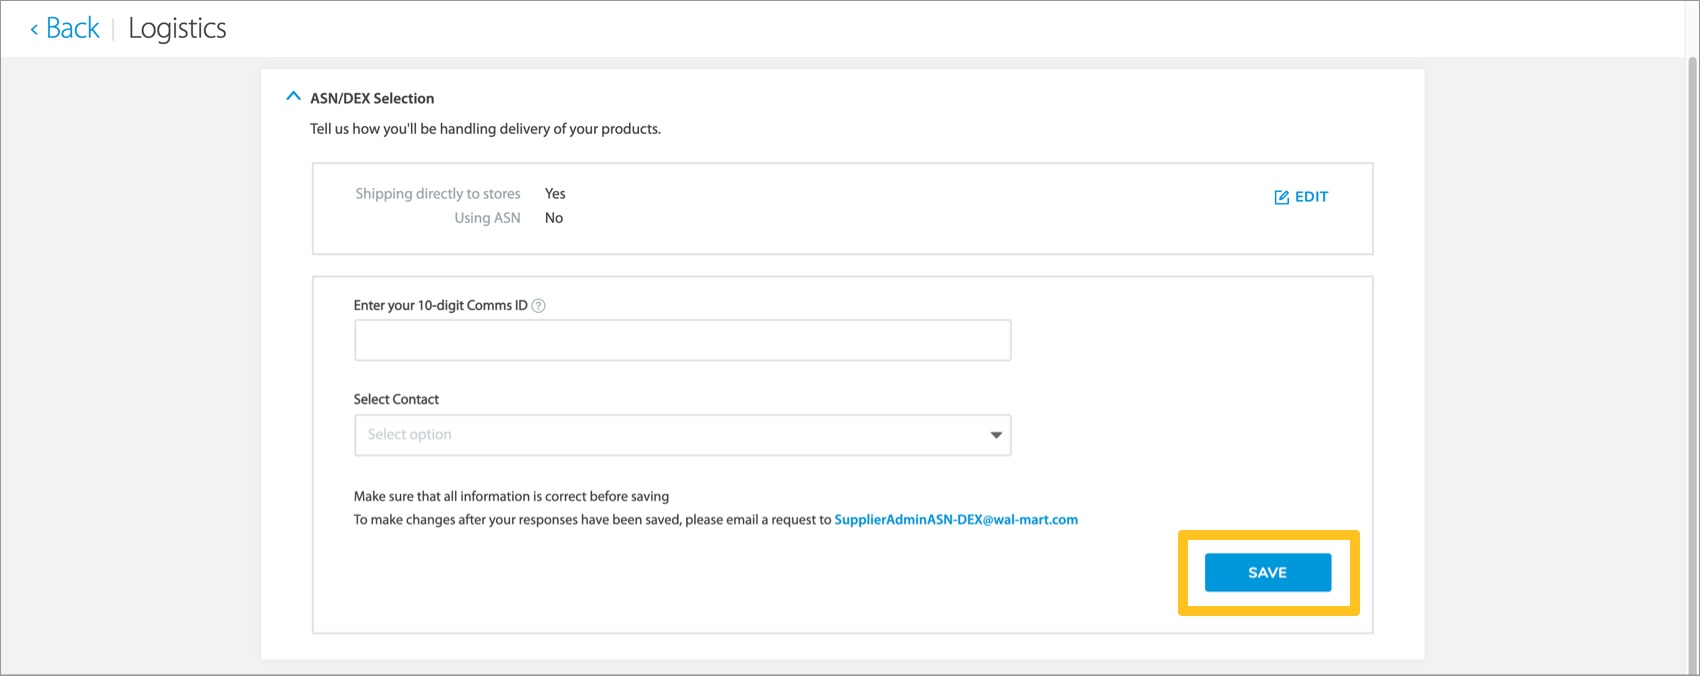
- Review the shipping directly and ASN information. Click Edit to make changes.

- If you are using ASNs: No further action is needed. The ASN/DEX Selection tile is complete.
- If you are not using ASNs: Provide your 10-digit Comms ID (also known as DEX) and the DUNS Number associated with the Comms ID. Then, select the appropriate Contact from the drop-down menu.
 Make sure the information you provide is correct before saving. To make changes after your responses have been saved, email a request to SupplierAdminASN-DEX@wal-mart.com
 - Click Save to submit your changes. A Completed status displays on the right of the menu.You must add your DEX information and complete the Shipping and warehouses tile before the agreement can be sent.
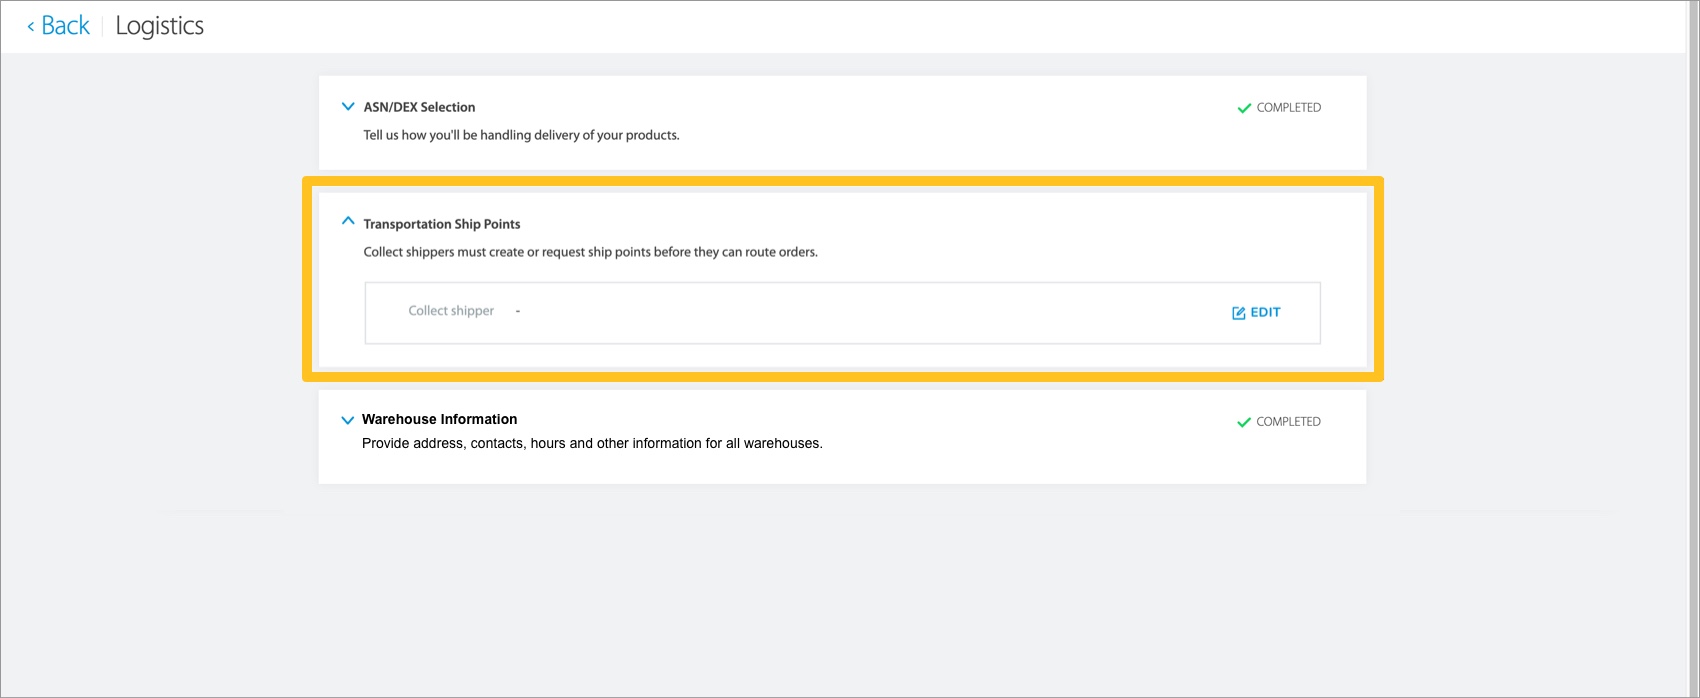
Transportation Ship Points
- Click Transportation Ship Points to expand the section and provide information.
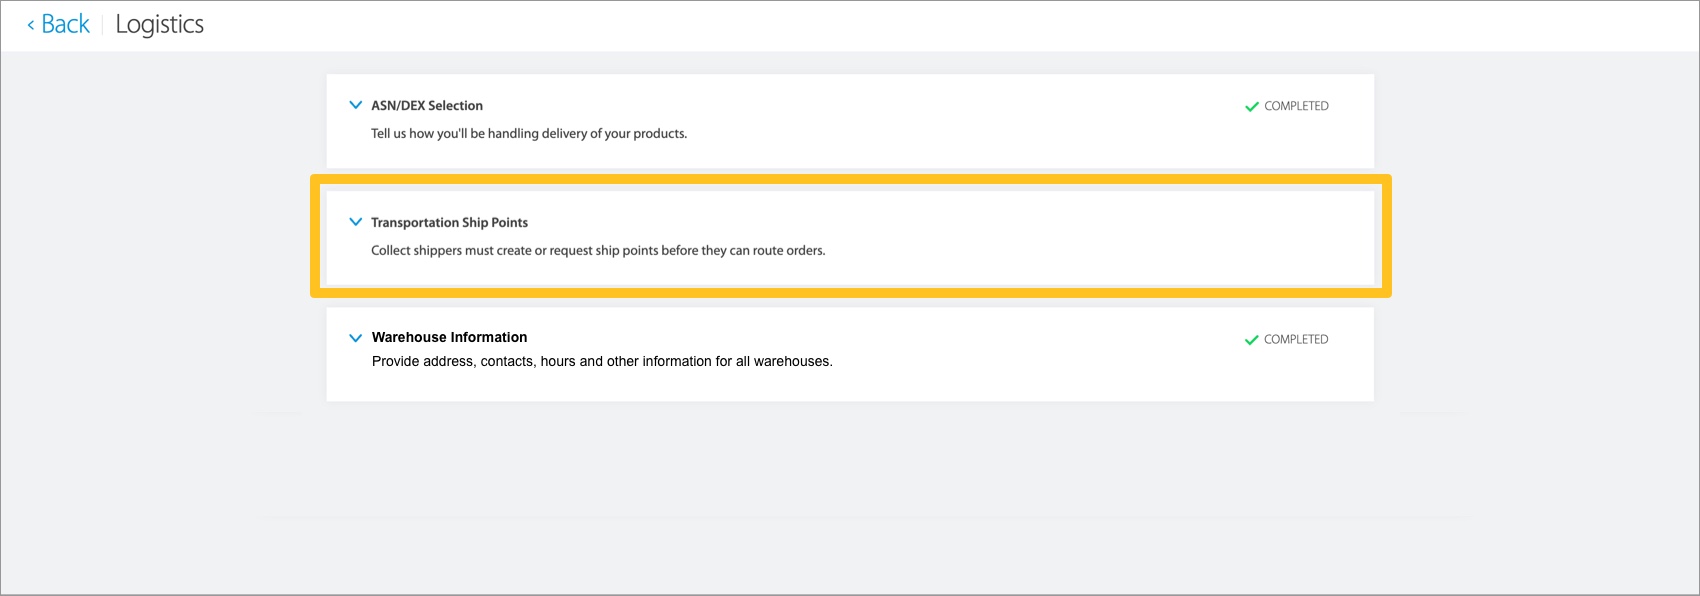
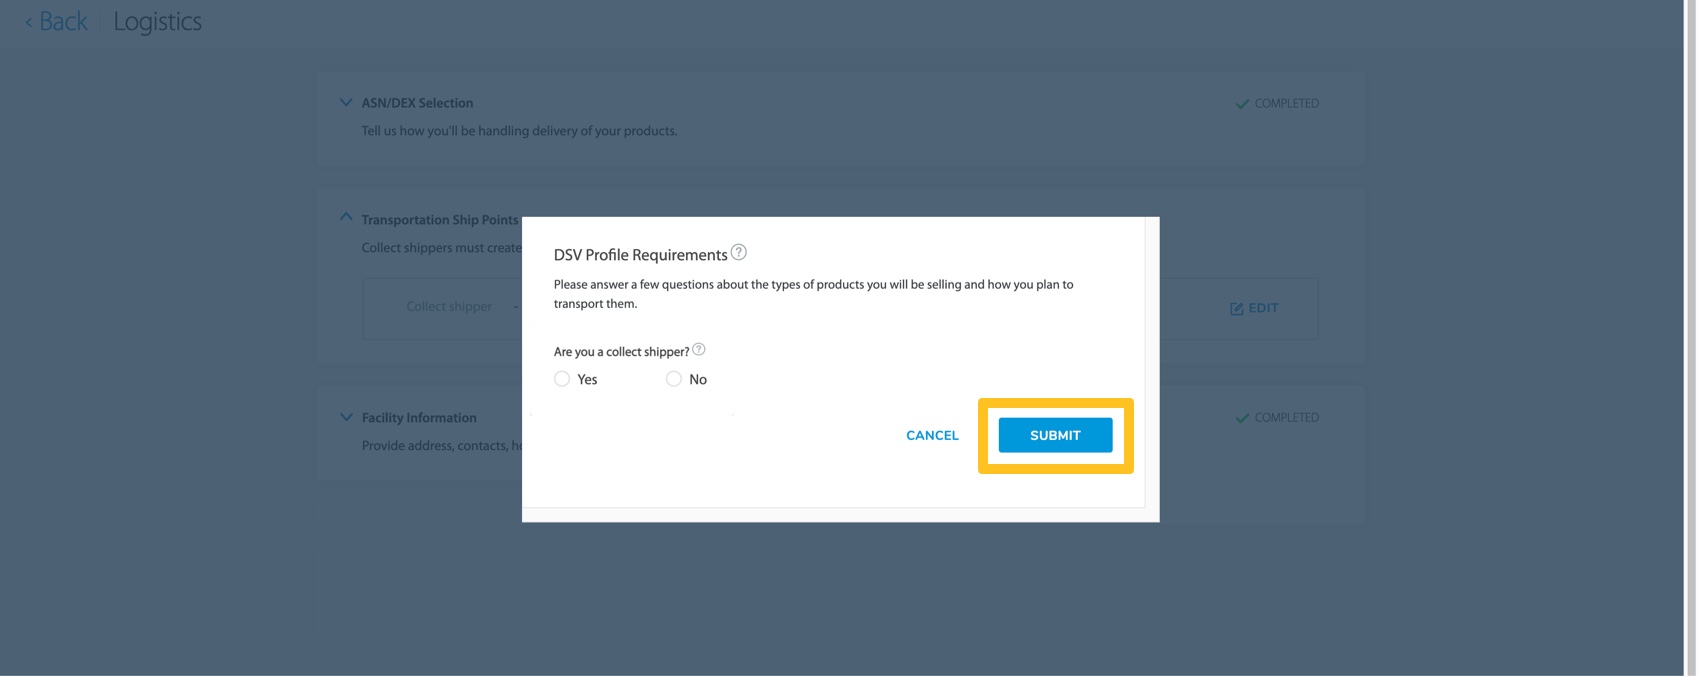
- Click Edit to define Collect shipper status. A pop-up appears with the DSV Profile Requirements.
- Tell us if you are a DSV supplier who is a Collect shipper.A Collect shipper means Walmart pays for transportation costs.
If you select No: No further action is needed.
If you select Yes: As a Collect shipper, you will need to set up ship points in the Transportation Supply Chain Portal (TSCP) app after onboarding.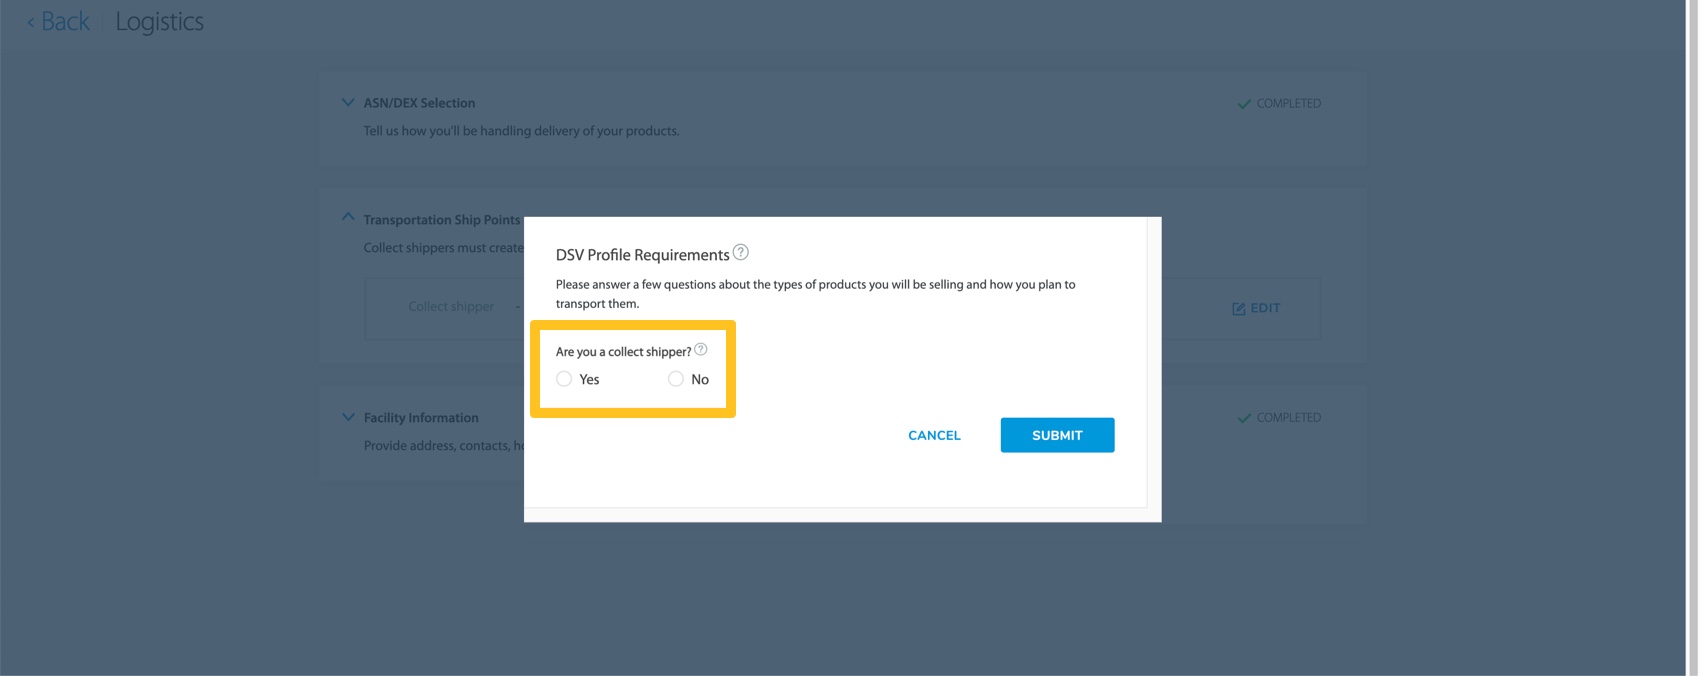
- Click Submit.
Warehouse Information
- Click Warehouse Information to expand the section and maintain information.
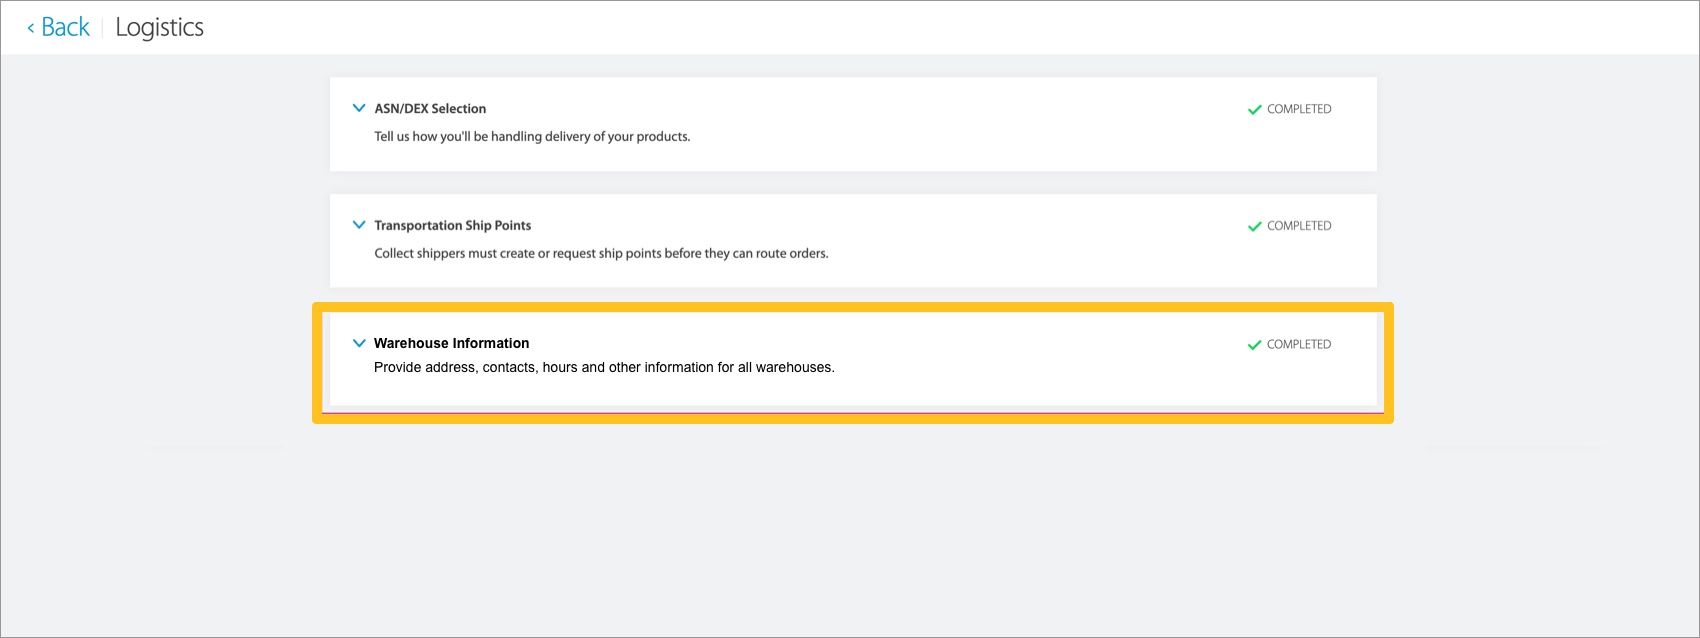
- Click View to review the address, contacts, hours, and other information for all your warehouses.

- Review the information on the View Warehouse pages. Click Continue or Back to navigate forward or backward.
Return to Dashboard
- Click Back in the page header to return to the supplier onboarding dashboard.
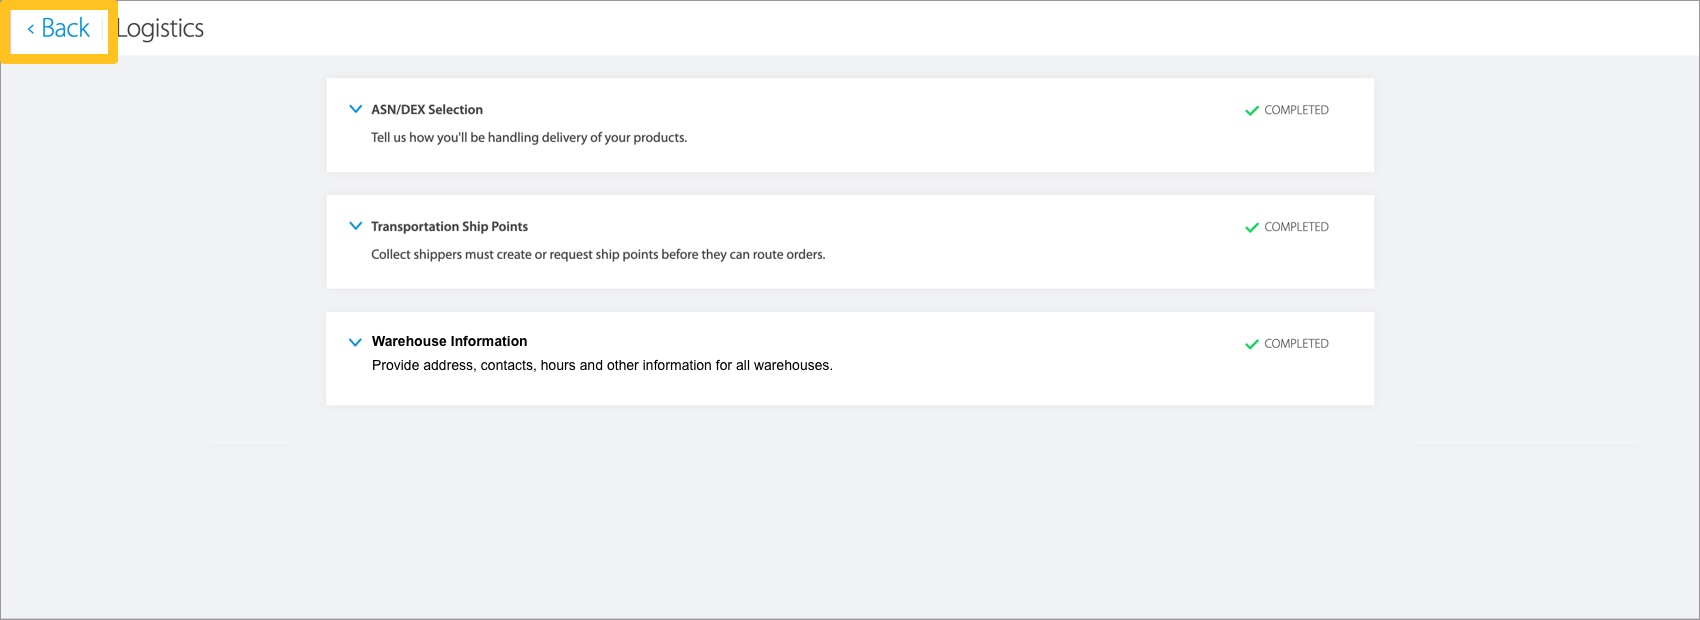 A green check mark on the dashboard indicates you completed all tasks in the associated onboarding tile. The task progress bar increments up to reflect the current status of the supplier onboarding process.
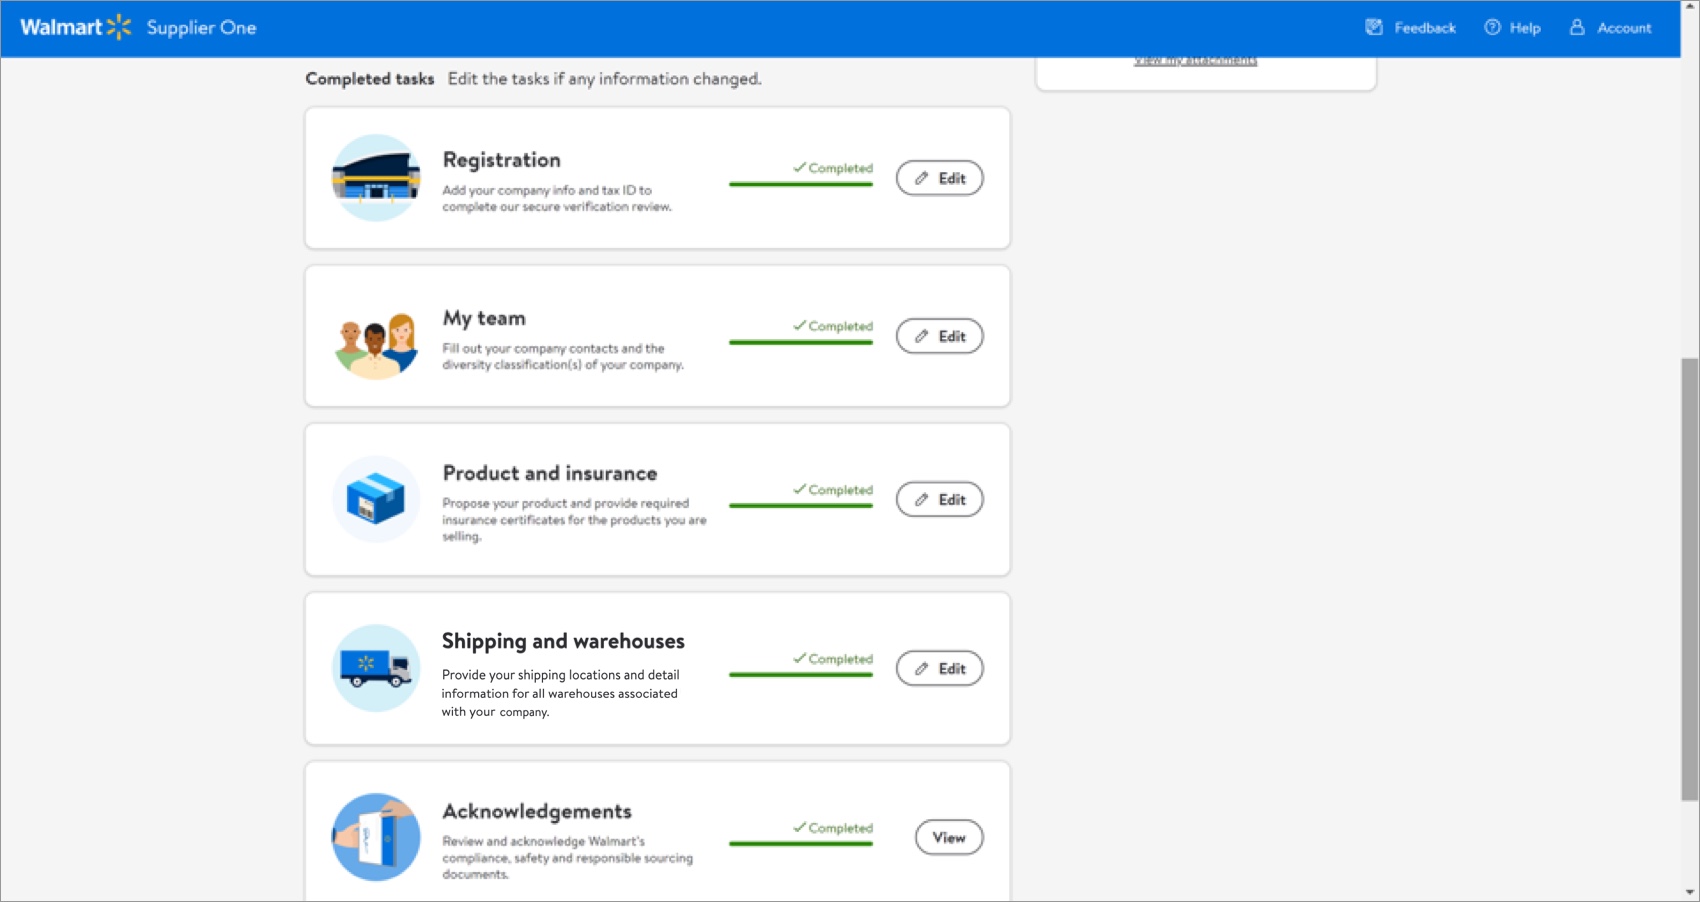
Additional Resources
Once you have started registration, you can log into Supplier Academy to access training materials on merchandising, transportation, getting paid, replenishment, analysis and working together.
The most direct way to resolve onboarding questions or issues is to contact the Retail Link Help Desk at 479-273-8888 or toll-free 888-499-6377. Refer to Supplier Onboarding: Support (GFR) for information that will help expedite your Help Desk experience. You can also click Help within Supplier One to get assistance from the Supplier One chatbot, manage tickets, and search articles.